How to fit a thin tang ? Pancake style handle block
By Bjorn Jacobsen, March 2023
Have you ever wished for an easier way to get a clean, nice fit between blade and handle on a thin tang?
A key part of fit and finish on a knife with a stick tang blade, is the actual blade/handle fit.
The tang is the part of the blade that is glued into the handle and not visible when the knife is completed. If the shoulders on the blade are not ground square and even, the fit will never be good.
The traditional way of drawing a line across the blade and tang, and then filing to the line works ok if you take the time to be accurate but takes a bit of time and sometimes you might end up with one shoulder higher than the other.
Use a file guide
An easy and possibly better way to make this a clean line is to use a file guide:
The red line in the photo is showing the square, matching shoulders on each side of the tang. This red line will touch the top of the handle block for a nice, clean fit-up.
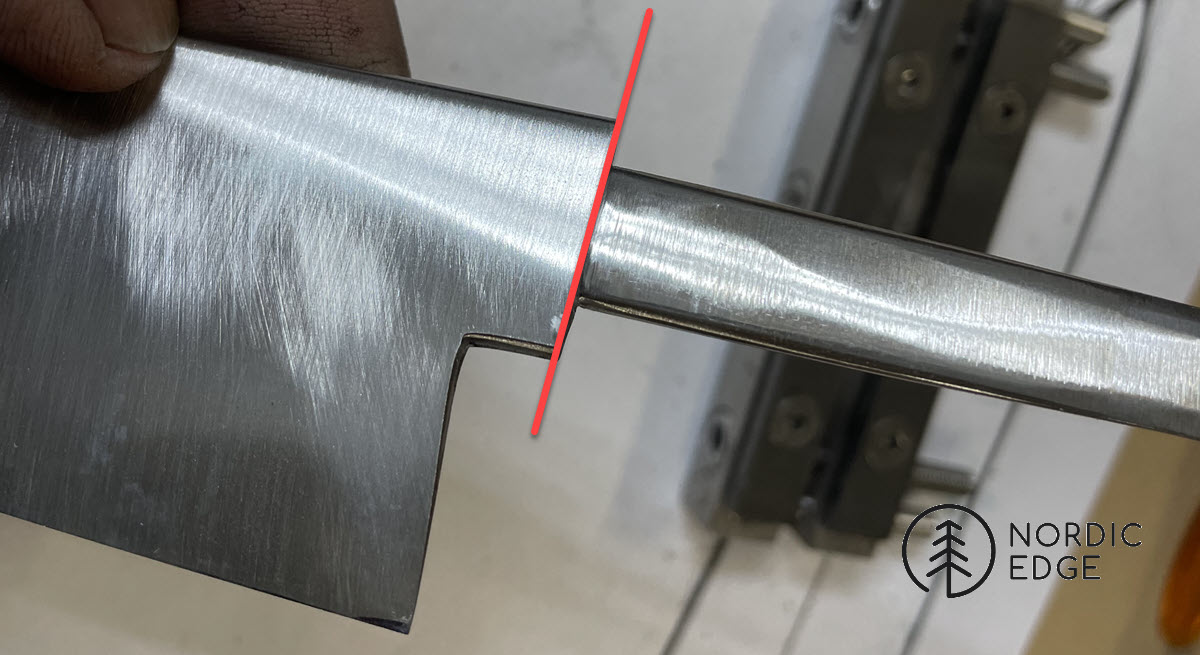
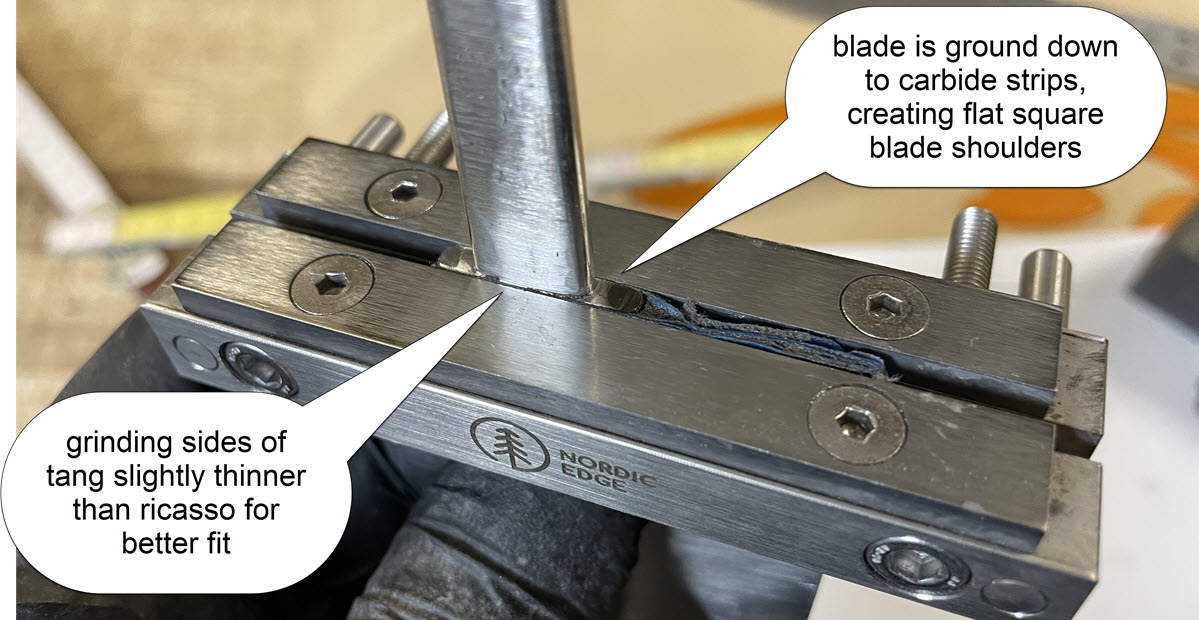
In the above photo you see the finished result, the below photo shows the blade clamped in the carbide faced file guide. The tang is already ground to shape in the photo, the shoulders are flat and even with the carbide strips.
The file works on the simple princible that the carbide strips are harder than the abrasive belt or file, so you cannot grind past your line (the carbides making the line).
In addition to the "shoulders", the tang sides are ground slightly thinner than the ricasso/blade. This helps get a nice, clean fit into the handle by the tang being undercut a touch for a more elegant fit.
It also gives the blade a shoulder to sit on around the tang hole meaning the hole or slit in the handle can be made slightly smaller than the width of the ricasso. This helps with that frustrating issue of having filed the tang hole just right for the tang and it finally fits - only to have a gap on one side of the tang..
The dreaded thin tang
So with the blade ready for hand sanding and then handle, we hit an issue..the tang is quite thin.
In this case we are making a chef knife and we want a slim, elegant blade with a fairly thin spine. Fitting a thin tang into a handle block or guard can be a tricky challenge.
On bigger blades this is not a problem where you have a 3, 4 or 5 mm - or even bigger on some bowies - thick tang. You can drill holes in a row, start filing the holes out to a slit. Then clamp the guard material in the file guide and file to your line, knowing the file guide will stop you going too far.
But on a thin tang this can be a pain and this article is showing an alternative way to do it, should you wish to try the "pancake style" handle block. We are not saying this is "better" or that "easy" is what knifemakers are chasing, just that this is another technique to have up your sleeve should you ever want to try it.
The knife here is the one from the "how to etch stainless damascus" article. Check this link out if wanting to see the blade come together and the etching of the stainless damascus, here we will only show the handle bit: LINK
How to fit a thin tang - pancake handle style
Fitting a stick tang blade into a handle block without any visible gaps is an art in itself.
However, if the tang is thin it can be difficult drilling small diameter holes in a perfectly straight line and then filing them out with tiny files. In this case the tang was almost 2.5 mm thick and a "pancake" style handle block might be a good solution.
The "pancake" consists of how many 1 mm pieces of G10 spacer needed to match the tang thickness. Then 2 normal handle scales outside. So if the tang is 2 mm thick, you use 2 pieces of G10 which each are 1 x 40 x 120 mm for instance in size for the middle bit, then glue the actual handle scales to the outside of this.
In my case I added 1 mm of additional G10 on each side as a contrasting colour and to pad out the middle of the pancake a little bit. So I ended up with 4 layers of 1 mm G10 rather than the 2 that were strictly speaking needed.
**Health warning; all dust is dangerous, G10 especially so as it is a fiberglass like material. Take care to use PPE and work in a ventilated area. It is a good idea to have a grinding area and as soon as done making dust to get out of those clothes > shower > move onto clean work in another area. Do not sit around with G10 dust on your clothes and hair please, do not drag it around the house etc**
Pancake Handle Process:
- Tape 2 pieces of G10 spacer material to each other with masking tape. Draw on the tang shape with a pen to mark out what to cut away from the pieces.
- Cut out tang shape, I used a bandsaw but whatever you have that will cut G10 works.Remove what's left of the masking tape. You now have 2-3 pieces of G10 (depending on the thickness needed) that fit around the tang. I made the tang hole slightly oversized knowing some epoxy might get in there. (Note I did not glue the pieces to each other as when trying that process I got glue on the outside and ended up having to sand the outside, tape works well enough here, even though you are cutting through the front strip with the bandsaw)
- Flatten all parts on all flat sides that will be glued on a sheet of sandpaper on granite place or anything else flat like a piece of glass or stone kitchen benchtop. This is more of an issue with wooden scales than these synthetic ones but it makes sure everything is flat. Press the piece down on the abrasive paper and move it in a figure 8 movement as little as possible until the entire surface is the same scratch pattern. Note that overdoing this step or only pulling towards yourself can make the pieces uneven so go light on this step.
- File edges / corners of G10 and handle materials to make sure they glue down flat on each other with no edge sticking up from the sawing or if there is a lip in the handle material that will be visible later.
- Glue it all up with epoxy glue, trying to get no glue inside the tang slot, or at at least as little as possible while still covering the inner two pieces fully. (this is why I made the tang slot slightly larger, knowing I would get a drop or two in there)
- Clamp up with the pieces wrapped in plastic, insert blade and make sure parts are matching up as much as possible.This means that as the pieces slide around on the epoxy, clamp together gently with multiple clamps and move all pieces to a unform block again, checking that for instance one white G10 layer has not shot off to the side and no longer part of the sandwich. (handle pins would have made this easier to match up)
- Pull blade out after a minute or two - you do not have a lot of time here
- The longer you wait the better as the glue is less likely to be pulled into the tang hole and then harden but waiting too long makes it hard to pull the blade out. I pull it out and put it back in a couple of times and still end up having to file a bit in the tang hole before the blade fits back in when the glue is dry. This works as the "block" is clamped enough to hold it together but not very hard to stop parts sliding off all over the place. The plastic wrapping around the block means I can push the pieces back into a block and hold it still if needed while the glue starts to set.
Ready for glue-up
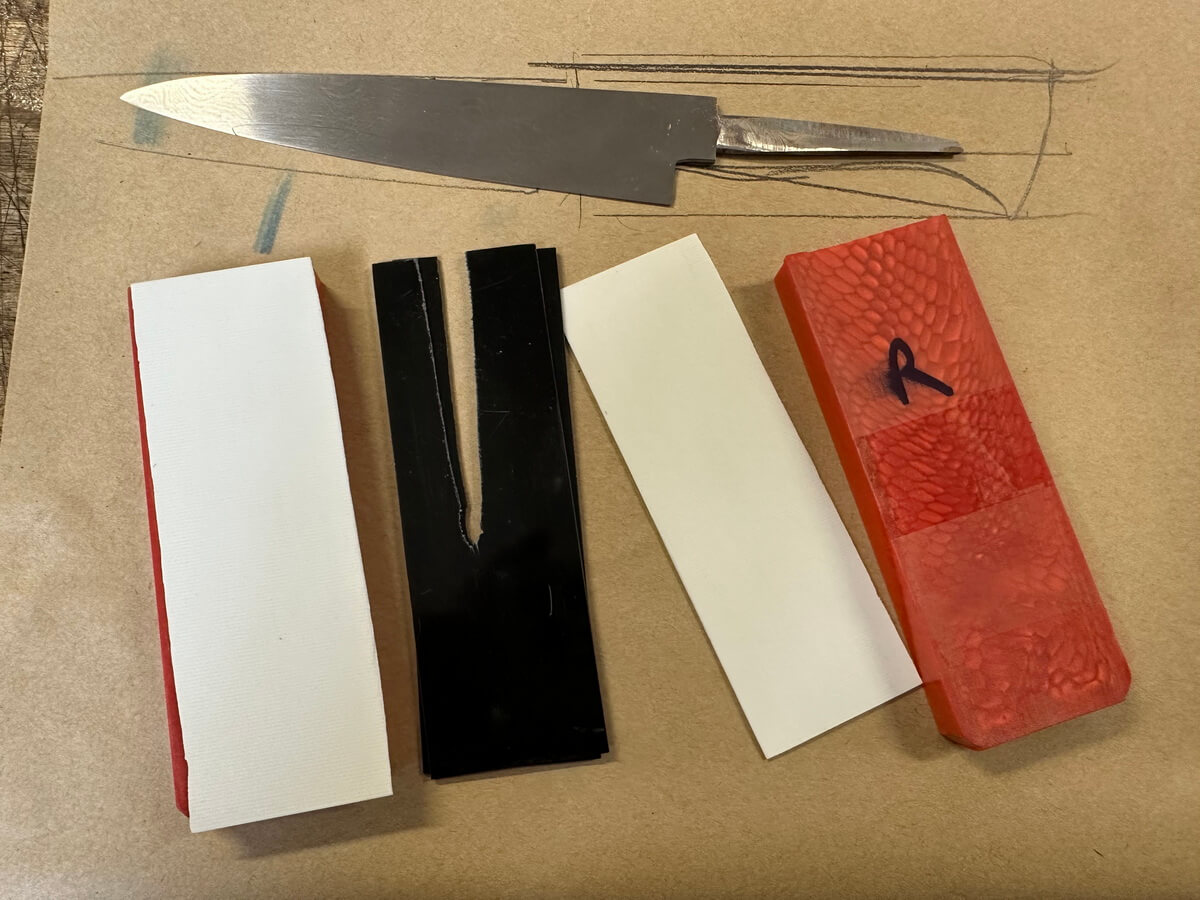
Components ready for glue-up, wiped with acetone on all sides to be glued, as well as the tang. The 2 black G10 pieces are the middle of the pancake, they are the same thickness - or close to - as the tang of the blade at the ricasso.
Gluing up wrapped in plastic
Showing the handle components glued together and clamped, wrapped in plastic to stop glue going everywhere. The plastic wrap also means I can squeeze the sides of the block until all parts are back in line to become a block and not a set of stairs!
The blade is left in for a short time, feel for if it can be pulled out. If going up freely 10 mm (1/2" for our American friends), push it back down and wait a little before trying again.
When you feel resistance to moving the blade, pull it out of there while feeling your pulse rise and doubts about knife making really being such a great pastime creeping in. In a flash you vividly remember the funny comments made at work about golf and reality tv-shows when hobbies have come up. Your only mental crutch at this point is that at least you feel comfortable in the knowledge no photos have hit social media yet, so no one will ever know if this fails and the pancake goes in the bin shortly. (right? you did not post about it already?!)
Should it all go to plan somehow, please keep reading. This was the only critical part of the pancake project.
In summary: be quick.
We are talking 1-3 minutes after the whole handle sandwich was glued together, not a good time to check your phone and zone out.
Worst case scenario: the blade does not come out - just leave it in there and grind around it. Only problem will be if the front section is not very uniform, you might need to get creative evening that up as much as possible.
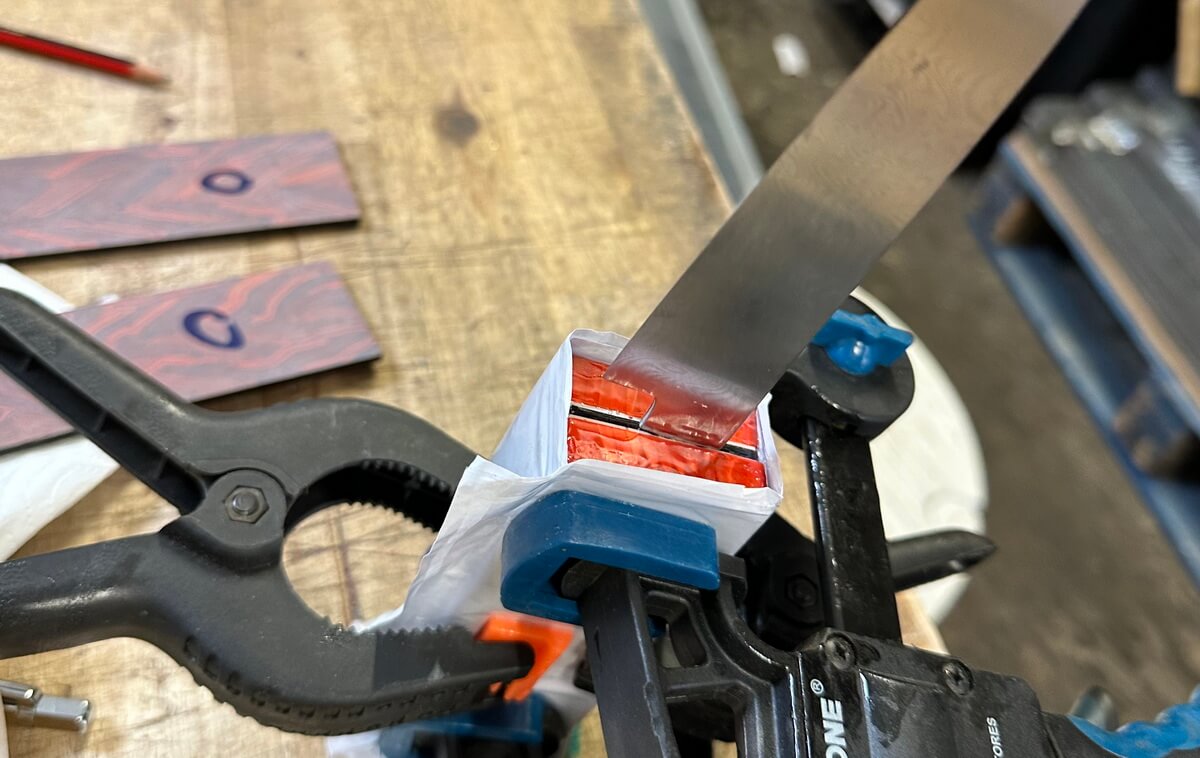
Pancake block after glue-up
When the epoxy glue is dry, the tang can be fitted back into the now solid handle block. Usually this takes some filing or rasping with a tang hole saw, I ended up having to file the sides of the white G10 spacers a bit as well before the tang would go all the way back in. This is not a problem, having undercut the tang slightly it will all look nice and matching when the blade is glued into the block.
In the below photo you see how the layers have come together to form the pancake block, fitting neatly around a thin tang that will be glued in after the handle is shaped. It looks like a full-tang construction really (?) with spacers and handle scales, but with no visible tang in the middle.
What I should have done here is to flatten up the front and sand to a high grit when all materials form a single side. I fitted the tang too early and then when squaring up the block on all sides had to file again to fit the tang all the way inside the block. (so the right step would here have been to grind the front of that block to a nice, even surface with all layers showing)
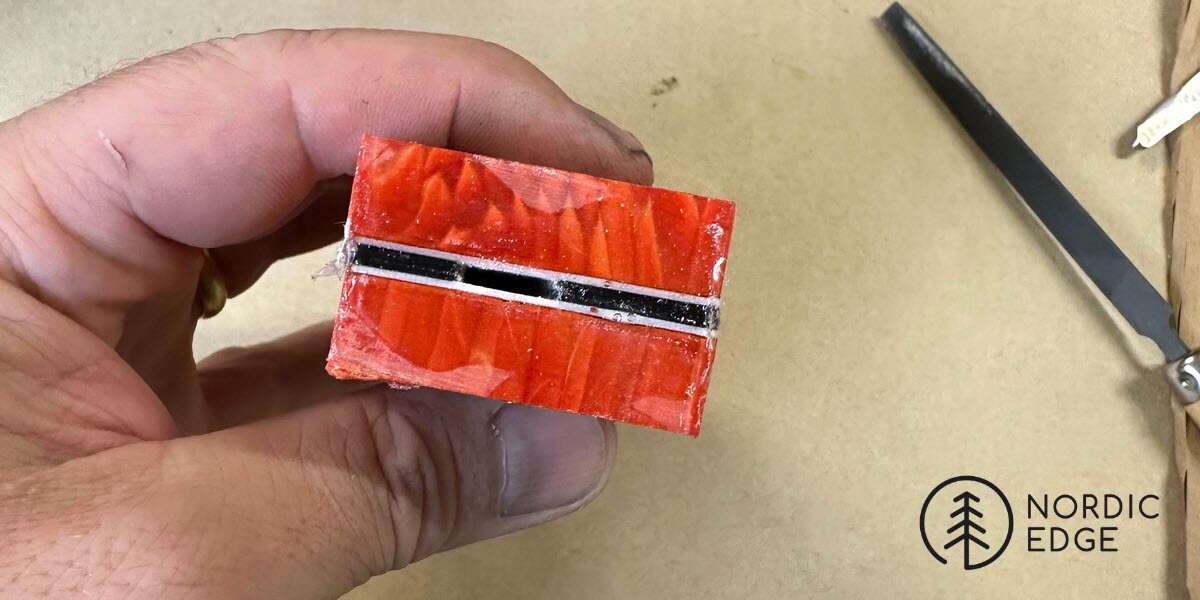
Fit the tang back into the pancake
In the below photo we are partially through fitting the tang back into the block. Might be smart to grind the front of the block first to one smooth surface with all components as a flat surface but I did that after fitting the blade back in.
Rasp and file inside the tang hole slot in the pancake if needed until the tang fits all the way back down. In my case I also filed the sides a bit near the start of the hole before the blade would fit.
**Again, dust is dangerous. I am doing any dust creating work in the grind room, the below is just coming back out and taking a photo of the progress **
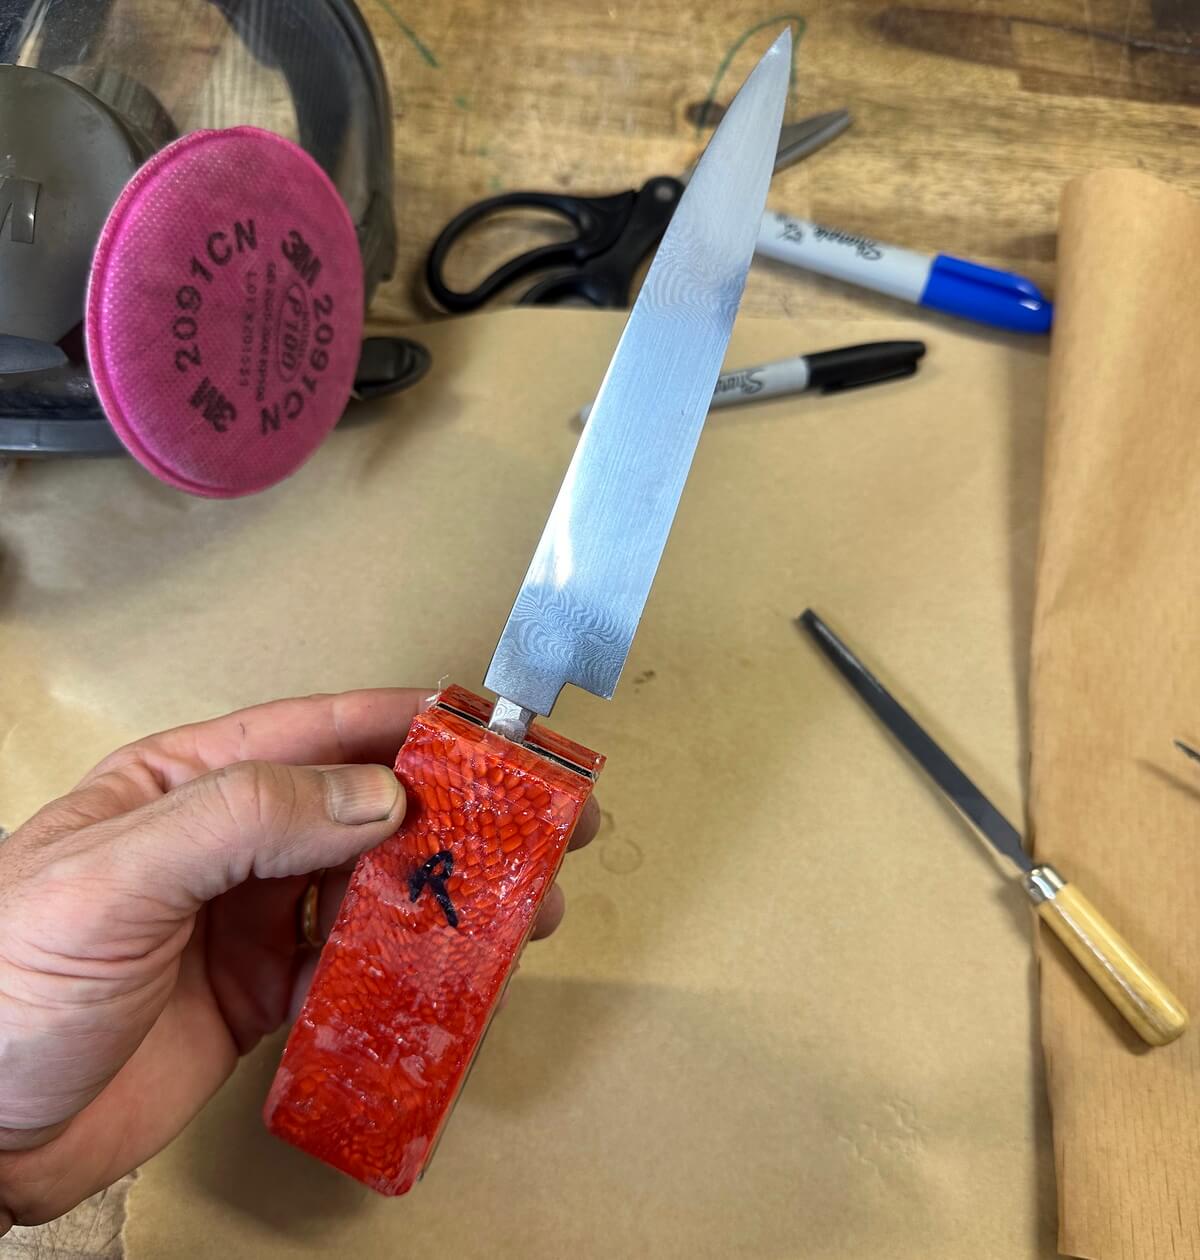
Shaping the handle
This is probably more taste than "right or wrong", I just like the handle lines to on top follow the spine of the blade. So I placed the steel ruler on the flat handle side following the spine line, then move the ruler a few mm up and draw a pencil line.
Same thing underneath, aiming for the bottom of the handle to start a couple of mm below the line from the ricasso. Removing material to these lines give me the rough shape, with finer belts and hand sanding removing the extra few mms are mostly removed and the finished handle lines follow top of blade and the ricasso line.
Before drawing on the spine and belly line, the front is cleaned up to a flat front surface and sanded to high grit. This means I can draw also on the front with the pencil, marking where to grind to also in front to thin the handle towards the blade.
I dryfit the handle on the blade several times while drawing these lines, grinding a bit and going back to dryfitting and drawing lines. This helps make sure the handle becomes centered on the blade and symmetrical.
Mert Tansu from Tansu Knives gave me some pointers on handle lines, saying it looks "right" when the curve on the bottom of the handle matches the curve on the top of the spine coming down to the tip. If that made sense in writing. I am here trying to match the curve on the spine towards the tip by grinding the bottom of the handle up a bit.
In the below photo the handle block is roughed to the profile, slightly taller than it will be when ready. From here I draw on pencil lines on the flat surfaces of the handle say 5-6 mm down from the top and up from the bottom. And the same lines on the spine and edge side of the handle block. Then go grind these "corners" off to get a symmetrical spine and belly section of the handle block.
Thinking out loud here
I thin the handle towards the blade both from the side, and when seen from above. This is how I think through this step, feel free to skip this next bit:
To thin the handle and keep it symmetrical, I measure with calipers and doodle on a piece of paper, drawing the handle from the top view for this next step. "the G10 pancake is 4 mm thick, each handle scale is 10 mm thick. So in total 24 mm. At the front I want ....16(?) mm so that means 4 mm of G10 and 12 mm of handle scales, meaning 6 mm on each side of the G10 pancake." Having measured them a couple of times already, I know the handle scales are cut very exactly at 10 mm so I can scratch a line 4 mm on each outside of the scale at the front section of the block. Spine, belly and front of scale where the blade will be are all marked with the calipers 4 mm from the outside of the juma scales. The 10 mm scales after grinding off these 4 mm will be 6 mm thick so total thickness when seen from above will be 16 mm.
"At the back it will be say.... 20 mm (playing with the calipers over the handle, finding a number I think looks right). That means 4 mm of G10 and 16 mm of Juma, or 8 mm of Juma on each side of the G10 pancake. So I can draw a 2 mm line scratched with the digital calipers from the outside of the Juma scales on the end of the handle block, and on top and bottom. 10 mm scales minus these 2 mm will leave 8 mm at the back of each Juma scale" I then draw a pencil line from the marks on spine and belly connecting front and back of the handle marks to the lines I will grind too. When grinding these lines, I remove anything outside of the lines from the sides only, thinning the Juma handle scales until the result is 16 mm of handle at the front and 20 mm at the back of the handle.
I also draw over the scratched line from the digital caliper jaws with a sharp pencil. In a dust mask, in the grind room, the pencil marks are easier to see than a faint scratched line from the calipers. I make sure I draw on the ends of the block too, meaning the front of the block where the blade will be glued in later, as well as the back. Because as I grind off the handle scale sides, if loosing any marks I have them front and back still to make sure I get the sides flat and too the thickness I wanted.
Take the time needed
Taking some extra time here really pays off, in my opinion. This is where you measure, draw lines and slow down enough to be accurate. If the grinder is too agressive, do it by hand. It is easier to file to a pencil line by file than by grinder. Going hard and fast eats off a corner in a second, and then the next day you hold the handle up for a critical look, wishing you had not removed that 5 mm off the back corner without noticing. Slowing the grinder down is great, let it take a couple of minutes extra. This step should be fun, no need to rush.
This is one of the most satisfying parts of knife making - when it works - and the way to make it work is to do it several times, taking your time, and thinking each step through. If stressing and needing to wrap up for the night, save this step for when having time and mental bandwidth. Rushing handle shaping does not end well, at least not at my skill level :)
Disc grinder at 10 Hz for Wa handles
If you have a disc grinder, this is where it SHINES. Being able to rough grind on a belt grinder and then nice and slowly, accurately grind to your lines on a disc grinder is a completely different experience than just rouging it out on the grinder and hoping you don't overshoot.
Completing this step to the lines with files works 100% as well, just saying if needing any arguments when discussing with yourself if you should invest in an 84Engineering disc grinder or not, there are 2 reasons: Flattening blade sides before hand sanding - and doing accurate handle lines on a level you did not think was possible if not having used a disc grinder at very slow speed with a tool rest before.
Flattening blades saves hours of unncessary work, doing accurate handle lines and angles makes your knives worth more money, should you wish to sell any at some point. Both are excellent ways to pay for the disc grinder, if you have space for another tool. When using a disc grinder, go way slower than you might think. Kev Slattery says to go 8-12 Hz when flattening blades, a tip I took to heart also on handle materials. Slow means accurate here, and with some rough stock removal on the belt grinder, you are only removing a small amount of material on 180 grit rhynowet to clean up lines. Then change paper -using as little spray adhesive as possible - and go again.
If you end up rounding corners like I did, it matters less using a disc grinder but for clean, sharp lines in a Japan-inspired Wa handle for instance, the disc grinder is an amazing tool. A massive thank you to Pierre Mefflin from Mefflin Knives for helping me learn the tool rest part too.
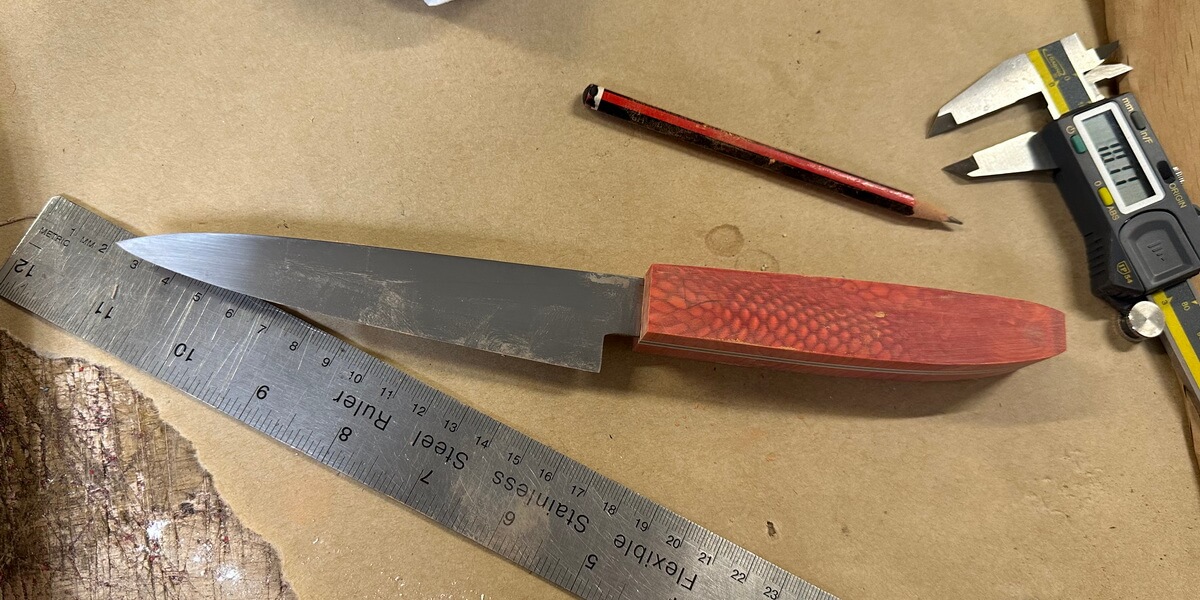
Juma Magma Dragon Scales
Elforyn is a German company that started by making synthetic ivory. They make several "elephant-friendly" ivory materials that have an authentic look and warm hand feel, without the need to hurt any elephants. They also make some stunning 3D patterned handle materials. These are "snake", "dragon" or "TAC" pattern in lots of different colours. These redddish orange ones are called Juma Magma Dragon and I have wanted to try them since I first saw them several years ago. The 3D pattern go all the way through the blocks and scales, so when grinding you reveal more of the pattern. They are expensive but look pretty special, I think.
In the below photo the corners are rounded on the grinder, then finished by hand.
Juma 3D scales are easy to grind and sand, and take a beautiful polish. The below is hand sanded to 1500 grit, then given a good buff on a polishing mop with green compound.
The beauty of this handle construction is not only the ease of fitting up a thin tang - but how nice it is to grind the handle without having the blade in the way(!). You can of course pull the handle out of any stick tang handle block, only here saying that it is also an easy thing to do with the pancake block.
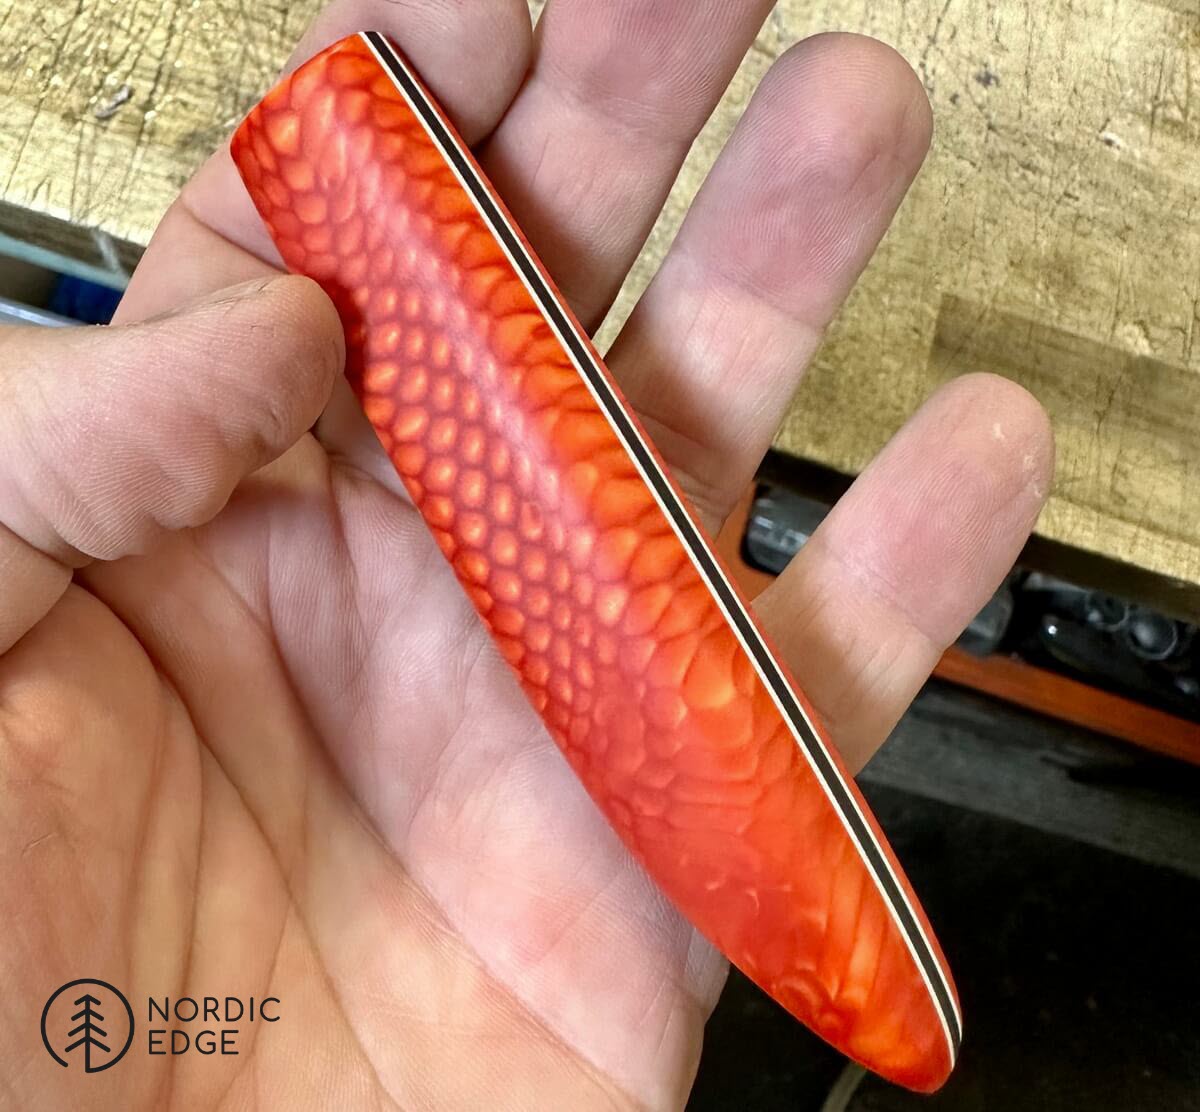
Pancake construction
In the below photo the blade is glued into the blade with 5-min epoxy, you can see the spine side of the pancake construction. The 2 middle layers of G10 are the same thickness as the blade or slightly thinner. Then 1 layer of 1 mm G10 on each side before the Juma magma dragon scales originally were 10 mm each before being ground to shape.
You see the handle thinning towards the blade, and how drawing lines after some simple calculations about dimensions made for a symmetrical handle.
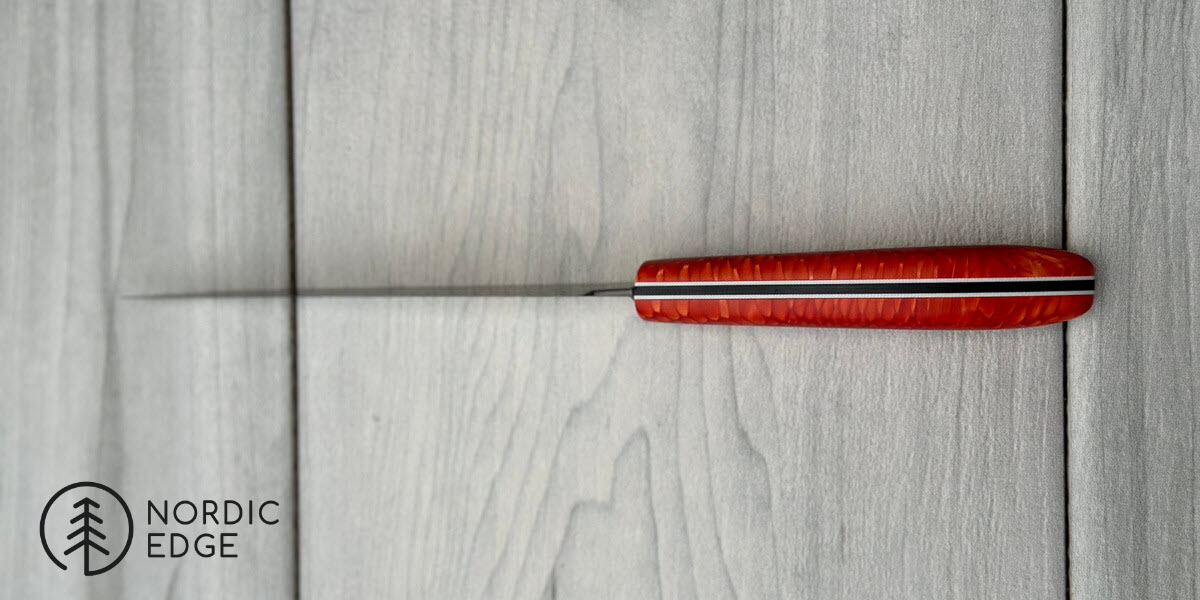
Final thoughts and lessons for next time
Having done this pancake style block only a couple of times so far, here are some pointers I have made for myself;
- do not glue the inital 2 pieces of G10 to each other before sawing out the tang slot. This ended up being messy and I got glue on the outside which needed to be sanded off, risking the G10 pieces not being flat. So this time I just taped them together with masking tape and then sawed out the tang shape on a bandsaw. This worked really well and it made for only a single glue-up of all 6 pieces in one go.
- Flatten all pieces before gluing up; each piece of G10 as well as the handle materials, here all synthetic and already flat but I still flattened them on 180 grit rhynowet paper on a granite flat surface to make sure, then rounded all corners with a small file. All outside edges are ground off anyway due to the components sliding on the epoxy so no need to worry about the 1 mm of rounded edges even between parts being glued to eachother. The first time I did this construction, I ended up with a visible gap on one side so this time I did not glue in two separate steps, made the tang slot slightly oversize in the first 2 pieces, and ground off all corners of all pieces to help clamp them flat with no visible glue line in the end block.
- During glue-up, insert and remove the blade from the clamped pancake several times to make sure there is room for the tang - but make sure you can get it out if needing to clean up the front of the block like I had to. When the glue is set, file or rasp in the tang hole until the blade fits again all the way in.
- Having drilled holes for pins would have made glue up easier as nothing can slide around if I had inserted handle pins as part of the glue up. This only works if the pins are not where the tang will be, or if you leave the blade in the handle for the handle shaping. If using pins, the handle scales themselves could have been ground more to final profile to help place pins in a symmetrical pattern of what would be the final handle shape.
- I wiped with acetone, added epoxy making sure very little would get inside the tang slot even when clamped. Then wrapped in plastic and clamped, making sure the 6 pieces were still in a uniform block and all were at the same level at the front.Then added the blade and removed it again while the clamps held the block as one piece, wiping the tang with axeone before inserting it again. Working quickly while the 5 min epoxy was starting to gel, it made for a fairly uniform block and a good fit.
- After drying, the block should have been squared up on all sides before moving on, to make sure any component that had slid sideways would be included in the block. As the blocks was 40 mm wide it was way wider than needed, so cleaning up the sides caused no issues. I moved straight to fitting the tang back in and then later when squaring the front had to file a little more to fit the tang again.
Final result
And here is the end result, a nice clean fit between blade and handle and some nice contrasting colours in the handle along the spine. This knife will be on the table at Melbourne Knife Show the first weekend of May 2023 if coming by.
Have you tried this out? Any additional lessons we could include for next time? Jump on the Australian Beginner Knifemaking Group on facebook and let us know what you thought of the process: LINK
Thank you for reading the article, hoping it will help you with your making at some level.
Bjorn
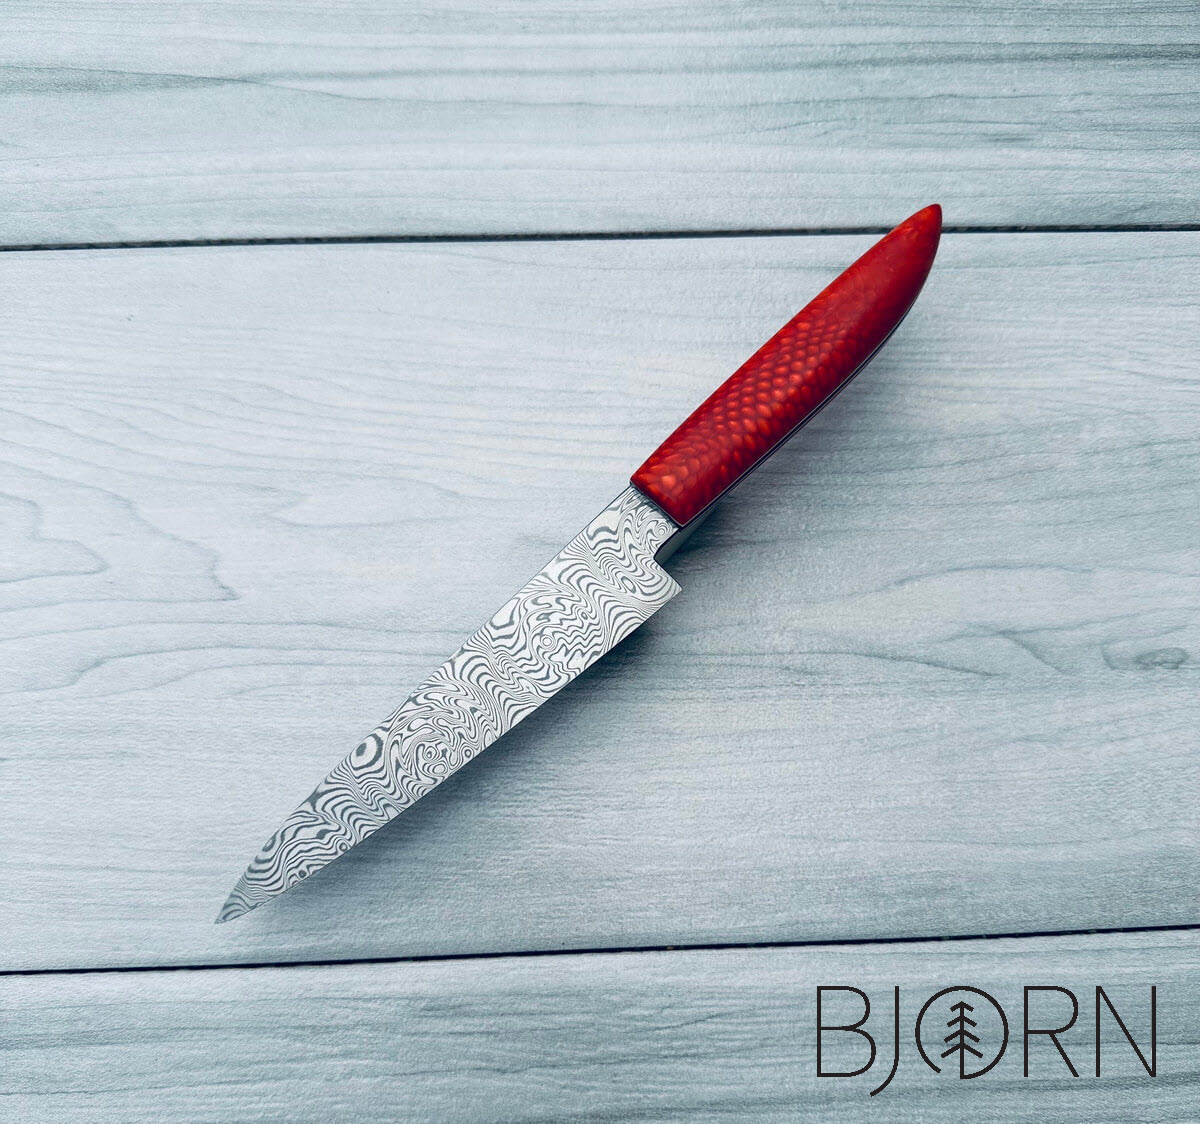
Recent Posts
-
The Etch Test: Ferric vs Hydrochloric vs Gator Piss
The Etch Test: Three Very Different Looks From One Steel One of the great things about knife making …3rd Jan 2026 -
Why Bed The Tang In Epoxy - Then Knock it OFF Again.
What is "Bedding the tang"? Bedding the tang means gluing a stick-tang blade into the handle block i …21st Mar 2025 -
Marble Leather - How to Dip Dye Veg Tanned Leather
This was my first experiment with hydrodipping or dip dying leather, and it came out pretty cool! I …14th Mar 2025

