
HOW TO: Hand Sanding a Knife Blade
How to: Hand Sanding A Knife Blade
by Bjorn Jacobsen, October 2023
- Hand sanding is part of the Fit & Finish of a knife
- Hand sanding flattens the blade, removing bumps to a level not possible with a grinder
- Hand sanding is u
- sually done lengthwise – the scratches or lines going along the blade is often the first sign of a hand-finished
- blade
- Changing direction for each grit helps make sure all previous grit scratches are gone
- First hard backing to flatten, then soft backing to blend it all in
- Spray with Windex, wipe with kitchen towels to get rid of steel residue
Why hand sand?
To a collector or other knifemaker picking up your knife, the blade finish is a key thing they are looking at when reviewing your work. How well the blade is finished is key in the overall impression of the knife – and often considered a requirement of any high-quality knife.
If wanting to take your own knives making skills to the highest level you can, hand sanding is something you probably will be spending time on.

(photo credit: Left Fire Creek Forge. Right: Jamie Bishop)
Grinder Finish vs Hand Finish
The last step on the blade when making a knife is often hand sanding the blade to an even, flat finish. Because hand sanding is creating additional work, it adds time for the maker. Adding a lot of time to a knife build will generally make it a more expensive knife – or just slower to complete if not selling it. There is time to save on the knife if a grinder finish is good enough for the project, and it has it’s place in your arsenal.
For many knives a satin grinder finish is a great look. Especially when your grinder skills improve enough to not leave big dents, finishing with for instance Scotch Brite belts will often leave a very nice, satin finish. Personally, I have done this quite a few times on gift knives for “non-knife” people where a stainless chef knife with a satin grinder finish is a great gift while saving a bit of time on the build.
Or if going to a market to sell some knives, it can be good to have different price points and a grinder finished knife is a good way to help reduce the time spent on a knife to bring the price down.
On the other hand, if wanting the best finish possible – hand sanding is the way to go. The blade is flattened using a hard backing before going up in grits and the result is a flat, smooth blade that shows off your knife making skills to a higher level than any grinder finish.
Grinder finish:
- More forgiving - hides small blemishes
- Satin finish easy to achieve
- Scratch pattern generally go across the blade
- Saves time
Hand finish:
- Less forgiving – blemishes show up if not dealt with
- Can do a higher level of finish than grinder finish (high satin or mirror)
- Scratch pattern generally go along the blade
- Takes more time and looks the best
When picking up a knife, the direction of the scratch pattern is often an easy way to tell if the knife was hand finished or not. This is not a reliable indication, the maker could have grinder finished lengthwise, but in general terms scratches lengthwise means the blade was hand sanded.
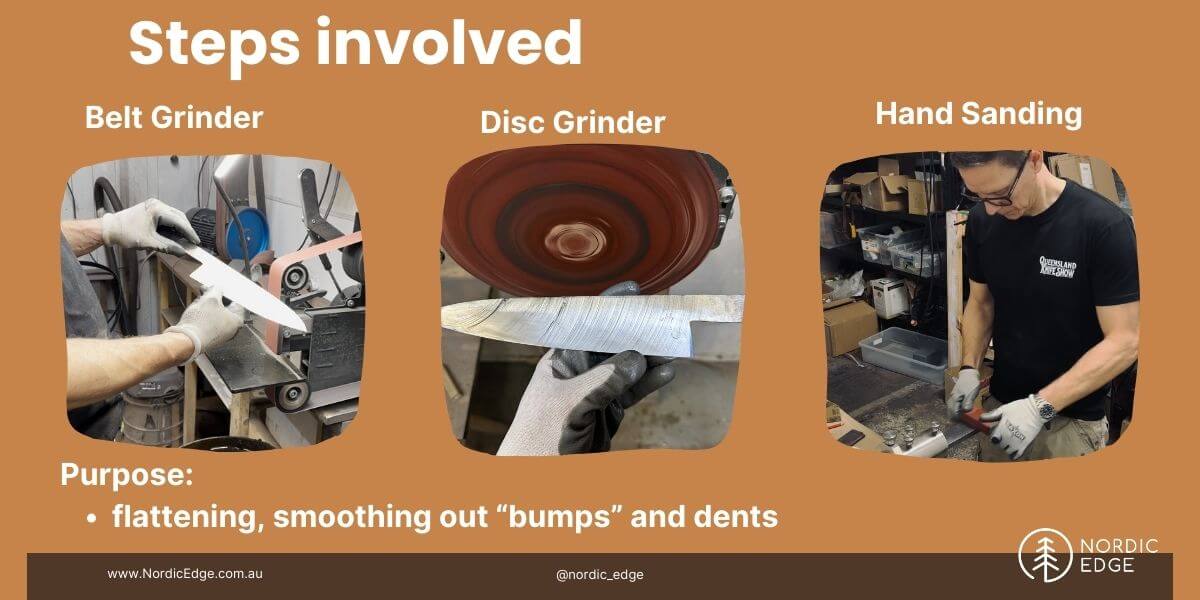
Steps involved
The main steps of finishing the blade are
- 1.Belt Grinder clean-up
- 2.Disc Grinder – optional step
- 3.Hand Sanding
The belt grinder removes metal to create the bevels, but for most of us it is not the tool for finishing the blade. To remove bumps and scratches to a higher degree, we end up hand sanding which is more work but has a higher degree of control.
Belt Grinder – what grit to finish on?
As your skill level on the grinder goes up, you get better at leaving a consistent scratch pattern on the blade. “Consistent scratch pattern” here means you see one set of scratches across the entire bevel – whatever grit and direction you are doing.
So if using for instance a 120 grit belt, the only scratches you want to see are the ones from this belt. Holding it up in the light and inspecting it closely should show no scratches from another belt grit, scratches going another direction, or hammer dents still left in the blade.
The higher the grit you leave the grinder on, the easier it will be to hand sand – if your scratch pattern is consistent. The reason is that if you have a dent in the blade and rather than removing this just keep going up in grits, you are sanding the rest of the blade while not dealing with the dent going into the blade.

Don’t leave valleys behind
Polishing the high spots while leaving the valley behind to show up later as the contrast grows between the course bottom of the valley and the now polished tops, is something that will happen to any new maker.
When going to hand sanding, you will discover the dent or valley in the blade and have to go back to coarse sand paper (or the grinder) to remove all steel around the dent before you can move on to a higher grit.
This is the key point on deciding when to leave the grinder – you need to go below the deepest point of the last dent – to get a truly flat and even finish.
If you can get the blade to 180 grit on the grinder with a consistent scratch pattern and no obvious dents or scratches, that is a good point to aim for.
Accept that you will not get a perfect finish off the grinder, that is not the point. The point is to not leave any glaringly obvious marks that will take a long time to hand sand out ?
Don’t be too proud to go back to the grinder though. If a big scratch or “valley” (dent) shows up when you start hand sanding, consider what is going to be faster; Going back to the grinder and taking the entire side of the blade down below the bottom of the dent -or spend hours and hours by hand to get there in a slower, more controlled fashion.
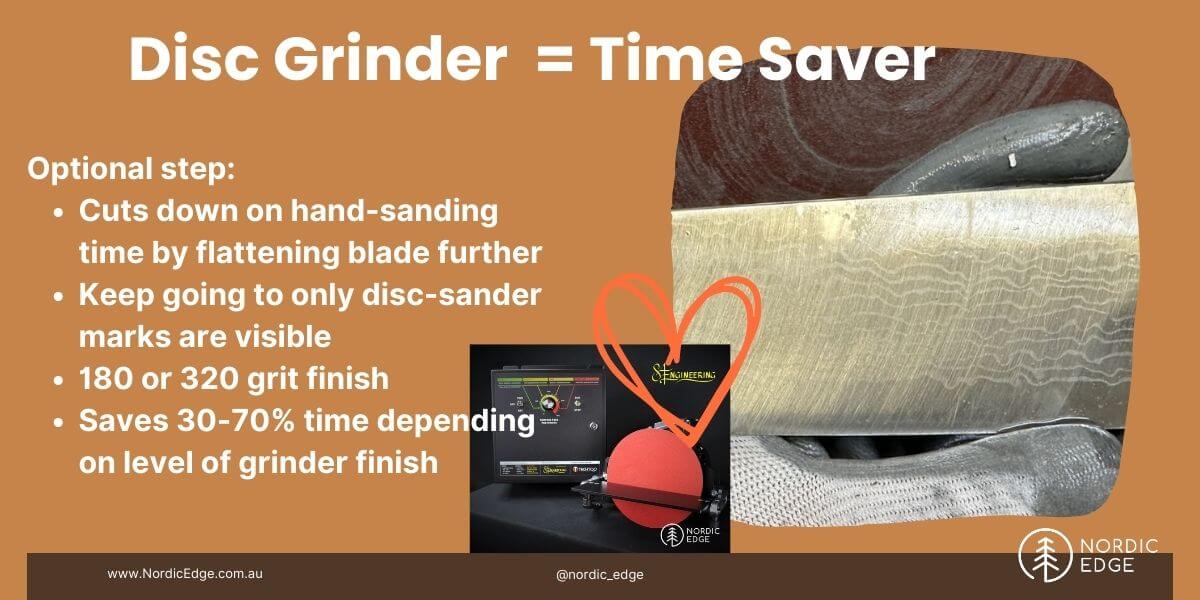
Disc Grinder saves you time
The disc grinder or disc sander is an optional step, not all makers have one. For those who do use a disc grinder, this is one of the two processes it is a key part of (along with accurate handle bevels).
The disc grinder is used at very slow speed, with sheets of abrasive paper spray glued onto it, then cut to the shape of the grinder with scissors.
Running the disc grinder really slowly (7-10 Hz on the one we use from 84Engineering), the blade is flattened further than what was possible on the belt grinder. If hand finishing a belt is like smoothing out a wave, the disc grinder is the middle step taking out a lot of the “wave” left from the belt sander.
How much time this saves is dependent on a lot of factors. Some steels are easy to sand and some are crazy hard (440C, ApexUltra). Some makers leave hardly any marks behind and some leave lots of marks to deal with (me). Some makers spend a day hand sanding each side of a blade, others 1 hour all-up, both sides (!).
While it is guaranteed that a disc sander will save on hand sanding time, some makers say it saves 90% of the job and some say it saves only a small amount of time so let’s generalize and suggest it will save 30-70% of the time involved from grinder to blade finished (?).
How to use the disc sander
Again the process is to keep going until you see a consistent scratch pattern only from the step you are doing, any straight scratches from the belt grinder means you need to keep going. The disc grinder scratches are circular so straight scratches tend to stand out.
Personally I start with 180 grit rhynowet paper attached with spray adhesive on the disc grinder, cutting around the disc with scissors. Then setting the speed to very slow for control (7-10 Hz) and flatten one side at a time. Using many, many sheets of abrasive paper to flatten and blend as my grinder finish usually looks nice and flat until the disc grinder shows how bumpy it still is..
I do not stress this step, the more time spent and the flatter the blade gets here – the easier the actual hand sanding will be. Keep dipping the blade to keep it cool and wipe and inspect critically in good light to look for scratches.
This is the step where you blend the bevel and top of blade to one if the bevels do not go all the way to the spine as well, if needed.
A disc grinder eats abrasive paper, it is just how it seems to work. Sanding hardened steel is hard on any abrasive, even Rhynowet so you spray it lightly with spray adhesive (it does not take that much to stick it on an already sticky disc) and then use it for a minute or two before changing.
Some makers prefer to cover the disc grinder with a 1 mm layer of rubber to turn it into a soft backed sanding process. Personally I use it without rubber backing, wanting the hard surface to flatten as much as possible before moving on to hand sanding.
If having to spend a bit of time on the disc grinder, it can make the edge really thin. If needed go back to the belt grinder and touch the edge to a 120 grit belt to thicken it up again. Then back to the disc grinder.
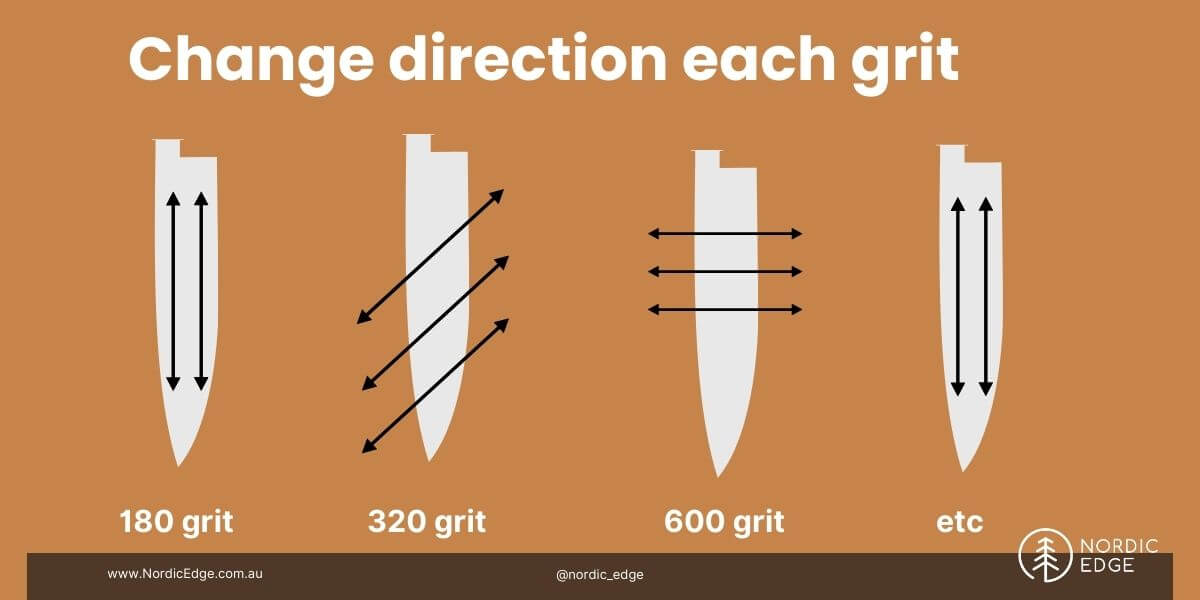
Hand sanding – change direction
Onto the actual hand sanding at last! When hand sanding it is good to remember that the reason we are doing this is to flatten the blade, removing any bumps or scratches left behind. That means that we will sand and sand and sand until the only marks we see are the ones from the current grit.
To make this clearer; say you are sanding all the grits the same direction – from tip to tang and back again. You go through the grits and at 600 grit keep looking at a line (scratch) thinking it does not seem to go away. How do you know what grit it is from, has it been there all along? Can you fix it by keep going on 600 grit paper or are you wasting your time and need to go back to 180 to remove it?
Why change direction
Any scratch showing up not following the direction you are currently sanding – is deeper than the blade around it. Meaning you are still not done, keep going until that scratch is gone. If all scratches go the same way or not, can be hard to see. Lots of light, move your head around and inspect closely.
- 180 grit: along the blade from tip to tang. Most of the work is on this coarse grit, keep it simple. When you think you are done, go one direction only, from tang to tip and inspect in good light. All scratches go in one direction? Well done, move to the next grit.
- 320 grit: pick another angle, sideways to the one you did for 180 grit. Keep going until you can only see the scratches in that direction. This means you have worn away all the 180 grit scratches that went tip to tang.
- 600 grit paper: back to tip to tang, or pick a third angle, just not the same as the paper before. Keep going again like this until your selected finish.
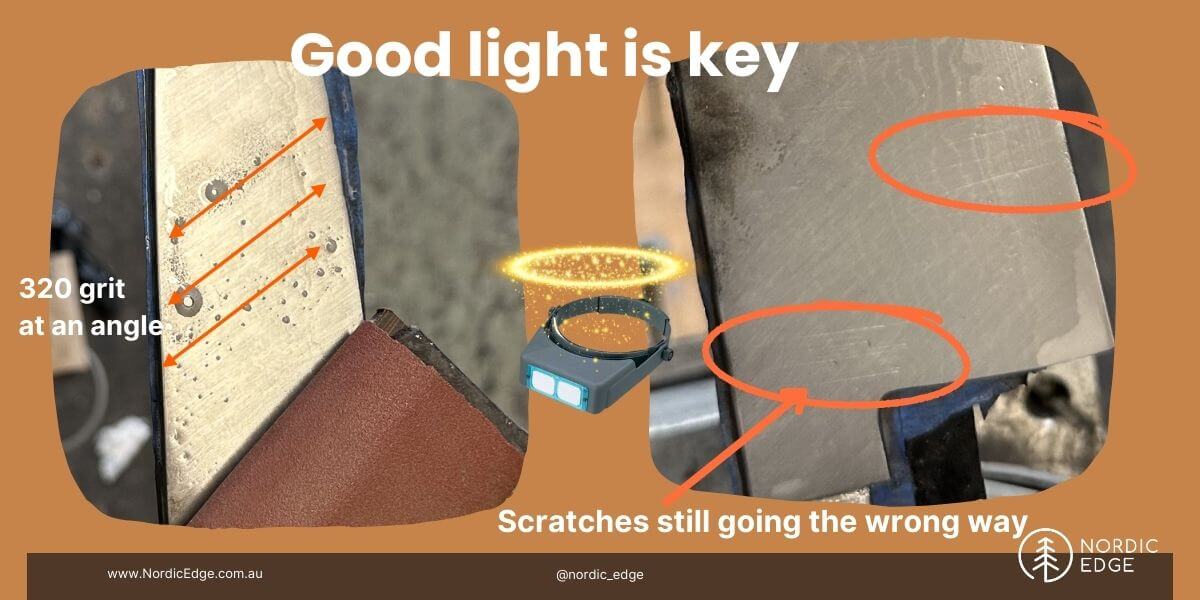
Good light is key
When inspecting the blade looking for scratches going “the wrong way”, good light is key. Spray the blade with windex or anything else you prefer to wash away the steel dust build-up, wipe with paper and inspect closely. An Optivisor is a good tool, as is really good light. Adam Fromholtz put me onto the Optivisor a few years ago, and it seemed a bit over-kill until trying one. Now I use it all the time. It is so helpful when centerpunching, drilling, scribing or looking for scratches. It is just one of those tools you think you don’t need (in my case it was a digital calipers more than anything) until you use it.
Spraying away the dust
When hand sanding the steel dust builds up, you spray on soapy water and then wipe it off with some kitchen towels or a rag. Some use WD-40 or lightweight oil, many use Windex, I generally start with Windex or a similar glass polishing spray then when half-full just top it up with water. When that runs out a squirt of dishwashing liquid and water fills the bottle another several times before I consider getting another Windex bottle. Anything really, it’s only purpose is to wipe away the steel dust so you can go again.
Sanding with gloves
Hand sanding steel creates a very fine steel dust that gets into every pore and likes to stay there. If not being a big fan of black fingers, nitrile or other closed pore gloves is a good idea to keep the fingers clean.
First hard, then soft backing
It is much more effective when removing scratches to have a hard backing. This can be a block of G10, a steel bar or something else that is hard, flat and gives you something to hold on to. The purpose is to use something hard to press down with to really flatten out bumps and ripples.
A hard backing will show up faults much harder than a soft backing – this is good. Now keep going until you only see a consistent, even scratch pattern from this grit. Personally I always start at 180 grit even if leaving the grinder at a higher grit, thinking it is faster to get really flat a coarser grit.
I got hard backing 180 grit, then 320 grit, then switch to soft backing for 320 again and for the 600 on carbon steel blades. For stainless Damascus or something else needing a high finish, I got to 1500 grit before the etch.
The soft backing is either just a piece of veg tanned leather on your normal hard block, or some rubber or leather glued to a different block. In my case I have a handle scale of G10 with veg tanned leather glued to each side for the soft block.
The soft backing blends and evens out for a nice, even finish – but to do so any marks need to be gone already.
Other points to consider:
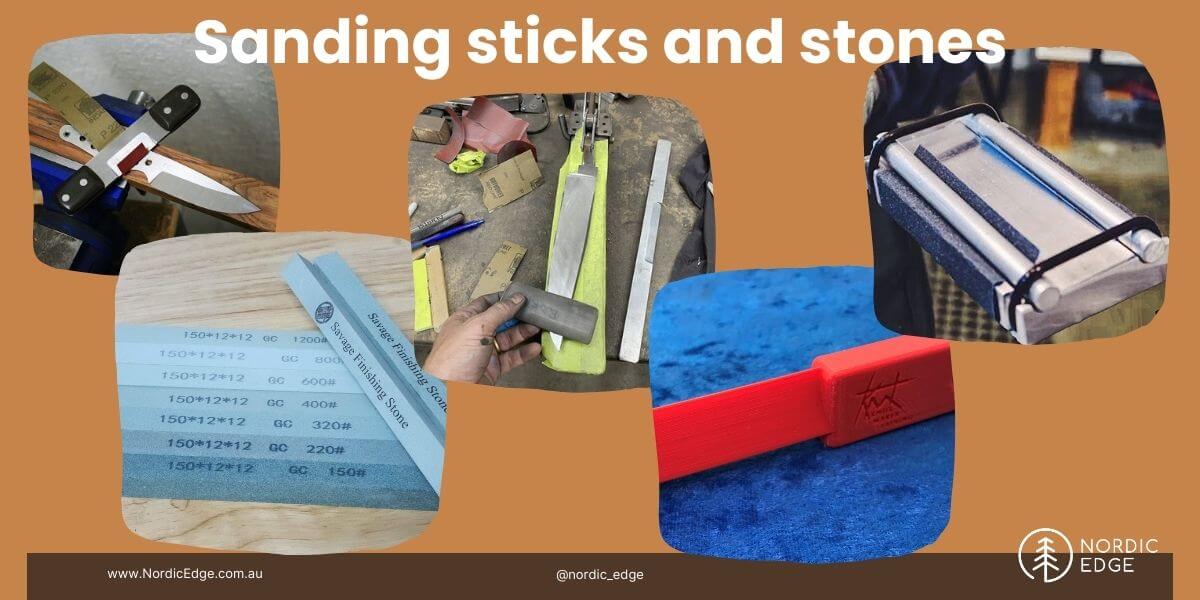
Sanding sticks
During a class with Jackson Rumble, we all used plexiglass sanding sticks. If good enough for Jackson, it is surely good enough for the rest of us. I am used to using my G10 block and kept doing that but the sanding stick also seemed clever. They really have a place if sanding plunge lines or need to get into odd angles or corners.
Sanding stones
Shane Savage was kind enough to send me some sanding stones they sell. They are a great idea, rather than wearing out tons of sand paper you sand with a soft, thin sharpening stone. Again I gave them a try and just went back to my G10 block from habit, but they do seem another great way to get the sanding done. I just felt they were not flat enough and ended up going over the surface with rhynowet and the G10 block afterwards. They are probably your best bet for getting rid of deep marks if not wanting to go back to the grinder.
Spray glue the paper on
A few years ago at Tharwa Valley Forge, Karim Haddad showed a group of us how they had changed the student hand sanding over to a bar of aluminium or steel with the rhynowet spray glued to it. Karim let me know this reduced the hand sanding time for their classes by the sand paper not rubbing back and forth on the sanding stick. I tried that for a while but got sick of cleaning the bar off masking tape and spray glue. Again, only saying what works for me here, Karim will have forgotten more than I know all-up about knife making ?
Steel selection matters
As we all know, different steel alloys have different qualities. Amongst these are abrasion resistance, this is part of edge retention but not the only factor by far. What it means in this context is that some steels are waaaay harder to sand and grind marks out of than others.
Some steels are fairly easy to grind, sand and finish. 1084 high carbon steel is easy, AEB-L is a crazy tough stainless steel but easy to grind, sand and even etches really nice and evenly if doing a stone washed finish. 14C28N or the older version 12C27 are easy to grind and finish.
440C is the worst I have personally ever done, but I understand ApexUltra and CPM S35VN are other steels that are so abrasive resistant that they are a challenge to finish.
The pre-hardened stainless steel Damascus we have at Nordic Edge are easy to deal with in my experience and the winner is of course San Mai! Assuming you use san mai with mild steel cheeks, most of the job consists of grinding, sanding and finishing the mild steel cheeks with only a slice of edge steel to deal with. San Mai for the win!
Take your time
Last but not least, take your time when sanding. Listen to a book or some music. Think about life, plan a holiday in your head, whatever you enjoy doing while zoning out a bit while sanding. You can go hard and fast, it builds up a sweat surprisingly fast. Or you can go lighter and a bit slower and take your time, whatever you prefer.
Remember that 80-90% of the work is in the first grit, getting the blade truly flat and even, blending spine and bevels and ricasso and plunge lines where relevant.
And be critical when you think you are done on the first grit – don’t skip ahead and leave a scratch you need to go back to coarse paper to deal with later. Take a break and come back tomorrow if needed – don’t leave a scratch you know you should deal with.
There are lots of versions of hand finishing blades, you may have a different process with different tools that works for you.
But in summary, this is what works for me:
- 1.Grinder: go for at least 180 grit with consistent scratch pattern. 10 mins extra here saves 2 hours of sanding.
- 2.Disc grinder: Optional step that saves a lot of time if you have it. GO SLOW. Change paper often. Flatten the sides and blend together. Some use rubber backing, I only use the steel disc to not blend at this stage. Disc with 180 and 320 grit.
- 3.Hand sand; Start with 180 grit and hard backing until FLAT. Change paper often, don’t wear your arm out on spent paper. Especially when sanding hardened steel. Be very critical when you seem to be done. Clean and wipe blade, have good light. Optivisor is a great tip, use it ?
- 4.Stop at 180 grit, now make the guard and handle. I always scratch something when doing these steps so save the finishing sanding to later. Especially clamping with the file guide for a stick tang blade seems to often leave marks for me so I stop at 180 when most of the work is done anyways.
- 5.When guard and/or handle is ready and blade needs to be finished:
- 6.180 grit again to clean up any marks, then change direction for 320 grit to an angle, when done there should be no more lines from the 180 grit
- a.Soft backing: 320 grit again, then 600 grit for carbon steel and all the way to 1500 for stainless Damascus, or as mirror finish preparation
- 7.When done completely on one side, wash and wipe blade, cover the finished side with a touch of oil and wipe again before covering in masking tape. Place the completed side down in the blade vice and now sand the other side.
- 8.Do not leave carbon steel blades with masking tape on, it might leave marks.
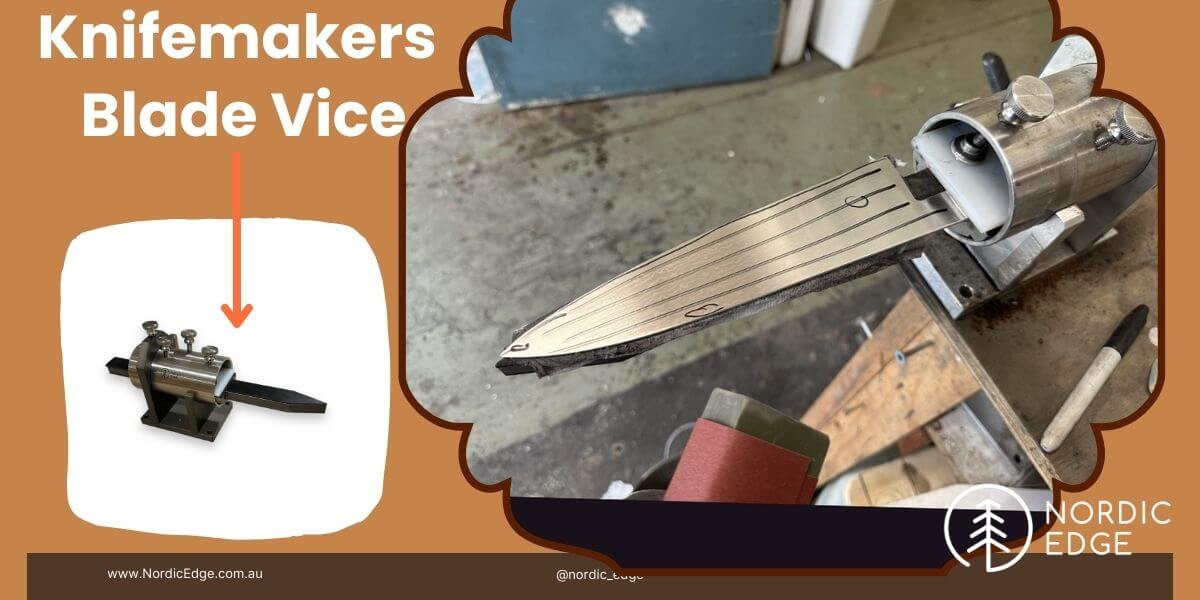
Blade Vice
A knife makers blade vice makes hand finishing easier, by securely holding the blade. At Nordic Edge we have designed our own model, this is as far as we know the only one with adjustable blade support which is pretty handy. A block of wood will work if you have not got one, as long as you shape the wood to fit your blade length.
You do not want an overhanging tip to bend – or stab you if zoning out while sanding.
A blade vice is very handy when sculpting handles but our go to tool for hand sanding as well.
In the photo you can see sharpie lines on the blade, just making sure the entire side is flat and having circled some issues that still needs to be dealt with at this first grit.
Thank you for reading along, hoping you got something out of this if a new maker or maybe just enjoyed seeing how your process compares if being an experienced maker already.
Bjorn
Recent Posts
-

The Etch Test: Ferric vs Hydrochloric vs Gator Piss
The Etch Test: Three Very Different Looks From One Steel One of the great things about knife making …3rd Jan 2026 -

Why Bed The Tang In Epoxy - Then Knock it OFF Again.
What is "Bedding the tang"? Bedding the tang means gluing a stick-tang blade into the handle block i …21st Mar 2025 -

Marble Leather - How to Dip Dye Veg Tanned Leather
This was my first experiment with hydrodipping or dip dying leather, and it came out pretty cool! I …14th Mar 2025