
How to: Sharpen on a belt grinder
By Bjorn Jacobsen, March 2024
"A Sharp Knife is a Safe Knife"
Knife sharpening is part of using knives - or at least it should be. Most people use knives all their lives in the kitchen, when going fishing or camping and never think too much about sharpening them. Most all knives start out sharp and then quickly loses that initial “razor sharp” edge before hitting the main usable “generally sharp” period of use.
Eventually all knives end up dull, and should be resharpened. The actual cutting edge is a very small percentage of the steel used to make a knife and a little bit of “maintenance sharpening” will go a long way towards making the knife function better again. This also makes it more enjoyable to use the knife as well, it can be pretty frustrating trying to prepare dinner with a dull knife that will not cut.
A sharp knife is safer, it cuts cleaner with less force needed to do the job.
Sharpening is not difficult
To many people sharpening is a bit of a mystery, but with a couple of concepts cleared up anyone can sharpen the average knife back to razor sharpness with confidence.
Here we are going to cover the initial first sharpening of a knife you have just made. If you can do that, resharpening other knives will be easy!

Key concept - burr
When we sharpen, we are removing a little bit of metal from the sides of the blade until we get a burr.
Learn to feel the burr
When the sides of the knife are sharpened, they meet in the middle (the cutting edge). Where they meet, the side that is being sharpened will create a “burr” – a thin sliver of steel that folds over the edge, away from the side that was being sharpened.
When sharpening, you have to keep going until you get a burr.
That is really all sharpening is in a nutshell – get a burr and you will be fine.
Get rid of the flat section
If you stop before the 2 sides meet, you are not really sharpening, you are just grinding or polishing on the sides of the bevels. If there is no burr at a point of the edge, it means at that point the two sides are not meeting and there is a flat section between the two sides.
This can happen because you are sharpening at an angle that is not touching the bottom of the bevels, or it can be because the blade is too thick behind the edge for the angle you want to sharpen at.
So the first and main point about sharpening is to simply keep going until you get a burr, then swapping for finer belts, stones or sand paper until happy.
Sharpening angles
The sharpening angle decides how thin the edge will be.
A lower angle (say 17 degrees) will give a thinner, weaker but sharper edge than a higher angle (25 degrees). The higher degree angle will make the two sides of the blade meet earlier for a somewhat thicker edge making it stronger.
A thinner edge requires less force to slice and will feel sharp longer than a thicker edge, while a thicker edge is stronger. A stronger edge is often considered necessary for cutting harder materials or when some edge abuse might be expected.
So a thinner edge will do a better job "be sharper in use" than a thicker edge even though it technially is not any sharper than the thick edge.
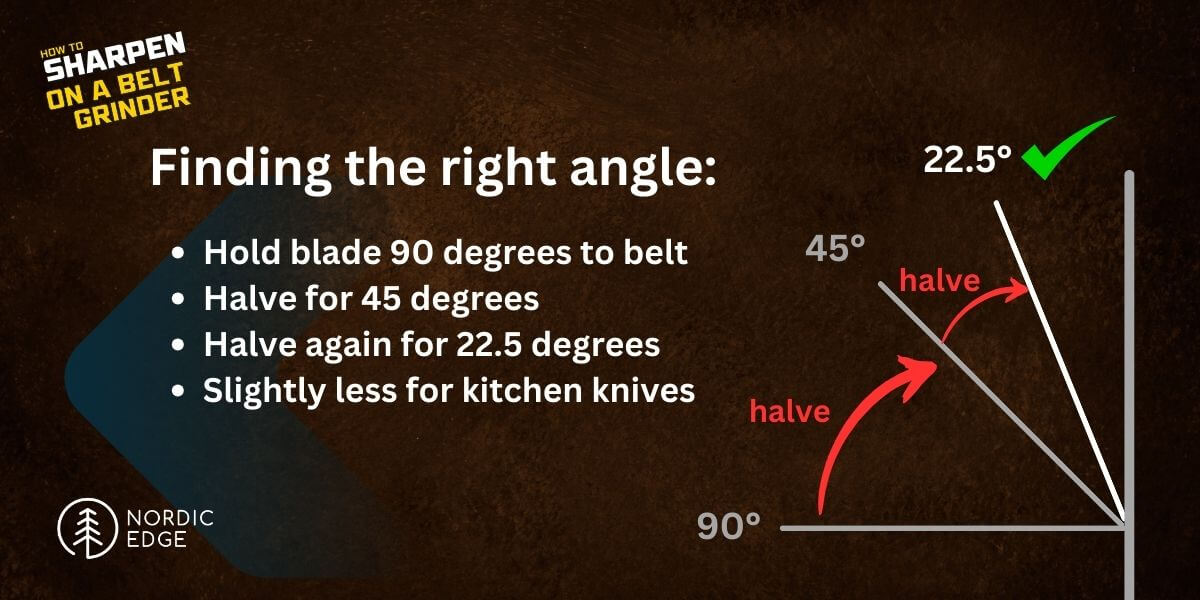
Finding the right sharpening angle for your knife – 22.5
There are many opinions in this space and lots of specialist sharpening tools, jigs and experts.
Here we are covering a bit of general ground on how to get most any knife to razor sharpness in a couple of minutes even the first time it is ever sharpened so this might not be the elitist view on sharpening – but it certainly gets our student knives razor sharp every single week at Nordic Edge so might work for you too.
Hold the knife with the edge facing the belt – this is 90 degrees to the belt.
Halve the angle, tilting the knife forward so the cutting edge is more down than flat now – this is 45 degrees to the belt.
Halve the angle again – this is 22.5 degrees to the belt and the right angle for sharpening.
Kitchen knives are often sharpened between 17 and 22 degrees and outdoor knives from 20-25 degrees. If in doubt, go for 22.5 degrees as it is simply halving 90 degrees twice, you will be fine for any normal kitchen or outdoor knife not used to chop hardwood or frozen meats.
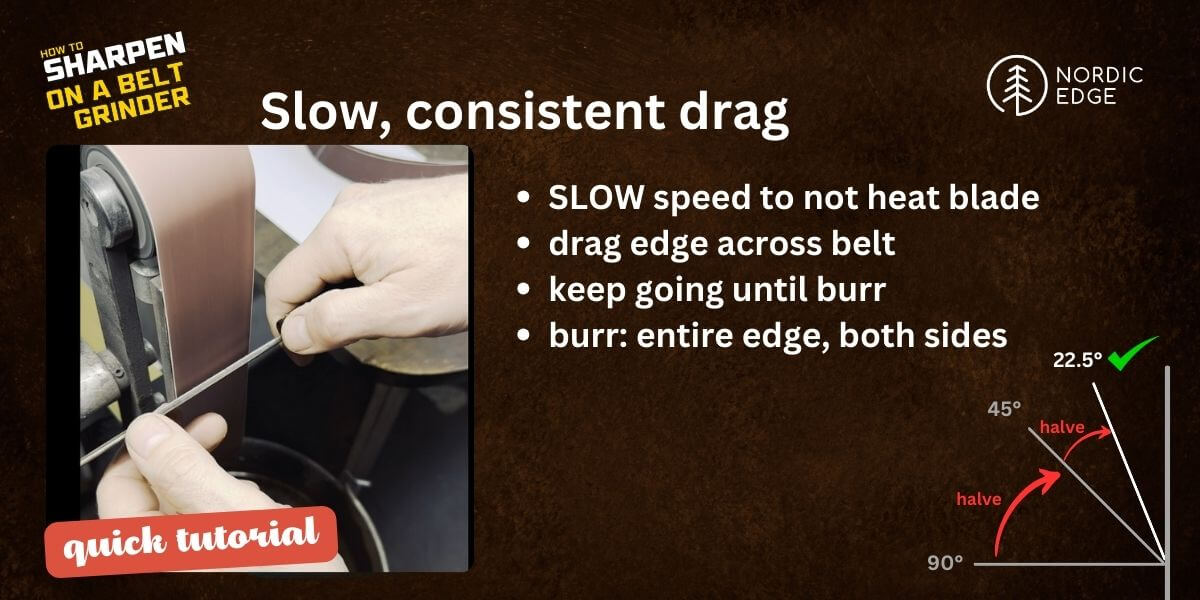
Slow speed is key
On a belt grinder we turn the speed down low (10% of max speed or so) to not burn the blade steel. On our 84Engineering grinders with VFDs (speed control) there is even a green section at the lowest speed marked sharpening.
How to sharpen
Stand in front of the grinder with the blade not touching the belt, and do the 90 – 45 – 22.5 degree exercise before gently and consistently dragging the entire edge across the belt.
Drag the edge across the belt, then change direction and go the other way to end up with equal passes on each side.
Back and forth, checking after every pass or two for the burr.
When you get the burr on a knife being sharpened for the first time, it will often not be even along the edge if the blade is not ground to a perfectly even thickness.
The thicker sections of the blade will need a few more passes than the thinner sections. Just keep going, back and forth until you have a burr the entire edge on both sides.
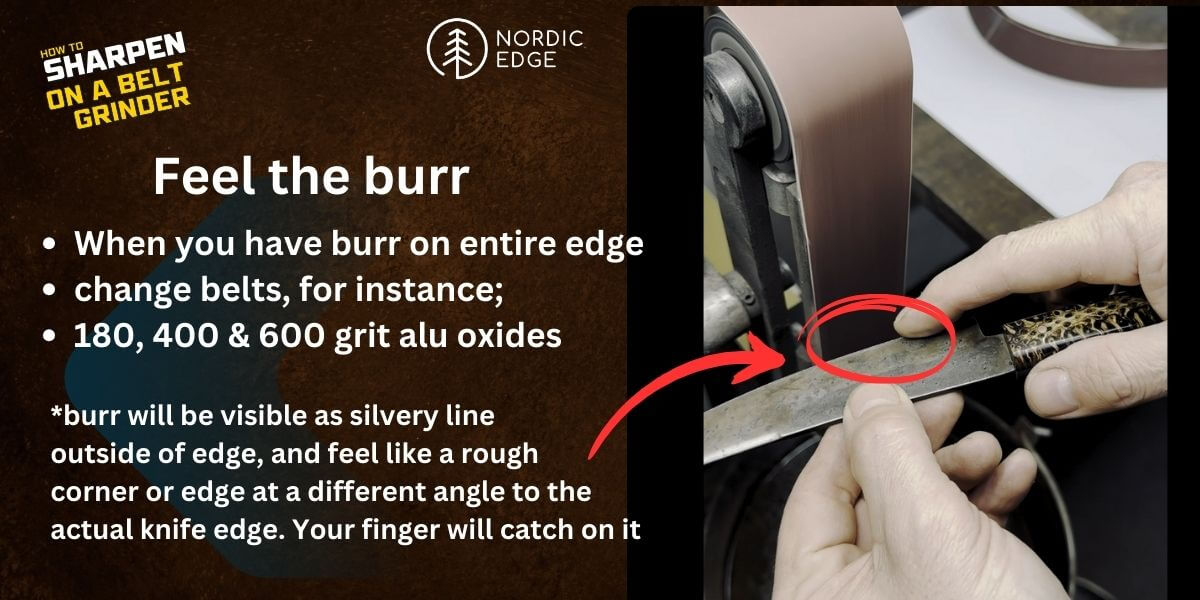
Can you feel the burr?
If you look for it, you will see the burr stand out as it appears. It will catch your finger if you carefully run your finger down the blade towards the edge. Kind of like a nicked nail that grabs you. Tilting the blade in the light, you will see a tin foil like edge of steel standing up from the edge at an angle and you go “aha”. (or you may not, I go "aha")
Sharpening stone or coffee mug
From now on, you can sharpen most any knife at any time. Touching up a knife that is already sharpened simply consists of rubbing it on something abrasive until the burr shows up. The bottom of a coffee mug, top of a car window, a toilet cistern (any unglazed ceramic sharp edge or bottom will do), or a proper sharpening stone of course!
Aluminium oxide belts
At Nordic Edge we sharpen student knives every weekend and the below is what we have found to work well for us. Using the same belts we use on the knife making workshops. Should we have a really thick edge we might even touch it to a 120 grit cubitron belt, but for all normal sharpening of student knives we do;
- 180 grit aluminum oxide belt
- 400 grit aluminum oxide belt
- 600 grit aluminum oxide belt
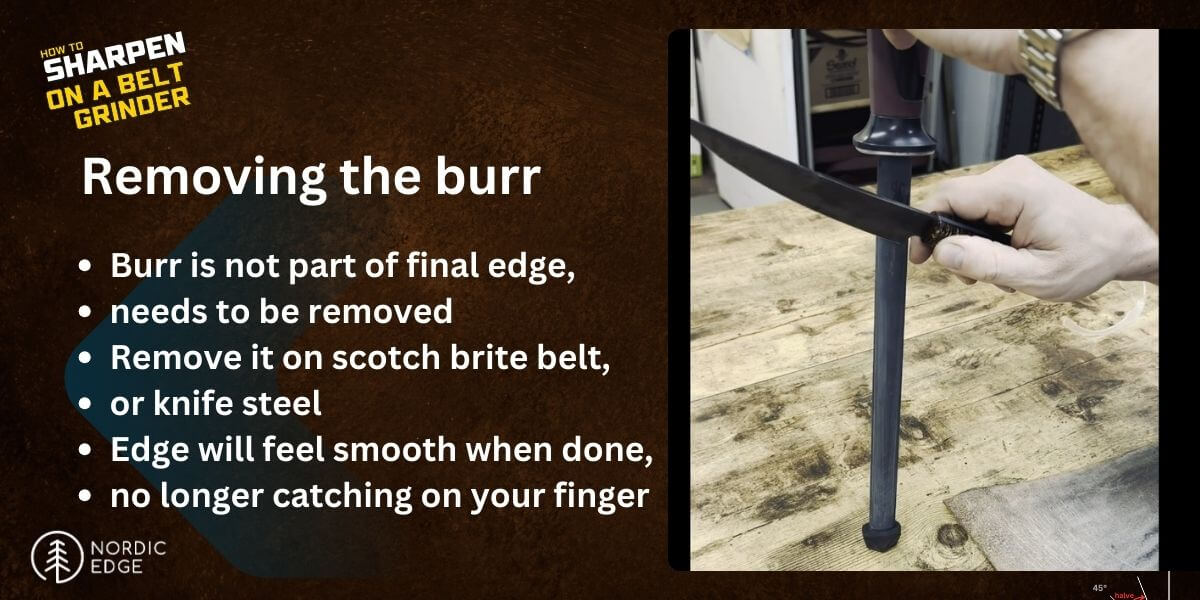
Removing the burr
After sharpening the blade the burr needs to be removed, it is not part of the final edge. As we are already on the belt grinder, we usually remove the burr with a fine or super fine scotch brite belt. Sharpen just like before and if the burr is not gone after a couple of passes, increase the angle slightly and it will disappear.
For etched blades where you do not want to mess the etched surface up with the scotch brite – or even after the scotch brite to make sure it is gone – we can also run the knife down a knife steel a few times to make sure the burr is gone.
Gently feel the edge across the blade – not along the edge but across it. When the burr is gone the edge feels smooth and there is nothing that grabs your finger anymore.
Some makers also very lightly place the edge down on their thumbnail and lightly drag the edge across their nail, feeling for any bumps that would indicate an unevenly sharpened section.
Stropping is optional but oh so fun!
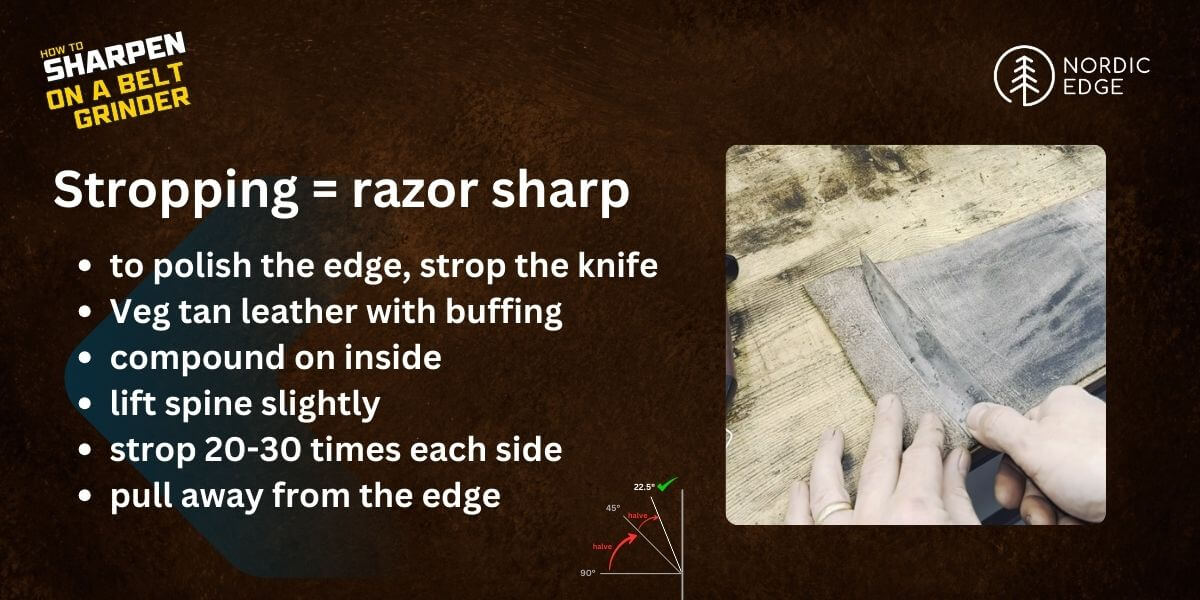
Stropping means to polish the edge to make it even sharper, this is optional and not necessary for most everyday knife use. Spoon carving knives and straight razors are stropped to function well but most everyday knives do not need stropping.
However stropping only takes a minute or so extra and if you – like us – think it is fun to take the knife to really, really sharp, then this is how to do it..
Leather and stropping compound
We use a scrap of veg tanned leather as this is thicker than most chrome tanned leather but there is probably no benefit to this over a piece of chrome tanned leather from an old couch or jacket if that is what you have available.
The key is to cover the inside of the leather with a buffing compound, which is a fine abrasive powder in a waxy substance used on buffing wheels. White or green are often the finest abrasives and the ones used for stropping.
There are lots of versions of strops for sale, here are a few we have at Nordic Edge if wanting a nice one: LINK
How to strop
You want a hard backing, either glue the leather to some wood or just place it down on a table top.
Then lift the spine of the knife slightly off the leather and drag away from the edge.
We generally drag 20-30 times one way ending with a few passes the entire length of the edge before doing the same on the other side.
By now the knife should be razor sharp – test it by slicing paper or carefully shaving some hair off.
How to sharpen a knife on a belt grinder
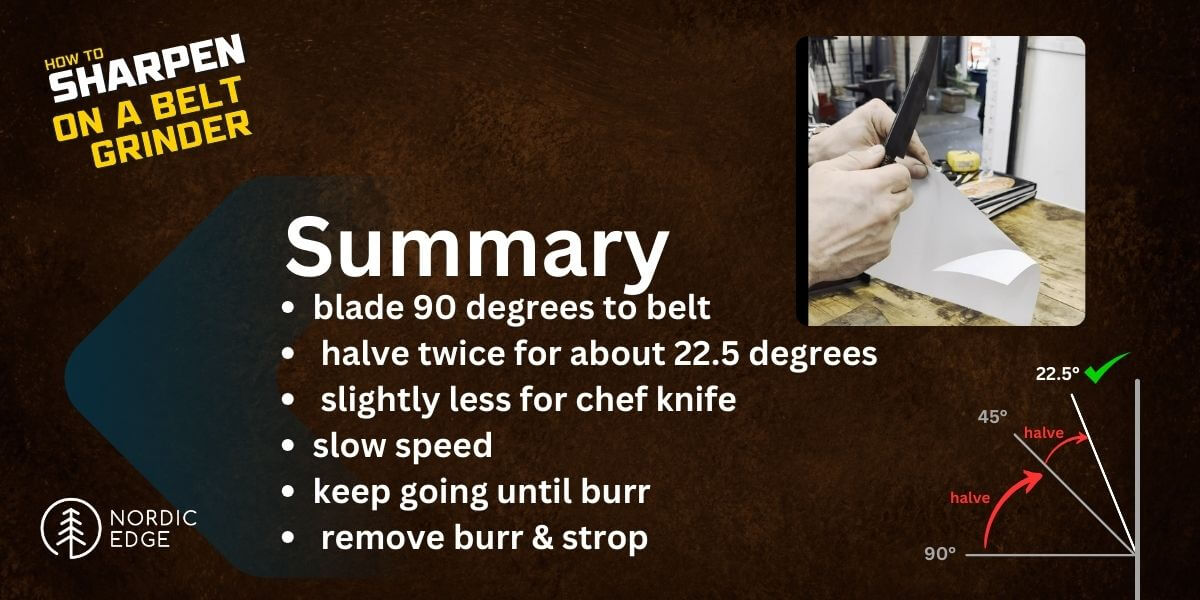
In summary, the 2 concepts to think about when sharpening is to use the right angle and to keep going until you get a burr.
- Place blade 90 degrees to the belt and halve the angle twice, for approx. 22.5 degrees
- Use slow speed – really slow
- Keep going until you got a burr on both sides, from heel to tip
- Remove the burr and strop for a razor sharp edge
Youtube video
If you want to see it done in a video, here is a 3 min clip following the above steps:
Recent Posts
-

The Etch Test: Ferric vs Hydrochloric vs Gator Piss
The Etch Test: Three Very Different Looks From One Steel One of the great things about knife making …3rd Jan 2026 -

Why Bed The Tang In Epoxy - Then Knock it OFF Again.
What is "Bedding the tang"? Bedding the tang means gluing a stick-tang blade into the handle block i …21st Mar 2025 -

Marble Leather - How to Dip Dye Veg Tanned Leather
This was my first experiment with hydrodipping or dip dying leather, and it came out pretty cool! I …14th Mar 2025