
San Mai Recovery and Our Veterans Forge
What is san mai?
San Mai is a term used to describe laminated steel, a sandwich of blade steel in the middle and cladding of some sort on the sides. The cladding can be another blade steel or something that will not harden, the point is more that when the finished blade is etched, the different materials will contrast.
The difference when working with San Mai is mostly about making sure you expose a similar amount of core steel on each side when grinding, and that final step of etching the blade to bring out the contrast between the core and the cladding.
But there are some other differences too, more about that shortly..
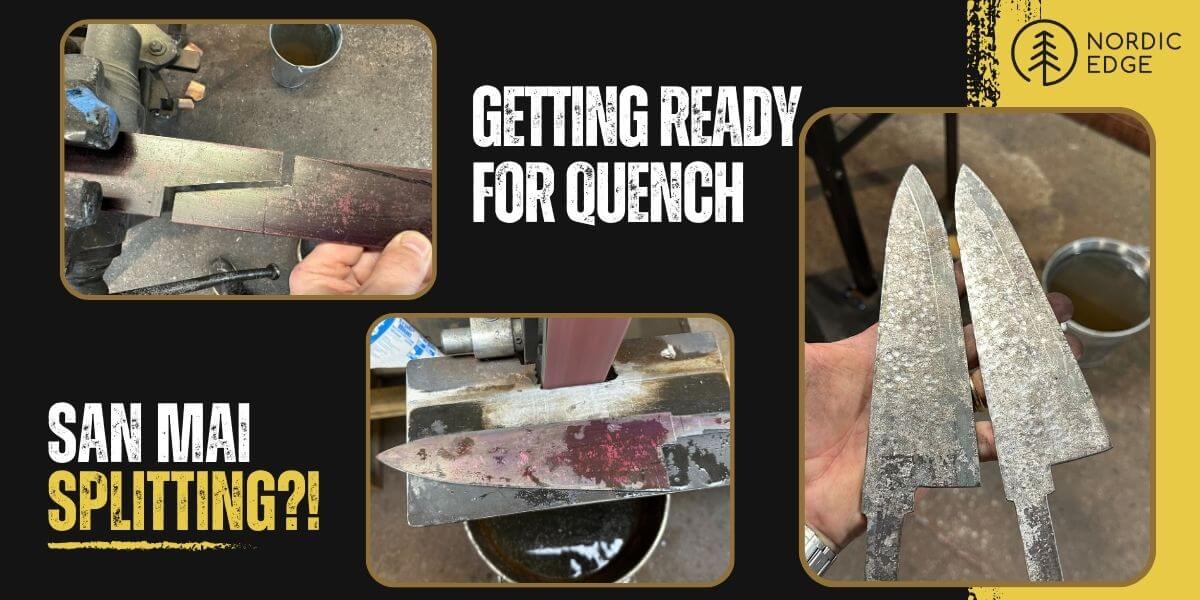
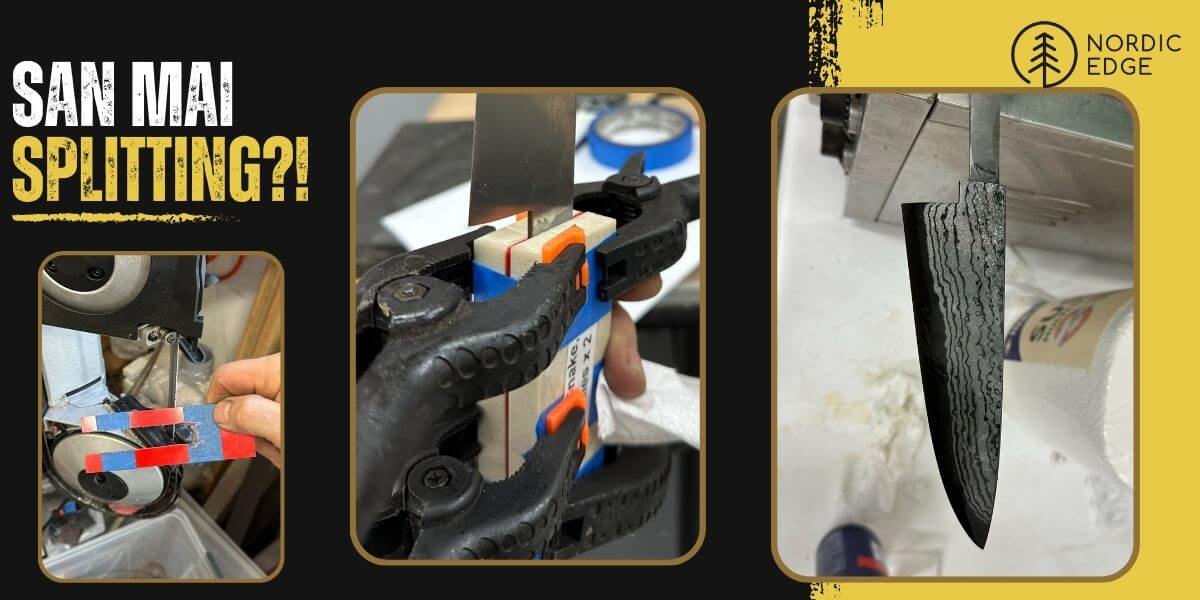
The steel used here is from Takefu Specialty Steel, a laminate of carbon steel damascus cladding on V-Toku2 carbon blade steel. I have used this exact steel before with no issues, the below shows how important it is to follow the right process and not stray too far off the path when working with advanced steel. The issue here is no fault of Takefu – this was all me ?
Preparing for the quench
One additional step I have learned to do with san mai where the cladding is lots of thin layers, is to cold hammer the steel for more texture. This disturbs the thin layers of the cladding, helping to create more pattern in the final blade sides. This is done before heat treatment while the steel is soft, staying well away from the edge itself.
After the cold hammering, the blades are hammered back to flat, and we are ready for heat treatment… or so I thought. This is where I made my first deviation from the process that worked so well last time; surface grinding.
(more info on cold hammering: LINK)
Surface grinding the blades – mistake #1?
The cladding here is not a steel that will harden, there is nothing to save in time or abrasives grinding off the sides before heat treatment. But I was considering leaving some black forge scale on the sides and spine of the blade, and thought it might be a good idea surface grinding the blades before heat treatment. If this actually increased the risk of failure by making the cladding uneven in thickness, I am not sure of. But it is another point that could introduce stress in the steel.
Being Takefu Suminagashi clad V-Toku 2 steel with 20 layer Damascus cladding, I followed the same recipe as last time from Jake Summerell:
- 750 C for 30 mins
- 815 C for 10 mins
- Quench in warm oil
- Temper for 2 hours at 180C x 2
Time for mistake #2 – delay tempering
Delaying tempering is generally considered a bad idea in knife making, the theory being that if you get onto the stress relieving tempering as soon as possible this is better for the steel. Many heat treatment recipes calls for tempering to start before the blade is even down to room temperature.
But then on the other hand we know that cold treatment between quench and tempering can increase final hardness of the blade (Read more on knifesteelnerds here: LINK )
As the kiln was hot from the heat treatment, I was unable to temper straight away so I wrapped the blades in wet kitchen paper and popped them in the freezer for maybe an hour before going home to temper.
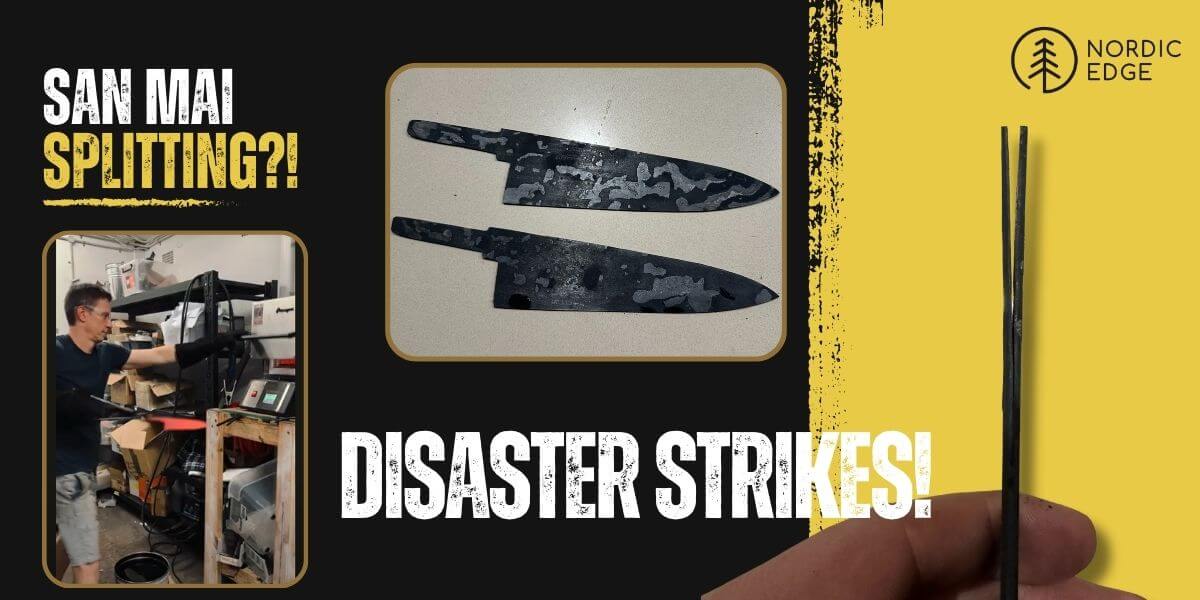
Disaster strikes!
After tempering in the kitchen oven for 180 C for 2 hours, I cooled the blades in the sink… only to discover that both blades had cracked tips! I had not noticed this from the quench while drying off the blades or when handling them in or out of the freezer. To my mind at least it seemed to have happened during the temper but might have been during the quench (?).
The blade in the photo on the right above had cracked a lot, at least 50 mm or more from the tip while the other blade had cracked maybe only half of that.
Recovery is always possible
First I was a bit upset, thinking the steel was lost and nothing could be done. But after a while I thought I might temper another 2 hours and try to save the blades. After tempering I knew the steel would be stable and if grinding off the damaged sections, the rest should still make a good blade!
This was after all some expensive Japanese specialty steel and I knew how nice it would look when etched in acid to bring the pattern out.
How to avoid splitting San Mai steel?
Over the following days I spoke with several experienced makers who all have done lots of san mai blade knives, and all have used this exact steel with good results. The below is a summary of what they think might be the issue and more importantly how to avoid it in the future.
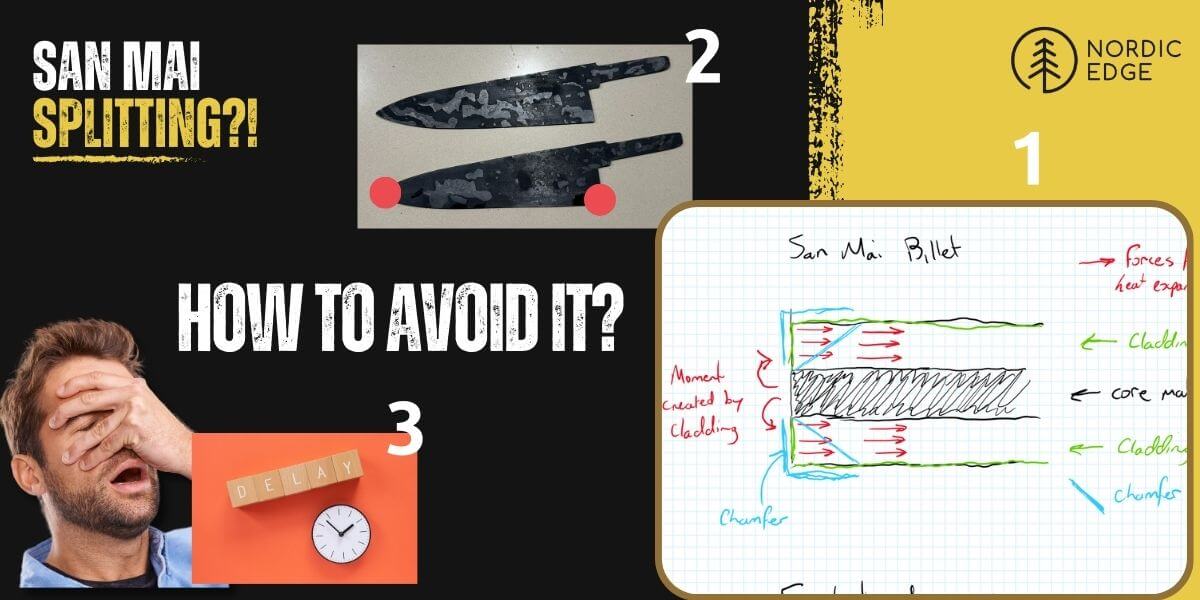
1: Bevel edges on all San Mai (Jake Summerell, 116 Blades)
Jake made the drawing in the photo above, showing how the core steel and cladding steel will move at different speeds during the quench. This is a very stressful split moment for the steel, and the cladding can exert pressure away from the core, literally ripping the steel core apart.
Jake suggests that all san mail steel should be bevelled before heat treatment. Rounding the spine and bevelling away from the edge for 1-2 mm will reduce the volume of cladding steel near the edge, reducing the ability to tear the core steel apart in the time the steel is cooling down.
2: Spread the load (Jamie Bishop, Sausage Man Forge)
Jamie said this exact topic was something covered on a webinar he took part in from Takefu Specialty Steel. The Japanese manufacturer explained that with the cladding contracting and moving at a different speed than the blade steel, large forces can be applied to the core steel in the sharp corners like the tip and heel of the blade. Takefu had advised that one way to avoid the issue could be to leave the tip and heel oversized to spread the forces out on a larger area. (the red circles in the photo above)
3: Do not delay tempering (Mert Tansu, Tansu Knives)
Mert suggested that for san mai billets it might be safer to not delay tempering, avoiding the cold treatment step and go straight into tempering as quickly as possible. Mert is not saying to avoid cold treatment but that if in doubt, it might be safer to go for a quick temper over a small increase in hardness from cold treatment.
For my part I think I will for next time
- Heat treat in the forge to keep the kiln free
- Temper straight away in the kiln
- Not surface grind the blades before heat treatment
And if that all works well, maybe try the cold treatment step again later to see if that introduces issues or not.
Recovery: How to recover from the damage?
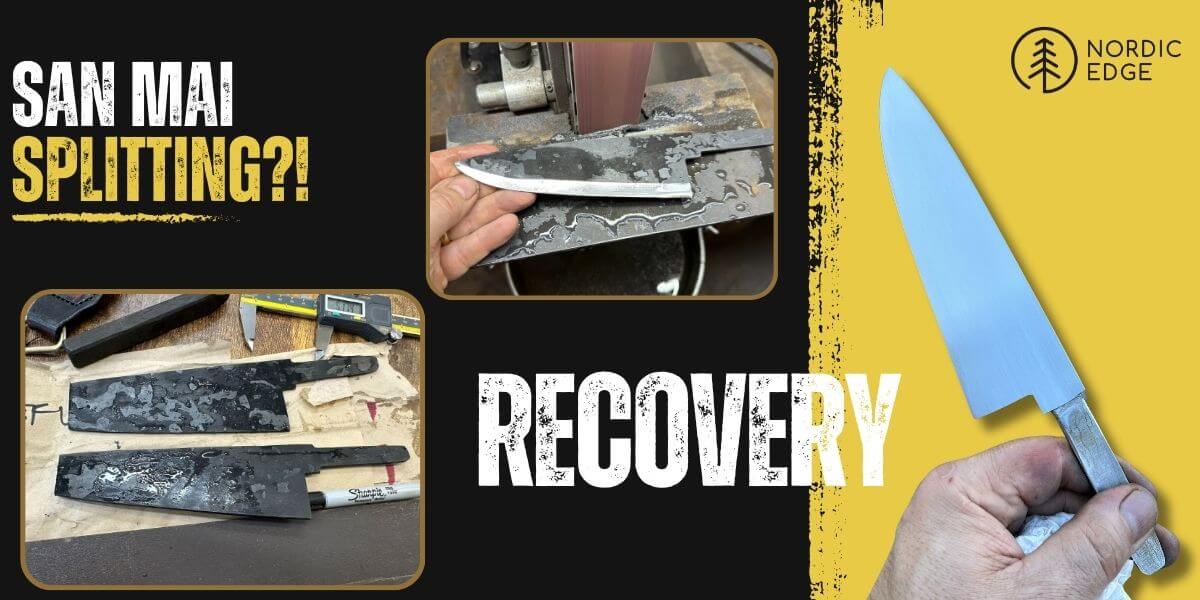
Inspecting the blades closely, it was only the tips that were cracked. Slamming them down on an anvil seemed to create no further issues so I decided to try to salvage the steel and see if we could make it into something nice still.
After cutting back the tip until I had clean steel and grinding off a bit of the edge just in case it did have any issues, I actually had quite a decent piece of steel left!
So I drew a shorter version of the blade, thinking this could be a nice medium-sized chef knife if it all worked out well.
Grinding the blade, I ground it to a distal taper thinning towards the tip. I really like kitchen knives to have distal taper, it make the knife lighter and more nimble. With the cladding you need to make sure to not grind through the cladding – otherwise you are left with core steel only.
It might be nice on outdoor knives to have full spine thickness towards the tip, it certaintly makes for a stronger, stiffer blade. But in the kitchen a nimble, lighter blade is better than a strong, inflexible blade in my opinion.
The recovery was going great, there were no more issues with the blade.
Grinding even sides
With san mai a key point is needing to grind even sides. If you have ever seen a san mai blade where one side has more pattern/cladding than the other side, it is because the blade was not ground symmetrically. To have a similar look on both sides you need to grind one side until you see core steel, then repeat this on the other side.
Some san mai billets have the core not very well centered, the cladding is thicker on one side than the other. This is resolved by grinding until you see core, then repeating on the other side as you centre the core in the cladding this way.
And as with all san mai steel where the cladding is not blade steel, we need to grind until the entire edge length is core steel. Sometimes you might see a blade with black etched core steel on one side while the other side has Damascus cladding touching the edge – that blade should have been ground more on the side with cladding touches the edge.
So while grinding bevels I moved the etching container with ferric chloride into the grinder room. Every now and then I would dip the blade for 5 seconds, enough to clearly show where the edge steel and cladding transition was on each side.
Time to etch in acid
After grinding the blade on the belt grinder with 3M Cubitron II belts it was back on the disc grinder to flatten the sides. This saves a large part of the hand sanding, cutting the hand sanding down to a couple of hours for both sides combined.
This is another beauty of dealing with San Mai steel - not only does it look beautiful when etched but the non-hardened cladding is easier to sand flat than hardened steel.
After hand sanding the blade was etched in ferric chloride for 15 minutes and left to dry for the oxides to set before being oiled and then waxed. Some of the black colours will come off in use, but it can always be re-etched in instant coffee if the owner wants to recover the black contrast.
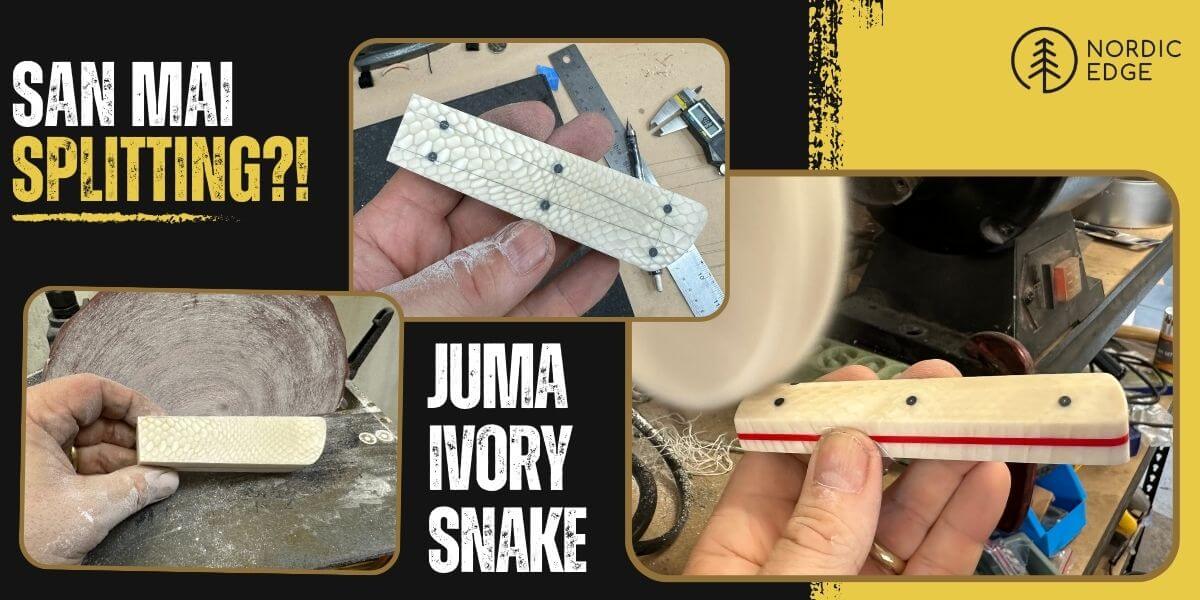
Pancake style handle in Juma Ivory Snake
Juma Ivory Snake is one of the colours the German company Elforyn make their 3D pattern handle materials in. I have no idea how this is done but somehow the snake scale pattern go all the way through the material, and is revealed more and more while grinding the handle. It has a nice warm feel to it, is easy to work and looks really stunning when sanded and buffed.
With the busy blade I thought a neutral or plain coloured handle might be the way to go, so the ivory coloured synthetic scales seemed a good fit.
The handle construction is a “pancake style” where I ground the tang to 2 mm using a Nordic Edge file guide. Then 2 layers of G10 spacer material is taped together and the tang is drawn on before the tang slit is cut out. This double layer of G10 now fits the tang inside, and this is all glued in between the scales of Juma Ivory Snake.
All parts being glued were flattened on sand paper on a hard backing first, then epoxied together, making sure to not leave too much glue in the tang slot. Smearing the blade tang with Renaissance Wax and leaving it in for a couple of minutes before pulling it out ensures a good tight fit.
G10 pins - strong and flexible
This is probably the only knife I have ever made so far with 6 handle pins. Usually I do only a couple of pins on the centreline or slightly above the centre, but this time I wanted 6 smaller diameter pins.
So I marked lines along the straight spine 15 mm from each end for the outer sets of pins, then divided the remainder in half for the middle set of pins. The pins themselves are 1/8” black G10 pins, the same material as the red middle spacer section.
G10 is a fiber glass product, flexible and very strong. I like the black pins against the ivory coloured juma and the red back spacer material.
Shaping the handle
After the glue has set, the front of the handle is squared up and the blade is refitted. There is always a little glue that got into the tang hole, I use a small rasp to clear it out until the blade fits again.
Then it is onto my favourite part of the entire knife build – the handle shaping!
I love this part, taking my time and trying to get better at making the sides symmetrical. Taking my time and being accurate are not strong suits of my knife making. I am more a fan of “whack it and see what happens” but when it comes to handle shaping I am trying to learn to slow down and taking my time.
The result is that I am having more fun with this part now, taking the time to draw on lines with callipers, height gauge and mechanical pencil. Then grinding to the lines before going back out and drawing on new lines.
The actual grinding is done with a Zirconia belt on the 84Engineering Shop Mate grinder staying well outside of the lines. Then it is onto the disc grinder at slow speed and taking my time getting as accurate lines as I can.
This part is so much fun, seeing the handle lines come to life and the accuracy on the disc grinder is day and night compared to what a belt grinder can do.
I start by drawing a straight line following the spine over into the top of the handle, then moving this line up a couple of millimeters. This becomes the flat top of the handle, the underside starts a few mm under the ricasso line then tapering away slightly so the end of the handle is wider than the start.
I do the same when seen from above, the handle tapers towards the blade, being wider at the rear than at the blade.
After the disc grinder I hand sanded the handle to 1500 grit, rounding all the corners a bit as the disc grinder is so accurate it leaves maybe a bit too sharp corners. Before it was time for some polishing on the bench grinder and the handle was done!
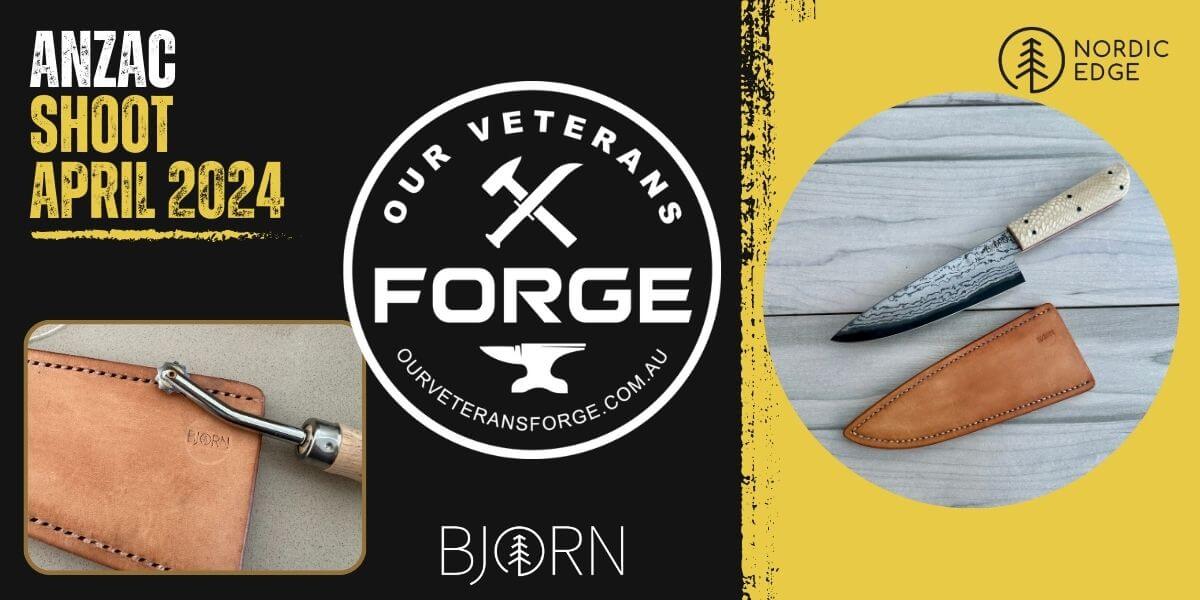
Our Veterans Forge Charity Auction April 2024
Our Veterans Forge is a non for profit organisation set up by veterans to help other veterans with PTSD and other associated medical issues after discharge from the Australian Defence Force. One of the valuable things OVF is doing for their community is to introduce veterans into longer-term programs including blacksmithing among other things. This helps teach new skills as part of finding a renewed sense of purpose and engagement in what can be a difficult time.
On April 20th and 21st 2024 Our Veterans Forge is taking part in the ANZAC Shoot IPSC with Jarrahdale Sporting Shooters to help raise funds supporting Veterans programs in Western Australia.
When Nigel Danson from OVF asked if I wanted to donate a knife for their charity auction, I was very happy to say yes. The knife from the photos here is the one I was making for the fund raiser, and I am very pleased with how it ended up.
It was looking not too bright there for a moment when the steel was damaged.
But after a reset and some recovery work it got a new purpose in life, and I hope someone will take a liking to it.
Our Veterans Forge: LINK
In case you want to see a short clip of the build, check it out on Instagram here:
Recent Posts
-

The Etch Test: Ferric vs Hydrochloric vs Gator Piss
The Etch Test: Three Very Different Looks From One Steel One of the great things about knife making …3rd Jan 2026 -

Why Bed The Tang In Epoxy - Then Knock it OFF Again.
What is "Bedding the tang"? Bedding the tang means gluing a stick-tang blade into the handle block i …21st Mar 2025 -

Marble Leather - How to Dip Dye Veg Tanned Leather
This was my first experiment with hydrodipping or dip dying leather, and it came out pretty cool! I …14th Mar 2025