
The Etch Test: Ferric vs Hydrochloric vs Gator Piss
The Etch Test: Three Very Different Looks From One Steel
One of the great things about knife making is how much variety you can get from the same material, just by changing your finish.
Etching is a perfect example of this. By using different etchants on the same steel, you can dramatically change how a blade looks — even when everything else stays the same.
In this test, we took one steel, finished three blades, and etched each one using a different etchant. The results were surprisingly different, and we think it’s a great example of how much room there is to experiment.
Why Etch a Knife Blade?
For hobby knife makers, etching is a simple and accessible way to add character and contrast to a blade. As the steel reacts with the etchant, different alloys respond in different ways — creating contrast, texture, and visual depth.
This becomes especially interesting with laminated steels, where each layer reacts differently. In many cases, the visual result after etching is one of the main reasons we choose a particular material in the first place.
Steel Used in This Test
For this experiment, we used a pre-hardened VG10 San Mai billet.
Pre-hardened billets are popular with stock removal makers because they save a huge amount of time — no heat treatment required. You can simply grab one and start grinding.
Billet construction:
- Core: VG10 / 10Cr15CoMoV
- Cladding: 316 stainless steel
- Intermediate layer: Pure nickel
The 316 stainless cladding is highly corrosion-resistant (often called marine grade), so in theory it should etch less than the core steel. The thin nickel layer is there to create a clean, bright line between core and cladding — at least when everything goes to plan.

Grinding & Prep Process
All three blades were finished the same way before etching.
Grinding:
- Stock removal on pre-hardened steel
- Profiling and bevel grinding to 180 grit on the 2×48” Shop Mate
- Belts used: Cubitron II 767F in 36, 60, and 120 grit
- Blade frequently dunked in water to avoid ruining the temper
Refining the finish:
- Moved to the 84Engineering Plunge Platen
- Belts: 180, 400, and 600 grit aluminium oxide
- This setup removes scratches fast and leaves a uniform finish
Hand sanding:
- 600 grit with hard backing
- 600 and 1000 grit with soft backing
- Result: a clean, shiny blade ready for etching
Cleaning:
- Hot water and dishwashing liquid
- No shortcuts here — clean steel matters
The Etching Process
- Single etch: 20 minutes
- Neutralised with Windex
- Rinsed thoroughly with warm water
- Light oil applied afterwards
Even though these blades are stainless, a bit of oil after etching never hurts.
The Etchants Used
Ferric Chloride
The most common knife steel etchant. Widely used on carbon steel and Damascus.
- Typically diluted 1:3 or 1:4 with water
- Familiar, predictable, and easy to work with
Hydrochloric Acid (Muriatic Acid)
Often used when ferric chloride isn’t strong enough for stainless steels.
- Used undiluted
- Readily available (this one came from Bunnings)
Gator Piss
A custom knife etchant made by Baker Forge & Tool (USA).
- Designed to achieve in a single etch what often takes multiple ferric cycles plus coffee etching
- Comes pre-mixed at the correct strength
- Very easy to use
The Results
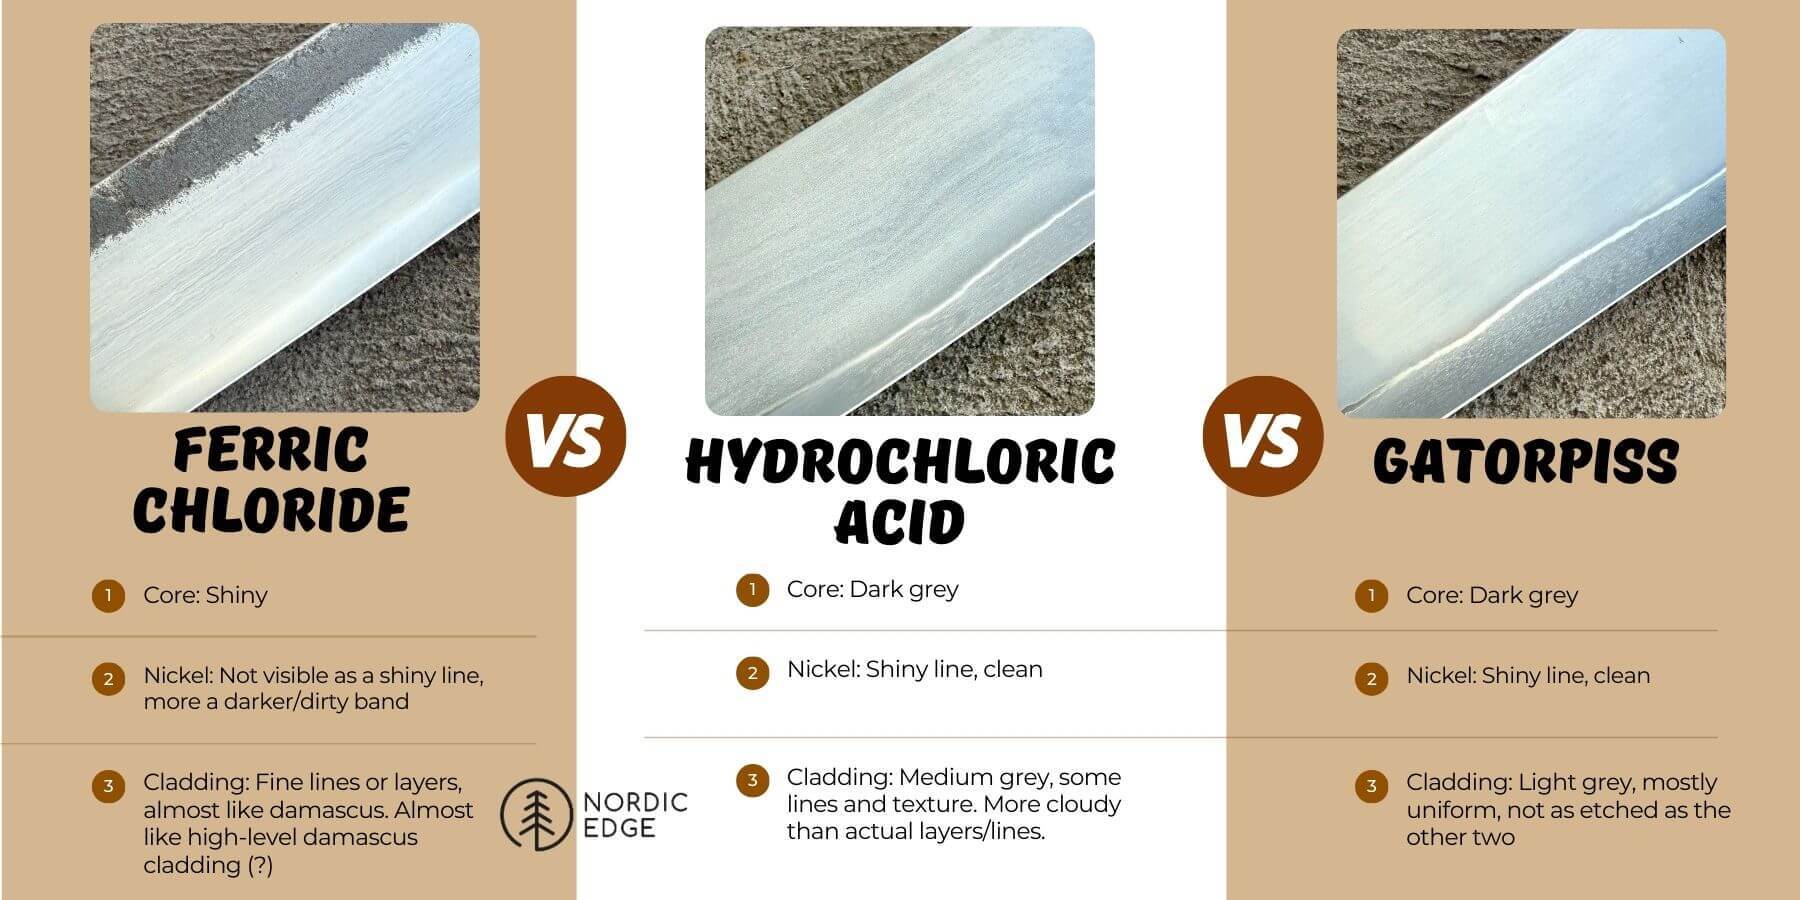
Ferric Chloride Etch
This one surprised us.
- The core stayed quite light
- The 316 stainless cladding etched far more than expected
- Visible lines or “layers” appeared in the cladding — almost like high-level stainless Damascus
- These lines were not visible at all before etching
The downside?
The nickel layer all but disappeared, leaving a darker, slightly dirty-looking band instead of a clean shiny line.
Still, the cladding effect is very cool — and definitely something worth exploring further.
Hydrochloric Acid Etch
- The core turned dark grey
- The nickel layer stayed shiny
- The cladding became a medium grey with a cloudy, swirly texture
This was the least striking of the three, but still a respectable result. The cloudy texture gives the blade some character, and polishing with 0000 steel wool didn’t remove it — meaning this look should hold up well in use.
Gator Piss Etch
This one delivered the most contrast.
- The core etched to a consistent dark grey
- The cladding was least affected, staying relatively bright
- The nickel line remained clean and shiny
Because the cladding etched less and the core etched more, the contrast between layers really stood out. Clean, sharp, and very intentional-looking.
And the Winner Is…
For us, Gator Piss produced the best overall result.
The strong contrast between core and cladding, combined with a clean nickel line, made this blade stand out the most. That said — we’ll absolutely be using Ferric Chloride again. Those unexpected layers in the cladding look fantastic, and there’s clearly more to learn there.
Which raises some interesting questions:
- What happens if you etch in ferric first, then follow up with Gator Piss?
- Could ferric create the cladding layers, and Gator Piss bring the nickel back?
- What about ferric followed by instant coffee — would that finally darken the stainless core?
Plenty more experiments to come.
Which etch would you choose?
Tools & Supplies Used
- Gator Piss – LINK
- Ferric Chloride – LINK
- Hydrochloric Acid – LINK
- VG10 San Mai billet – LINK
- Pre-milled handle blocks – LINK
- Cubitron II 767F belts – LINK
- 84Engineering Plunge Platen – LINK
Recent Posts
-

The Etch Test: Ferric vs Hydrochloric vs Gator Piss
The Etch Test: Three Very Different Looks From One Steel One of the great things about knife making …3rd Jan 2026 -

Why Bed The Tang In Epoxy - Then Knock it OFF Again.
What is "Bedding the tang"? Bedding the tang means gluing a stick-tang blade into the handle block i …21st Mar 2025 -

Marble Leather - How to Dip Dye Veg Tanned Leather
This was my first experiment with hydrodipping or dip dying leather, and it came out pretty cool! I …14th Mar 2025