null

Nordic Whittling Kit

(1 review) Write a Review
Gift wrapping:
Options available
default:
PolarWhittler/SilverBirch/R30/VulcSpacer
  • Nordic Whittling Kit
  • Showing the Polar blade with Silver Birch handle block, a nickel silver bolster and some spacer materials.
  • Mark where the tang is to be cut, and cut with dremel, hacksaw, angle grinder or just file it off with the corner of a flat metal file.
  • Cutting the tang is optional, but generally the tang is left about 2/3 of the handle length only. If there are more pieces in the handle, make sure the tang extends well into the last piece.
  • filing the sides of the tang, fitting the bolster. The bolster fitting is the single most time consuming part of completing the kit. Take the time required to get a nice, clean transition between blade and bolster.
  • The bolster now fits almost all the way up to the blade, from here on in it will be small adjustments inside the bolster.
  • Using a needle file small enough to get inside the bolster, round the edges and make the slit longer if required. Keep test fitting on the blade until it fits all the way up.
  • Nordic Whittling Kit
  • overview of tools required. Having more tools, like a belt sander and dremel will make it easier. Not shown in the dust mask which is the single most important part. Do not create wood dust without wearing a mask, and do not sit around in dusty work clothes when ready.
  • Putting a mark on the bolster showing which way it goes is helpful both when filing and later when gluing.
  • draw the tang on the side of the handle block, and decide if keeping the handle in one piece, or if cutting it into smaller pieces. Shorter pieces are easier to work as they can be drilled from both sides, and offers the option of using inlays, or another kind of wood.
  • showing the handle block with hole drilled.
  • Optional: Clamping the wrapped blade to something and hammering down the bolster than last mm for a tight fit.
  • All components are wiped with aceton to prepare for the gluing. Using max strength epoxy (24 hours) is recommended over using the quick setting 5 min versions. The Max strength is both stronger, and gives you more time to get everything together.
  • The next day, showing the glued up knives ready for handle shaping. Notice the different versions of silver birch, some are mostly white and straight grained while the piece on the right has some curliness in it.
  • To shape the handle, start by removing wood all the way down to the bolster in front. Try not to get a too big step up from blade to bolster, the closer the handle starts by following the line drawn from the blade, the more flowing it often appears. This step is where you decide the length, diameter, lines etc of the handle of your knife. Clamp the blade to a table and use a wood rasp, or better yet use a floor belt sander upside down in your lap or better again a linisher/woodworking belt sander.
  • Keep turning the knife around and around holding the tape wrapped blade, this helps centering the handle on the blade and helps make it even and well rounded. Here the blade is ready, it was shaped on a belt sander. As a starting point, aim for a 12 cm handle, try not to make it too thick. It helps having a couple of other handles you like handy, to compare dimensions with. The first couple of times it is easy to make the handle a bit big.
  • Hand sand the blade using a "shoe shining" technique helps even out any marks from the rasp or belt sander. This way the handle ends up more rounded, take care not to remove too much material with the coarse paper before going finer and finer until happy. 1200 grit would be a minimum on a wood there is a bit of character in, until then there is not much happening and suddenly it starts "popping out"
  • Showing the completed handle after the first coat of oil, to seal it.
  • the completed whittler knife
  • Nordic Whittling Kit
  • Nordic Whittling Kit
  • Showing the Polar blade with Silver Birch handle block, a nickel silver bolster and some spacer materials.
  • Mark where the tang is to be cut, and cut with dremel, hacksaw, angle grinder or just file it off with the corner of a flat metal file.
  • Cutting the tang is optional, but generally the tang is left about 2/3 of the handle length only. If there are more pieces in the handle, make sure the tang extends well into the last piece.
  • filing the sides of the tang, fitting the bolster. The bolster fitting is the single most time consuming part of completing the kit. Take the time required to get a nice, clean transition between blade and bolster.
  • The bolster now fits almost all the way up to the blade, from here on in it will be small adjustments inside the bolster.
  • Using a needle file small enough to get inside the bolster, round the edges and make the slit longer if required. Keep test fitting on the blade until it fits all the way up.
  • Nordic Whittling Kit
  • overview of tools required. Having more tools, like a belt sander and dremel will make it easier. Not shown in the dust mask which is the single most important part. Do not create wood dust without wearing a mask, and do not sit around in dusty work clothes when ready.
  • Putting a mark on the bolster showing which way it goes is helpful both when filing and later when gluing.
  • draw the tang on the side of the handle block, and decide if keeping the handle in one piece, or if cutting it into smaller pieces. Shorter pieces are easier to work as they can be drilled from both sides, and offers the option of using inlays, or another kind of wood.
  • showing the handle block with hole drilled.
  • Optional: Clamping the wrapped blade to something and hammering down the bolster than last mm for a tight fit.
  • All components are wiped with aceton to prepare for the gluing. Using max strength epoxy (24 hours) is recommended over using the quick setting 5 min versions. The Max strength is both stronger, and gives you more time to get everything together.
  • The next day, showing the glued up knives ready for handle shaping. Notice the different versions of silver birch, some are mostly white and straight grained while the piece on the right has some curliness in it.
  • To shape the handle, start by removing wood all the way down to the bolster in front. Try not to get a too big step up from blade to bolster, the closer the handle starts by following the line drawn from the blade, the more flowing it often appears. This step is where you decide the length, diameter, lines etc of the handle of your knife. Clamp the blade to a table and use a wood rasp, or better yet use a floor belt sander upside down in your lap or better again a linisher/woodworking belt sander.
  • Keep turning the knife around and around holding the tape wrapped blade, this helps centering the handle on the blade and helps make it even and well rounded. Here the blade is ready, it was shaped on a belt sander. As a starting point, aim for a 12 cm handle, try not to make it too thick. It helps having a couple of other handles you like handy, to compare dimensions with. The first couple of times it is easy to make the handle a bit big.
  • Hand sand the blade using a "shoe shining" technique helps even out any marks from the rasp or belt sander. This way the handle ends up more rounded, take care not to remove too much material with the coarse paper before going finer and finer until happy. 1200 grit would be a minimum on a wood there is a bit of character in, until then there is not much happening and suddenly it starts "popping out"
  • Showing the completed handle after the first coat of oil, to seal it.
  • the completed whittler knife
  • Nordic Whittling Kit
€54.58

Description

Whittler Knife Kit

Make your own version of a classic whittling knife.

The kit consists of

  • Polar Whittler Blade, 80 mm
  • Metal bolster R30, choice of Brass or Nickel Silver
  • Fibre inlay, choice of Red or Black
  • Solid wood knife handle block in white Silver Birch (see Options for other woods)

This is a classic Scandinavian knife kit, with a short, sharp blade that gives good grip and power when cutting.

Blade is from Finland, made by Polar in C-0 stainless steel.

The blade is 3 mm thick, about 22 mm high and has about 80 mm of blade.

Total length from tip to end of tang is 204 mm, the tang can be cut to fit the handle.

Customize the kit by selecting the handle material, spacer material and any optional add-ons.

To complete this kit you will need to

  • fit the bolster to the tang, with a file or dremel 
  • cut the tang to size, with a file, hacksaw or dremel
  • cut off a piece of the spacer material and drill a hole for the tang
  • drill a hole in the wooden block for the tang
  • glue blade, bolster, spacer and wood together with epoxy glue
  • shape the handle with a rasp, belt sander, or knife
  • Smooth the handle with sand paper
  • Optional finish: seal the handle with oil, wax or varnish


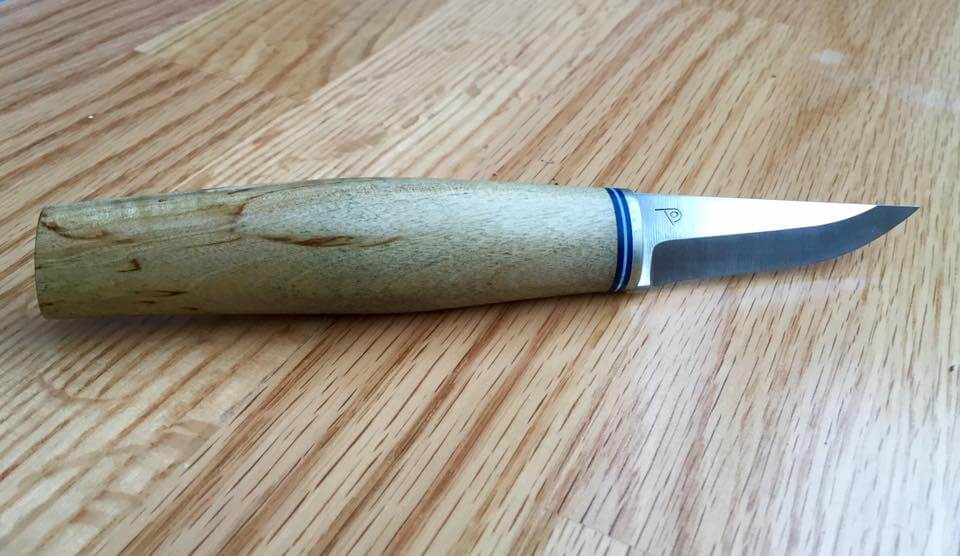
Example of a Polar Whittler Blade in Silver Birch handle, with blue and white spacers and nickel silver bolster, by Bjorn Jacobsen:
polar-whittler-creativeman.com.au.jpg

View AllClose

1 Review

  • 5
    love it...

    Posted by Unknown on 23rd Nov 2016

    So happy with the product and the service. Cant wait to put it together

View AllClose