
Making a Viking Sword - In Pictures
Who wants to make a sword!
As hobby knife makers, don’t we all want to make a sword at some point?
It doesn’t seem all that hard, it is basically just a long knife – right.. Like most other knife makers, you have probably been told by someone they want to make a sword even though they have never even made a knife. Well, I have been making knives for years and wanted to have another go at a sword so here we go!
Not quite my first rodeo
This was not my first viking sword attempt but my first “proper” build as in trying to create something that would pass for a usable sword should a 9th century Viking pop by looking for a spare sword. This blog post is to show how it turned out.
Tutorial – in pictures
This might be seen as a bit of a tutorial if nothing else it shows you the order and processes that I used. Including the mistakes and lessons I learned during the project, so if building your own you might avoid some of the issues I hit – and speed up a couple of steps by not having to re-invent the wheel yet again.
The research – Swords of the Viking Age
Ordering the book “Swords of the Viking Age” (Affiliate link: LINK) by Ian Peirce was a great eye-opener. I was not aware that all the different classifications for Viking swords are basically all about the guard and pommel. They refer to these as the “lower guard” (the actual guard) and the “upper guard” (the pommel) as they are looking at the handles with the sword tip down. The blade itself was mostly the same for centuries, a fullered blade with single or double edge.
It is a good read, and great for looking up handle shapes, dimensions and has quite a lot of interesting facts on how the swords were developed over centuries.
From the book I learned that the handles were surprisingly short. Dug up Viking sword handles are from 7 to 9.5 cm long – 9.5 being the longest ever found! When I make knives I usually make the handle 11.5 – 12.5 cm so that sounded very short to me.
Especially on such a long blade and with big guard and pommel limiting the usable handle space to whatever distance is left between the guard and pommel. But wanting it to be fairly realistic dimension wise, I decided 9.5 cm would be the limit I would stick to.
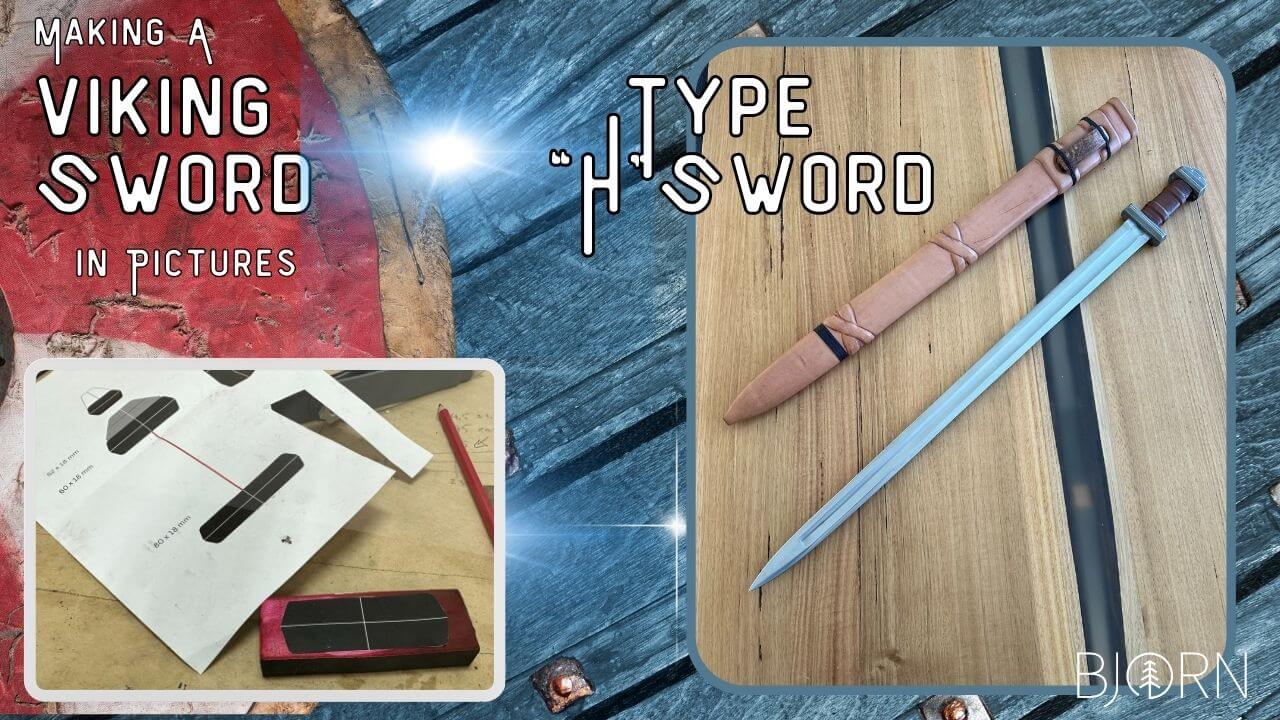
Design decision – Type “H”
From looking at the different options for sword types, I settled on a “H” type guard, being the most common guards found in 8th to 10th century swords from Norway. Not saying mine is exactly right, but H is what I aimed for at least. This is by the Norwegian Peterson classification system, there are several other versions of this classification as well. No other reason here really than I liked it, and it seemed an easier place to start without having to carve lobes on the upper guard which I was afraid would look less than symmetrical :)
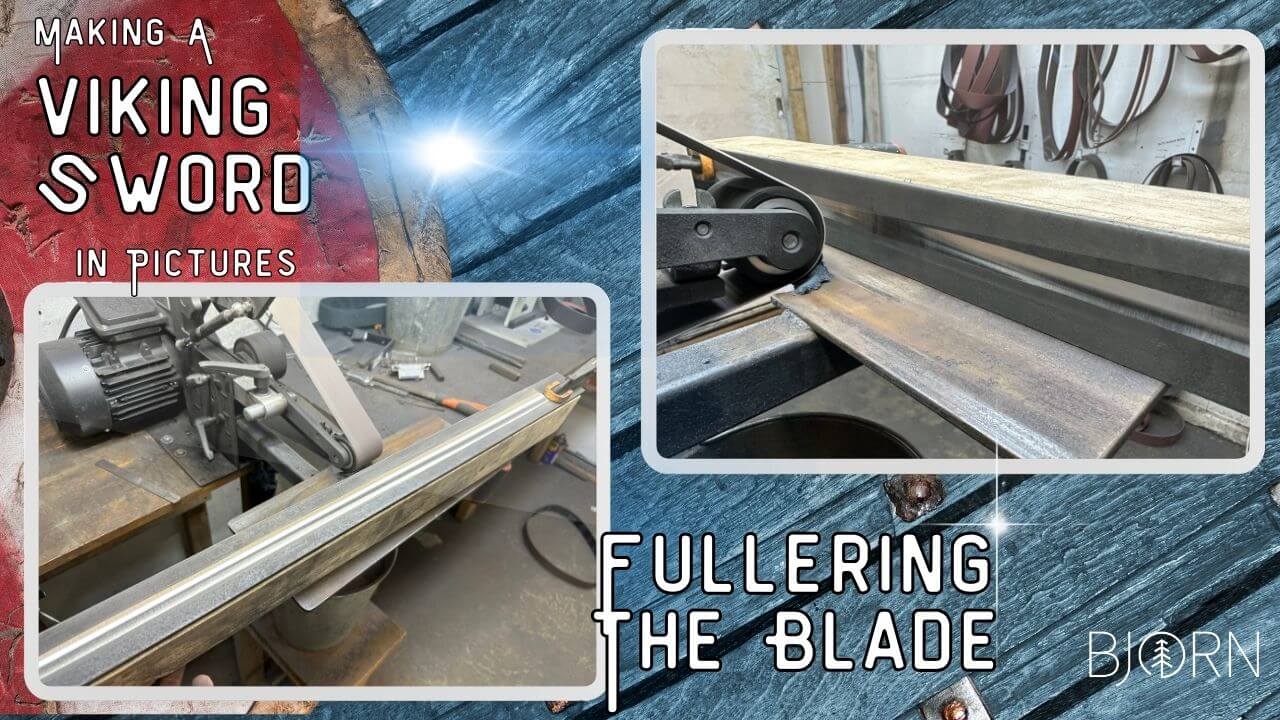
Fullering can be a challenge – Part I.
A fuller is here a groove going down the middle of the blade, reducing weight and making the blade therefore more nimble when handled. A blade without a fuller is stronger – but heaver and slower to move around. This was a step up for me, not only trying to make an even fuller but a massively long one!
From a maker point of view, it consists of grinding out the material in the middle of the steel bar on a wheel deep enough to make a real difference in cross section – without meeting the fuller coming in from the other side. The challenge is mostly around keeping it straight down the blade and to keep it an even width rather than waving in and out in width. The goal is a fuller with clean lines from guard to where the fuller ends.
Our grinders at Nordic Edge has rubber wheeels (84Engineering Shop Mates) which makes this a lot easier as I can then grind directly on the wheels.
Failure right off the boat
My first attempt was a complete failure. Taking a 6 mm bar of 1084 high carbon steel steel and free hand grinding the fuller with the steel bar on the tool rest and the top wheel of the 84Engineering Shop Mate grinder leaning forward almost touching the tool rest, I went for it.
Completely messing up a bar of steel, producing a fuller that was so bad I decided to not even trying to fix it. What happened is that the steel bar rocks on the short edge touching the tool rest. Rocking back towards me, reducing the contact with the wheel and then rocking back forward onto the grinder, grinding a wider fuller again. This resulted in a fuller that when looking at the bar of steel varied in width in and out towards the tip – as well as not really being centred in the middle of the bar. This might sound silly after grinding knives and doing so without rocking them back and forth willy nilly but try it with 900 mm of steel bar and it was a bit different.
Fullering made easy – Part II
What really worked for me, was to clamp the steel bar to a big block of wood that was so wide it could not roll back towards me and forward towards the grinder. (see photos above)
This locked the bar in to only move sideways. It was not quite as simple as it sounds, and the fuller still ended up with some wave patterns and not as clean as I would have liked. But this way I got a fairly smooth, consistent fuller. This was not my idea, I saw someone do it on Youtube and promptly copied it.
As with every other process involved in knife making, going back and doing it again or maybe even practicing before going for the actual steel bar being used would have been delivering a better result.
The height of the fuller is done by adjusting the rubber top wheel of the grinder down towards the tool rest until when barely touching the steel bar, it hit the sharpie line I had marked on the middle line of the steel bar.
PRO tip #1: Practice the fuller a couple of times before going for the production bar of steel.
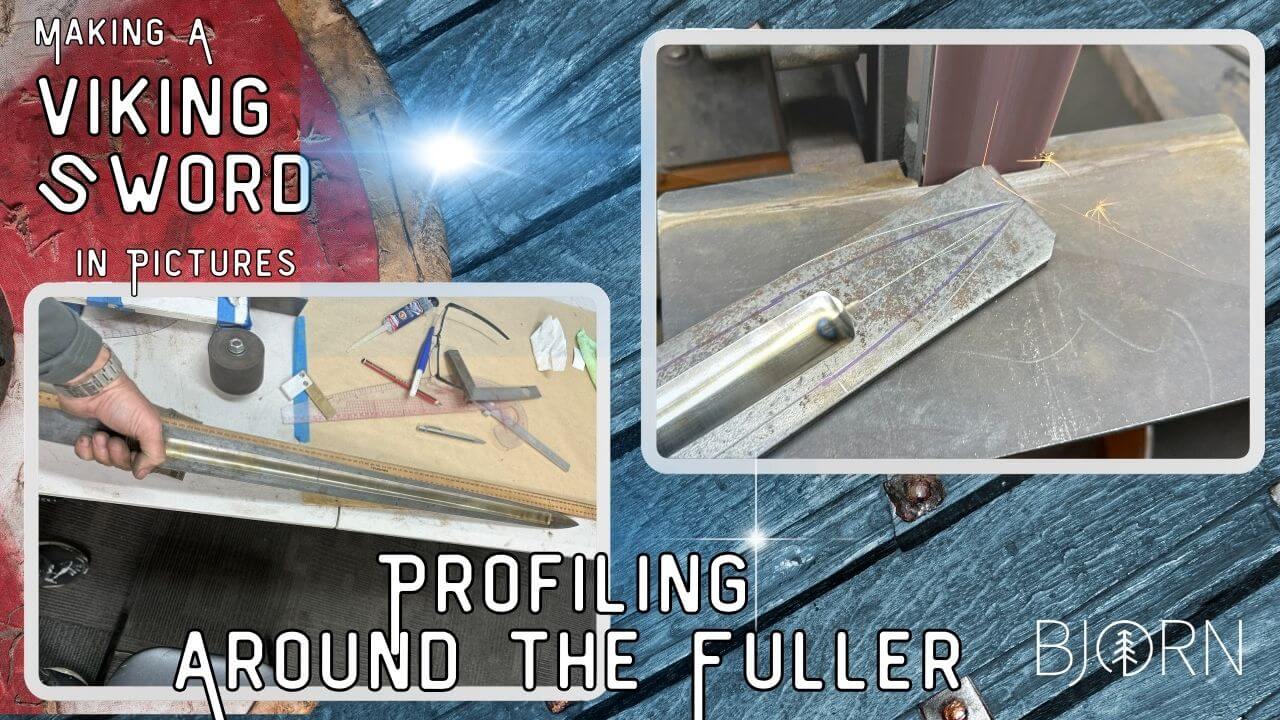
Profiling the sword blade
Because I did the fullering first while the steel bar had even parallel sides, the fuller was now going all the way down the middle of the bar. Had I profiled first it would been much more difficult to keep the fuller in the middle of the blade while it tapered to a point. (see how order of operation is important?)
So now I had an easier job marking out with callipers from each side of the fuller groove how far out the sword sides would go, before drawing on the profile and then grinding this out on a 3M Cubitron II belt (LINK).
I chose to make my profile a bit more pointy than what viking swords were in this period, let’s just call it “Viking Inspired” to not upset anyone. I went with a profile I thought looked good over a more traditional rounded tip.
I was a bit in doubt on letting the fuller go all the way into the tang. I would have liked the fuller to end in a ricasso to leave the guard to blade fit-up cleaner. But it felt like this would again have stepped away from how the original Viking swords looked and in a big way. So I went with the fuller going all the way into the tang, like on the originals.
Another thing I learned from the "Swords of the Viking Age" was that there were lots of swords dug up that were single edged. I had always thought Viking swords were all double edged. I toyed with the idea but in the end vent with a double-edged again just to try staying closer to the the original swords.
Tip and edges
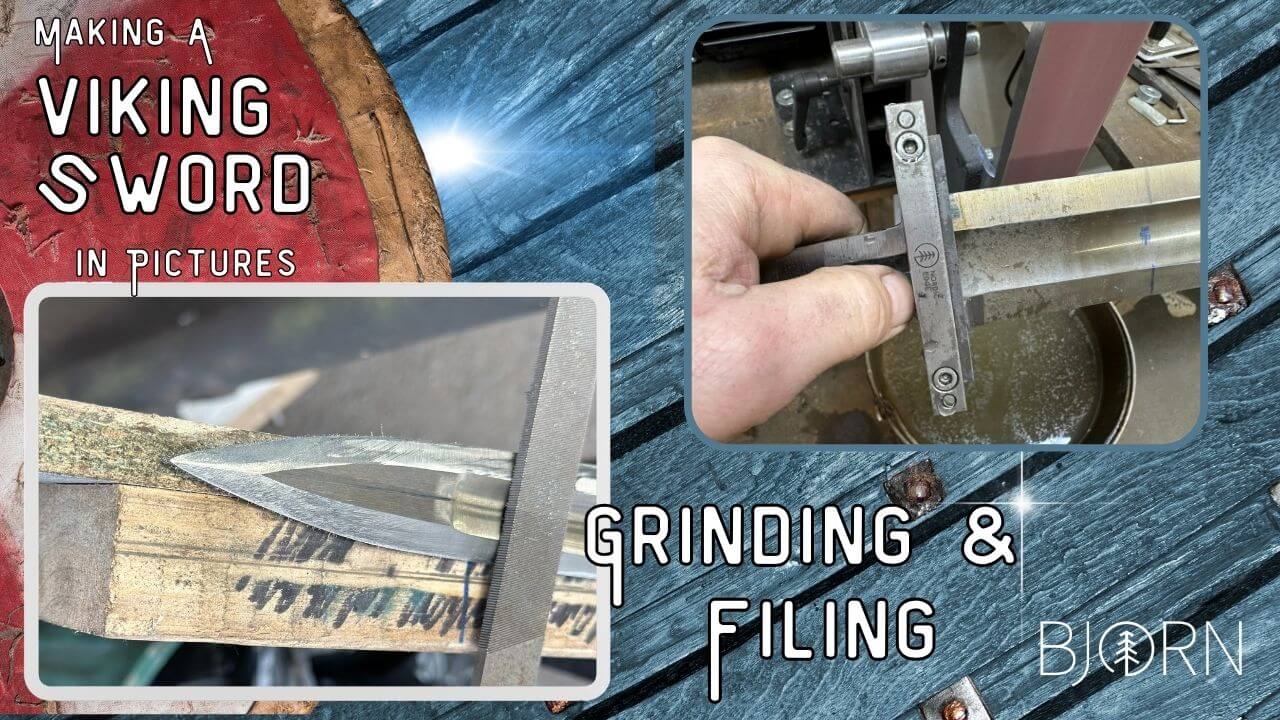
After the fuller was sanded with an old 2” rubber wheel wrapped in sand paper to even it out (which took a while), bevels were ground on the Shop Mate. Basically just a full flat grind ending in the fuller. If the fuller is straight, this is really easy.
I found it easier to get an even tip by finishing the double bevels by hand file to make sure they match, after removing a bit of material on the grinder. From the end of the fuller to the tip, these were filed to a matching bevel on each side. Before heat treat, hand filing is easy so important to do as much as possible now.
Using a nordic edge carbide faced file guide (do you know we sell them? LINK) the plunge lines were ground in on all 4 edges. Edges were left quite thick, thinking this would be safer in the quench and in the spirit of “forge thick, grind thin” I thought any steel left over would help if needing to grind off a bit or having to straighten with a carbide hammer.
The fuller is not as even as I would have liked in this area of the blade where the plunge lines are, next time I might even take the Pro Tip #1 myself ?
Two Mooseheads are better than one
When it came time to heat treating the sword, this created another challenge; not having a long enough forge! The first time I did a viking sword, I held it sideways and pulled it in and out of the forge until it had an even temp before quenching. The blade bent from the weight when hot from having ground it too thin and I knew I did not want to do that again.
Placing our two Moosehead forges (LINK) together and playing with the height until they matched, I then created a tunnel between the openings from a firebrick. Now this worked ok but was not ideal, the four burners across 2 forges creating hot spots and because the blade is so long, it cannot be hidden or tucked away in the corner under the burners like we do with knife blades.
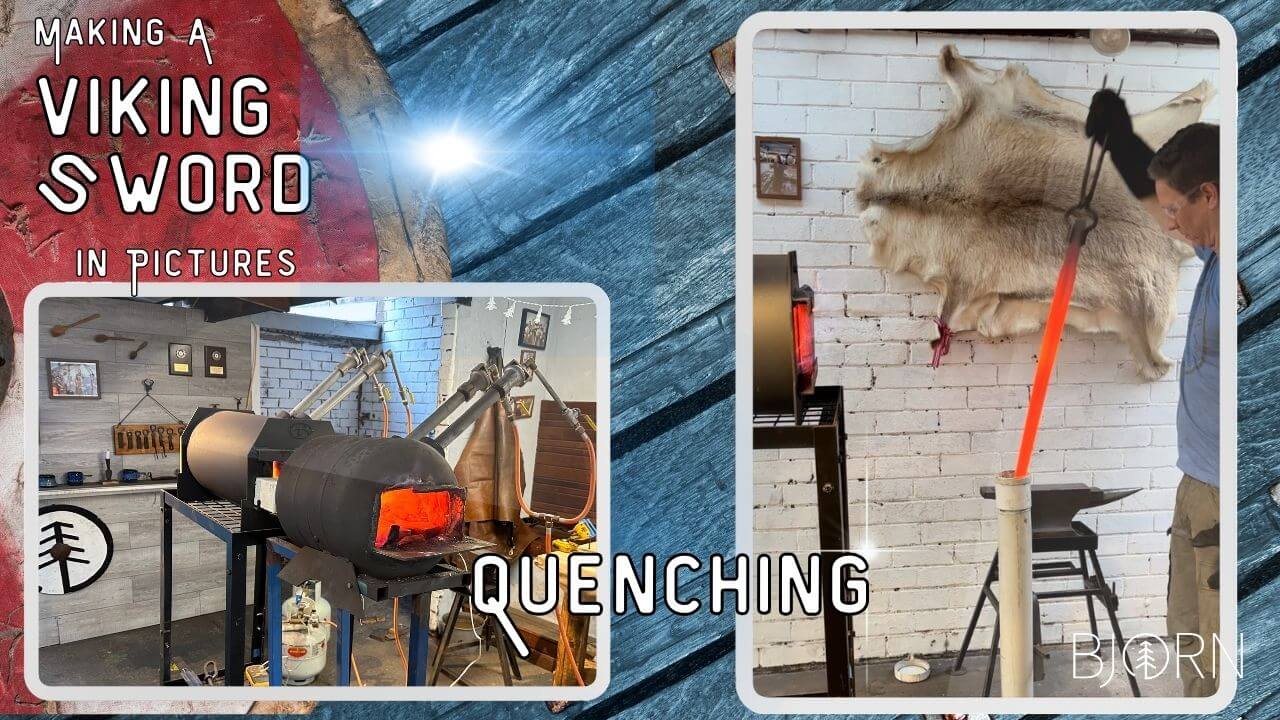
I kept moving the 1084 steel blade back and forth to even out the temperature and got through normalising cycles (3 cycles of holding at 875 C (1607 F) and letting air cool to black), before going to 815 C (1500 F) and holding/moving it for a few minutes to even out temp before quenching in a medium-speed quench oil heated up with a bar of steel.
PVC quench tank
The only thing I could find that would hold the sword length was a PVC pipe, so I filled this with quench oil and it did work.. However the pipe got so hot it deformed, it would possibly been smarter to use a steel pipe.
Pro tip #2: Metal quench tank is the way to go, but PVC pipe will work in a pinch.
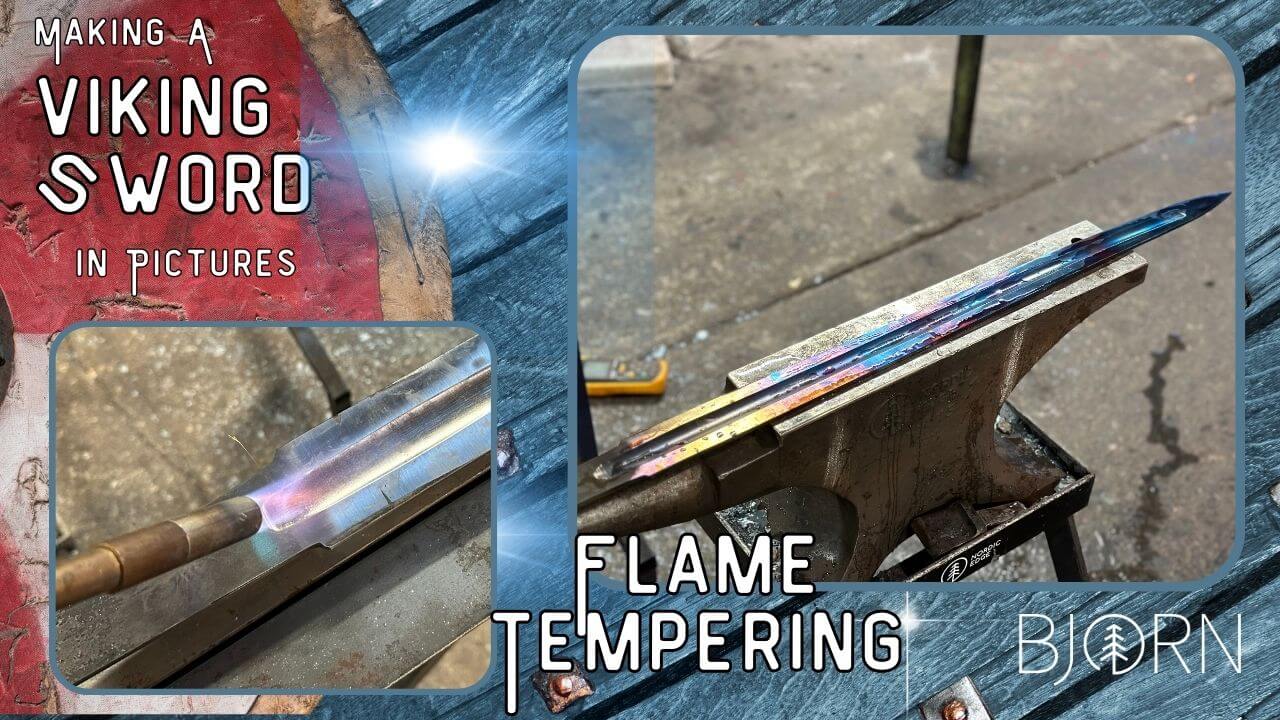
Flame tempering
After hardening the blade needs to be tempered, giving up some hardness for toughness. Being too long for our workshop kiln, flame tempering was the way to go. Flame tempering also creates a softer centre than edges which helps with added toughness which I think here might be important.
This being such a long blade, I wanted to temper at a higher temperature than what we normally do with knives, preferring a blade that bends over one that breaks. Hopefully our Viking friend coming through for a replacement sword would agree ?
Process: Grind to clean steel in order to see the tempering colours, then place up on blocks on anvil or other non-flammable surface. Lifting it off the surface stops part of the heat going through the sword and heating up whatever it is lying on.
Hit the fuller (not edges) with gas flame and wash up and down the blade, spending more time near the handle than the tip due to the smaller amount of steel heating up faster in the tip. (Had this been a single edged sword, I would have heated the spine instead of the middle, but here we had two edges to deal with)
It takes a minute or two until things start happening, then the tempering colours will appear. First light yellow, then darker, then orange before going blue/purple. I had a big wad of kitchen paper soaked in water and as soon as the steel hit blue, that section was doused in the wet paper to stop the tempering.
Keeping the flame to the middle of the fuller made the middle go warmer (softer) than the edges and allows the colours to go from the middle out towards the edges, helping with knowing when to stop it by cooling down with the wet paper. This buys you some time rather than doing each edge directly and "suddenly" having the colour appear.
Another way to do the same is to heat up a big block of steel in the forge, placing it in the fuller and sliding it up and down the blade while watching for tempering colours.
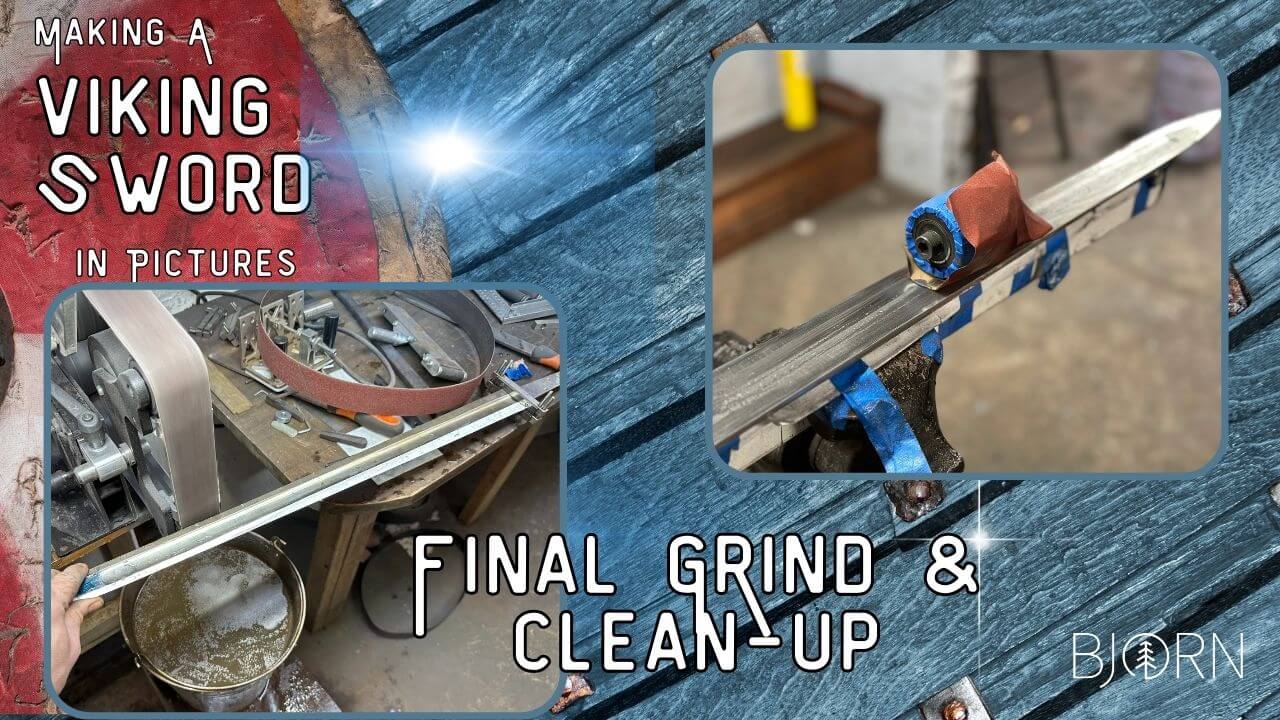
Final grinding to thin edges
After heat treatment, it is back on the grinder for grinding to final edges. At this point it felt like I had spent a lot of time on this project already and hand sanding for days and days did not seem quite the fun experience I was going for.
So after grinding to final bevels, the Scotch Brite belts came out (LINK). These are awesome at a satin grinder finish, blending in a lot of stuff that otherwise would be hours and hours by hand.
Distal taper formula
I ground in the distal taper from the tang to where the fuller ends, near the tip. Then had to redo the fuller a bit to even out the sides again before touching up the bevels for final clean up. Afterwards I read that the best handling swords have a formula for distal taper that is quite different to knives.
I cannot find the source now but from memory it was “aggressive taper the first 1/5 of the blade, then little to no taper the next 3/5 and then a taper to the tip the last 1/5”.
In my case I did it more like a knife, a gradual thinning of the blade towards the end of the fuller. This created a light blade that is easy to move around in the hand – at least to me as a complete ignorant when it comes to sword fighting. Cannot remember the last time I had to fight off anyone by sword.. So to me a gradual distal taper worked fine, but from reading about it there seems to be even better ways to do it.
Process wise, maybe it would have been smarter to first distal taper, then fuller, then profile then bevels. That way there would have been less of a need to revisit both the fullers and the bevels. If you are keeping a list of mistakes to avoid on your own build – how do you rate this one? Distal taper first or last?
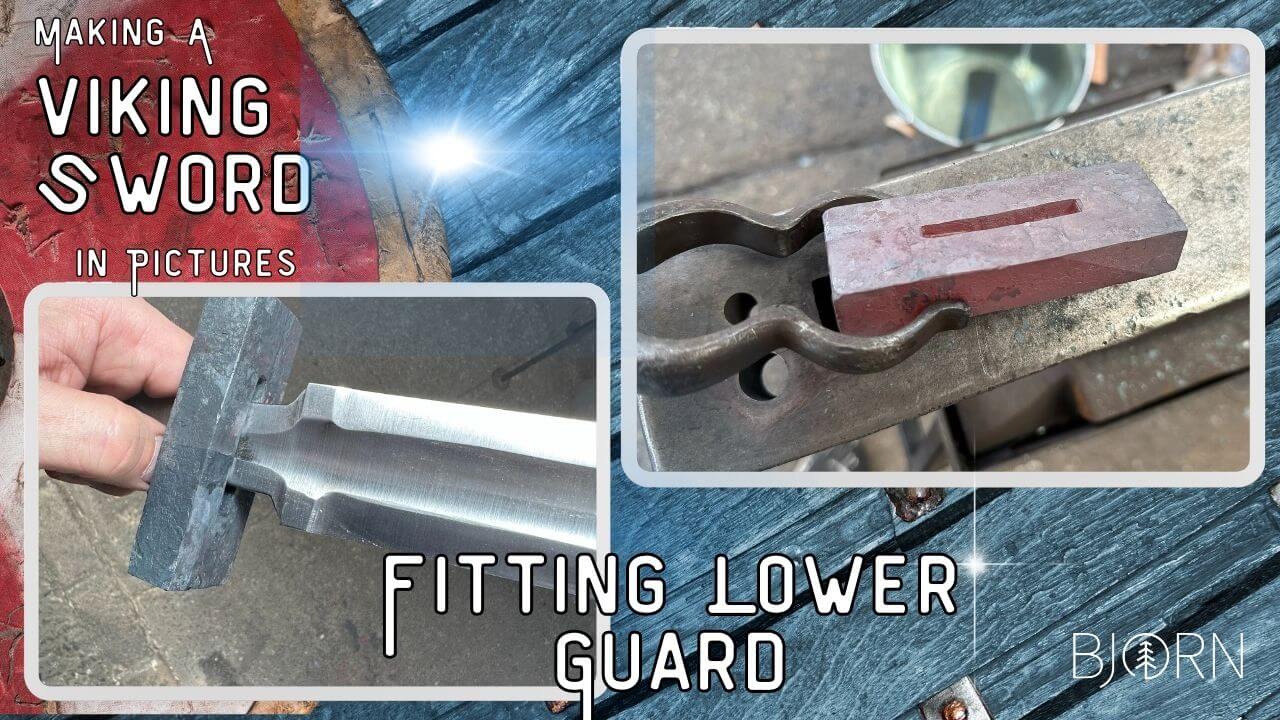
Starting the guards
For the guards I used mild steel, 20 mm thick plate. I made a drawing to scale for matching the upper and lower guard and pommel, cutting these out and using as templates after first fitting them to the tang.
Before grinding it to shape, I marked the centre line and started drilling holes for the size of the tang, then digging out the webbing between the holes with a Dremel and then files until I had a blade slot big enough to be hammered on hot.
Heating the guard up in the forge and with the blade clamped in leather in a leg vice wrapped with lots of kitchen paper soaked in water, the guard was hammered onto the tang for a good fit.
Pro tip #3: Hot fitting the final fit of the guard was easier than I had expected and much faster than filing and testing again and again.
Because Viking swords are classified by their guards with the tip pointing down, the actual guard is here called the “lower guard”. So the lower guard is now fitted to the blade and we can move on to shaping it.

The Goldilocks zone of creativity
As hobby makers we often push for “the next level” in our making, adding elements of complexity to keep learning more and to increase our skills.
This is the Goldilocks zone of wanting to pursue things just outside our comfort level in skills and experience, keeping the process of creating a learning journey as well as a fulfilling activity in itself. For this project I wanted to try silver wire inlaying, thinking it would look nice with an etched guard contrasting against the shiny silver wire inlay.
Silver wire inlay made simple
Authentic Viking swords often had silver and copper wire inlay, commonly from top to bottom of the guards, being hammered into grooves of the guard.
I wanted a simpler design with a single shiny line of silver against the etched, grey guard. Also as a beginner this seemed more achievable as first silver inlay project.
I ended up doing a whole article on this process, for the full story see this LINK
Recap here for those who want to try:
- Grind to almost final dimension, maybe 0.5 mm outside of the scribed line to have some steel to grind off when cleaning up at the end.
- Mark the centre line of the guard (or where you want the silver wire inlay if not in the middle)
- Hacksaw a slit almost the thickness of the silver wire
- Undercut the sides of the slits with a chisel
- Create teeth or flaps sticking up in the bottom of the slit with a small chisel
- Hammer in silver wire
- Grind clean to final scribe line, removing the silver wire sticking out of the groove and any marks from the hacksaw.
Temu is not great
I had ordered a set of tiny chisels off Temu. They were not great, having to regrind the face of the tiny chisel several times but it kind of worked still! At $8 or something for the set, who can complain of the quality. I was happy finding a small engraving chisel, not wanting to make it myself and grind it to an incorrect angle on my first try.
Use fine silver – not sterling silver
Reading up on silver wire, I learned that “fine silver” (or pure silver) is what you want, not “sterling silver” as this is silver mixed with copper. The sterling silver is not as soft as “pure” silver and more importantly it will not stay as silvery shiny and clean during the etch. Or so I read, I have not tested it, going straight for the nice stuff.
I did ponder using real gold wire but a quick search revealed the cost of 24k gold wire and we were quickly back on the silver train!
Where to get silver?
I bought silver wire on ebay.com.au, 1.3 mm diameter in 1 meter length for around all the guard pieces and messaged the seller who then sold me 10 cm of 3 mm fine silver wire for the inlaid pins or dots on the guard faces. 1 meter turned out to be more than needed for the 3 guard pieces, and a perfect size for a standard hacksaw blade from the hardware store. I bought the cheapest I could find and it did a great job.
Back yard process worked
Both Andrew Blomfield (LINK) and Mert Tansu (LINK) were giving me some advice on the silver wire inlay process, having pro setups and experience with engraving and inlaying. Both even offered to let me come and use their tools if wanting to do it properly. But I wanted to do this with simple tools in a way I could repeat it, and this process worked out well I thought.
It was a bit shaky around some of the corners, coming back to this being the first time I ever did it. I think if doing a practise run using copper wire on a piece or two before going “live”, this would look even cleaner but I was happy enough with my result. And it certainly worked, the silver wire locks in solidly and does not come back out.
Was both the undercutting sideways and the “teeth” or flaps being chopped into the bottom of the groove necessary? I am not sure but doing both of those things really worked. Andrew was telling me the wire often comes back out and has to be kept down for a while when starting, but in my case it smashed right into the groove and never came back out.
Hacksawing worked
Hacksawing a slit seemed a bit of a too backyard technique but it really worked well! The slit went in straight, deep enough to hold the silver wire and not deep enough to just swallow the entire thing. I think it was Andrew Blomfield who came up with the idea on one of our calls about silver wire inlay and engraving. This project was in the last 6 months of him working on his ABS Mastersmith set, and I would call with regular updates when I had completed another knife in a couple of days, as he spent the better part of a year working on his Master set :)
Pro tip #4: Tape with masking tape before hacksawing the centre slit, scratching the surface less than I did the first cut. And go slow around the corners, I cut too deep a few places as the corner is worked from both sides. Resulting in needing to grind off slightly more than planned and the silver wire being slightly wobbly a couple of sections. There is a theme here of practising before going live, isn’t there..
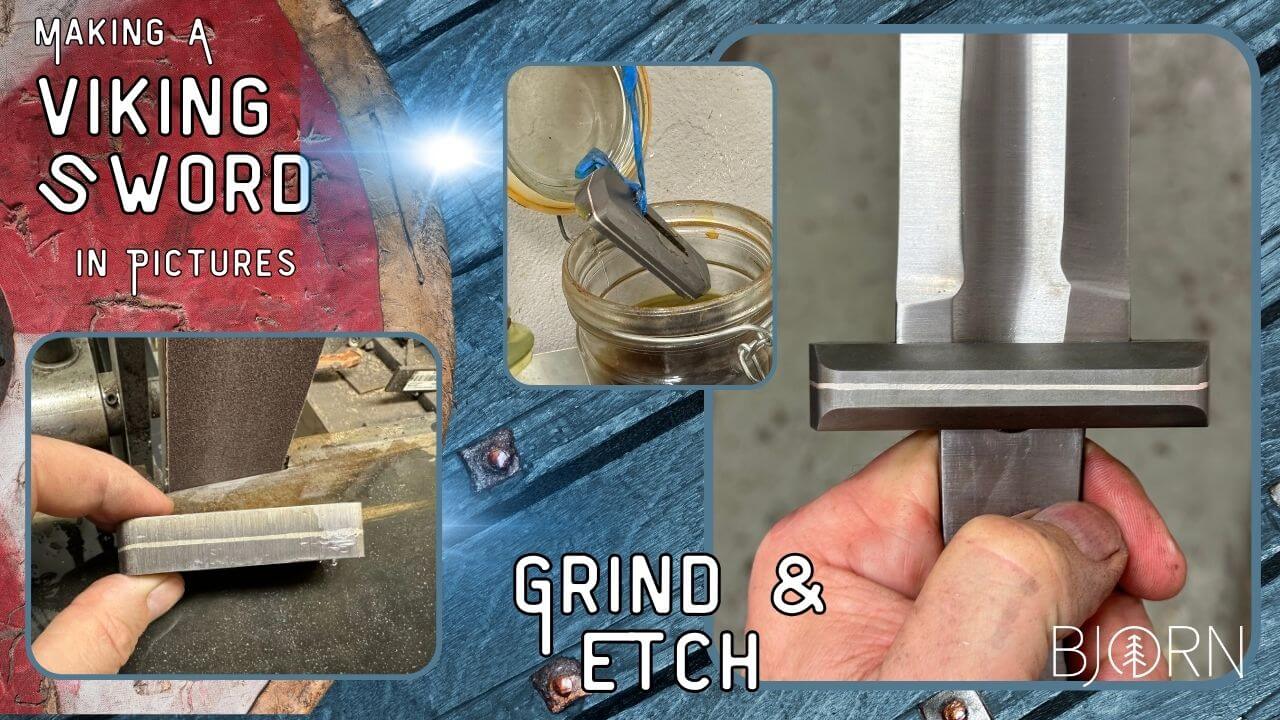
Grind & Etch
The guard is now ground to outline, and a quick test etch showed that it had worked! I bevelled the guard to look more like the “H type” sword examples in the book, this also took some of the weight off. I was so happy with this guard, ground to shape, etched grey with a shiny silver line running down the middle!
How heavy to make the guards?
I was unsure how to determine the weight to go for when it came to guard and pommel. From grinding the fuller quite deep and the blade fairly thin, I had ended up with a really fast, light blade. I really liked the light, nimble blade and wanted a heavy handle section to bring the balance back towards the hand. But a too heavy handle would surely not be all that clever either?
I did not end up with a clear answer here, kind of going with what I thought would look proportionally right and not worrying too much about the weight. The tang was the only part of the sword still almost full thickness, and the 3 pieces of steel guard, wooden core and leather wrap would also help bring the weight back towards the hand. It worked out in my case, possibly more luck than smarts but I think it is a point to make, adding a bit of weight to the handle makes a more nimble sword.
If you have ever picked up a non-fullered sword, you will know what I mean. Unless it is a thin sabre, they often feel very top heavy and rather clumsy. Strong, stiff and not giving you a feeling of being able to rapidly move the tip around – something I imagine would matter in a sword vs sword melee when jumping off a longship to liberate some gold somewhere.
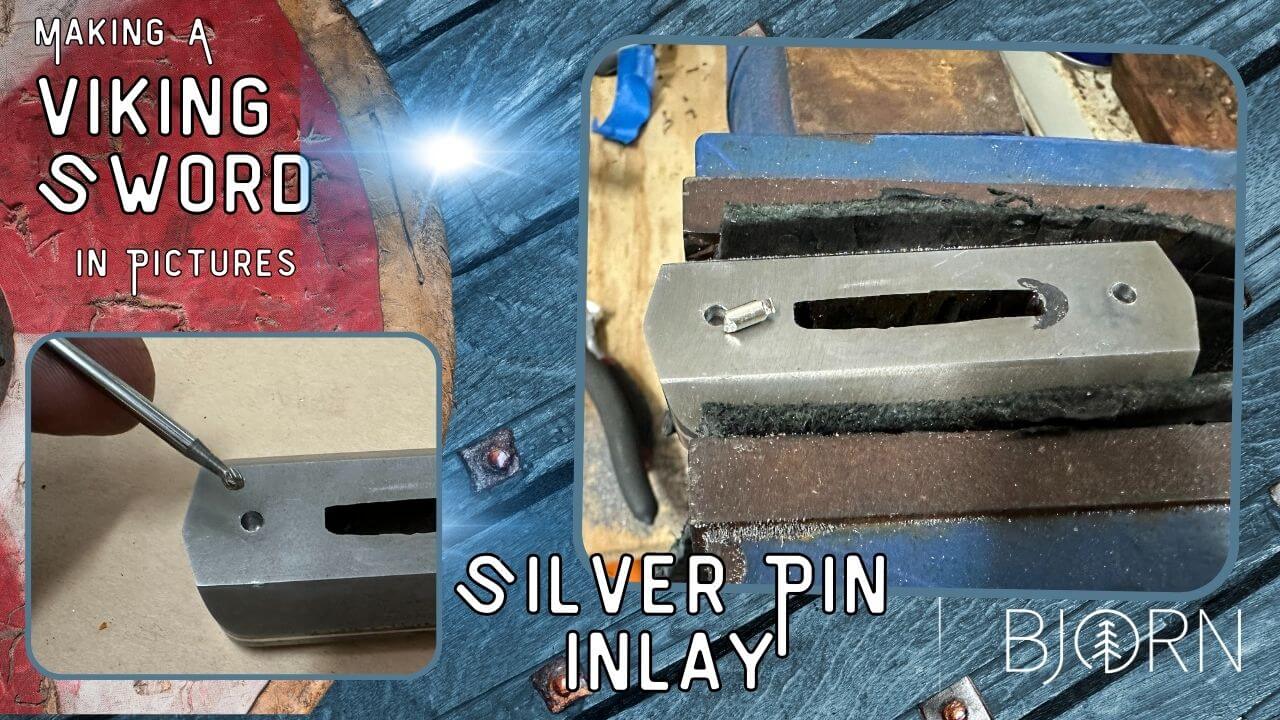
Silver Pin Inlay
For the faces of both the lower and upper guard, I decided to add some silver pin inlays. That might not be the actual term, but I felt it would be good with some more contrasting silver elements against the etched guard.
The process goes like this:
- Drill a hole the size of the silver pin ( 3 mm in my case)
- Undercut bottom of hole with a Dremel carbide burr to make bottom bigger than top of hole
- Cover guard face with masking tape around the hole
- Hammer in the piece of silver wire / pin
- Grind clean
This was even easier than the silver wire inlay! It worked so well using a tiny carbide burr ball I had for the Dremel. Only using it for a second before pulling it out and dipping in water, thinking such a small ball would overheat and blow up if trying to work it hard.
I am hoping it make sense with the “undercutting” bit, it simply means digging out more steel at the bottom of the hole or slit so it is wider at the bottom than on top where the hole or slit starts. That way the soft silver when hammered into the hole will deform, swell out and fill the bottom, wider section of the hole so it cannot come back up again.
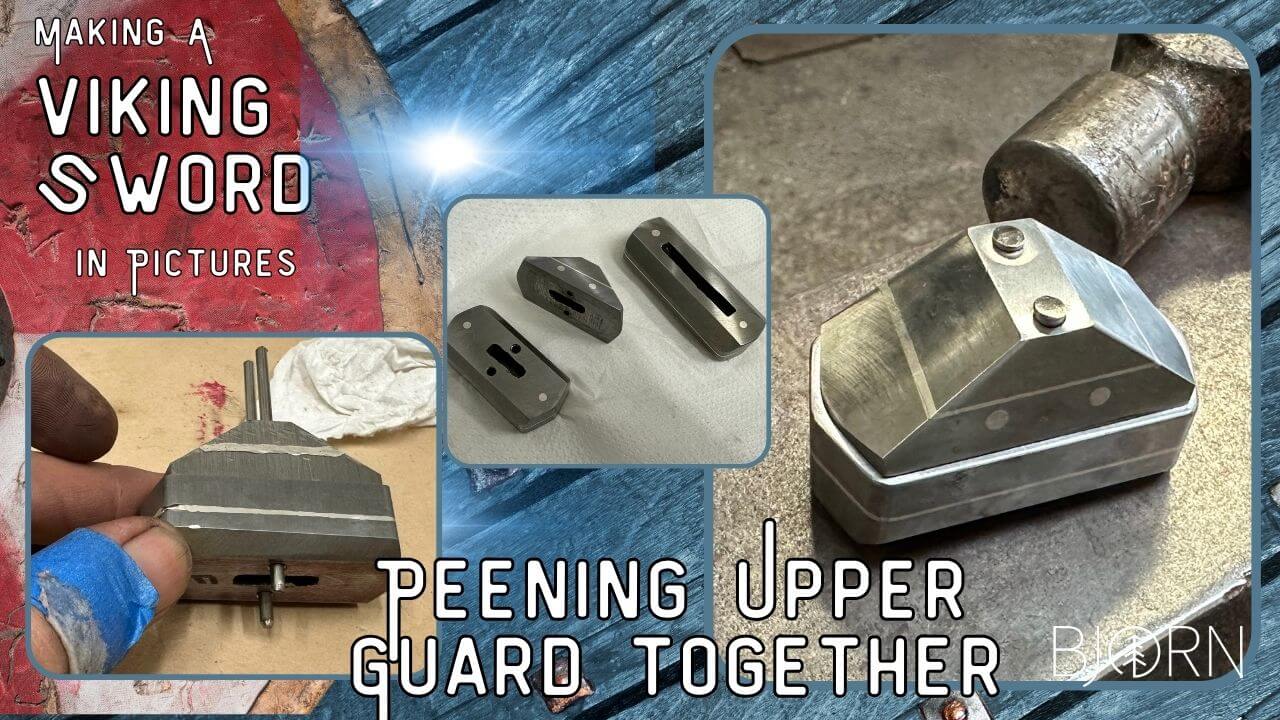
Upper guard or Pommel
The upper guard consists of 2 layers of the 20 mm steel plate I bought from Edcon steel, due to not having a thick enough piece to do it all in one. Leaning on the book again it seems these were often two parts also in the original swords so we should be on safe ground here.
First I made a smaller guard piece for the upper guard, matching the lower guard in profile. Then a top piece for the pommel to sit as a pyramid on the upper guard. These two pieces are peened together with stainless steel pin stock, the only non-silver part of the guard inlay. When etched these look like the silver wire inlay, but are stronger.
I was toying with the idea of not grinding the pommel to a pyramid, thinking it was reducing the weight by a lot but ended up doing it to stay closer to the shape I had in mind.
This would probably be a good time to play around with the balance point, if you decided to make the handle first and could now slide the upper guard and pommel on to test where the balance point lies in the sword before having to make a call on it.
Reaming holes
The drilled holes for the stainless steel pins were reamed to create a bigger hole on top than further down. This is done by taking a bigger drill bit than the hole drilled and grinding to a slight point on the grinder. This “pointy” drill bit is then used to drill out the top 4-6 mm of the hole so when the stainless steel pins are peened in, they swell out and fill this bigger space ensuring the pieces will never come apart.
All three pieces are ground, silver wire and pin inlaid, then ground and sanded clean and etched in ferric chloride. This was working out really well! Both guards were now done, and looking pretty good.
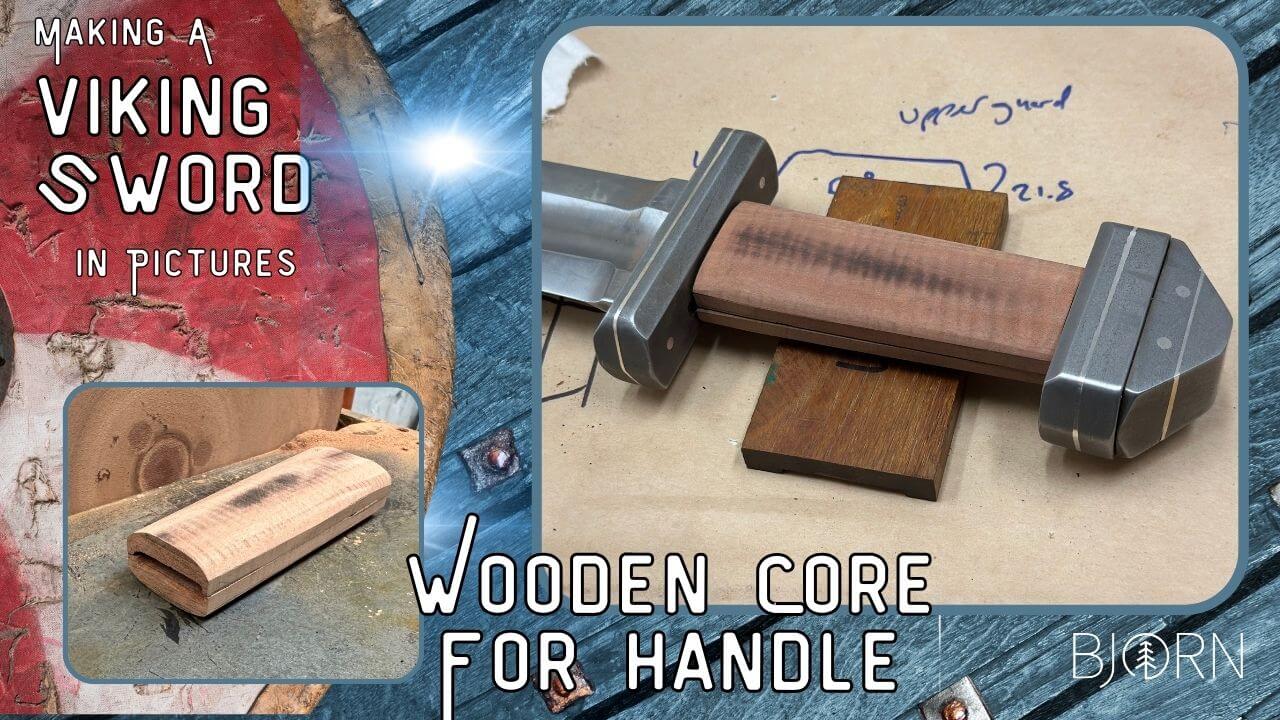
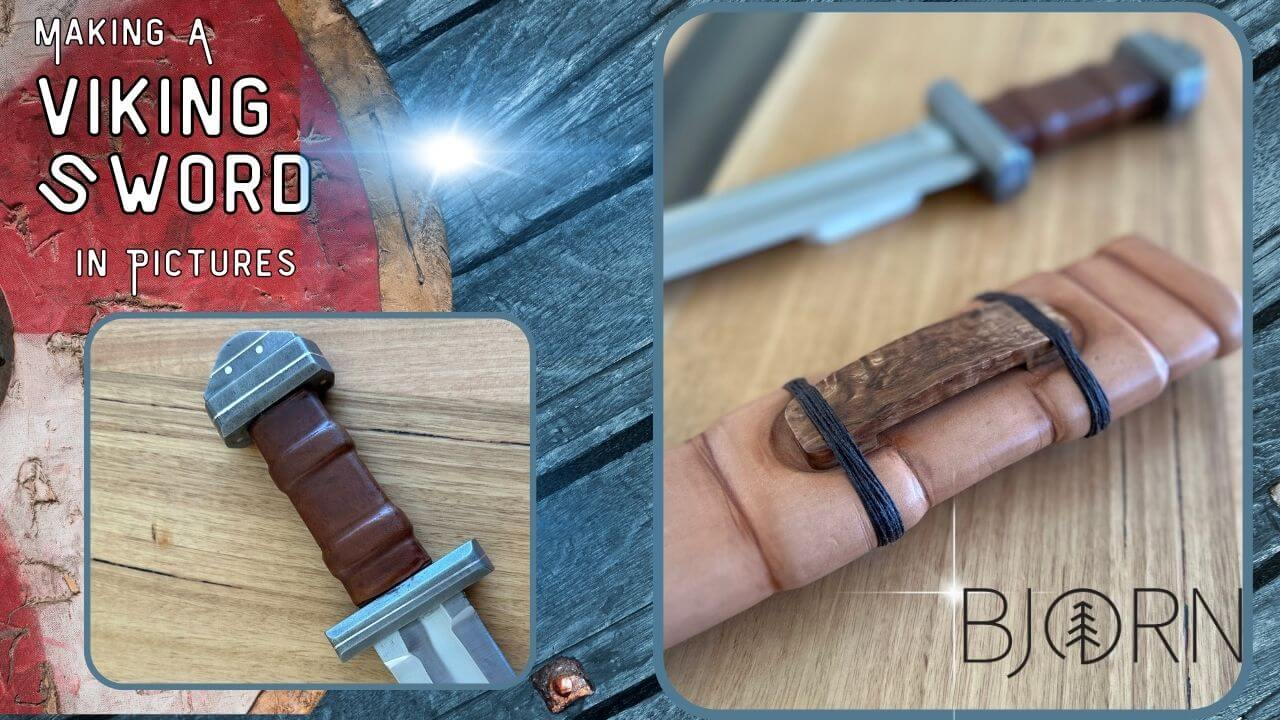
Starting the handle
The handle has a wooden core covered with leather. Because I had by now attached both guards to the blade, I made the handle in two pieces and epoxied these together onto the thick tang. I left the tang as thick and wide as possible, thinking it needed to be very strong – and also to help drive the weight towards the handle and away from the tip of the blade.
The handle core was ground to butt up against both top and bottom guards, and rectangular in cross section. Thinking the last thing you want is a rounded sword handle that could turn in the hand. A flattish rectangle of a handle will be easier to “index in the hand”, meaning you always know where the edge is.
Watching some “forged in fire” on TV (yes, I know..) they always keep going on about “indexing in the hand” and for a sword it really makes sense.
You pick it up and swing it around, and you need to know exactly what angle the edge is at, not a rounded handle that due to the heavy blade has twisted a bit sideways.
Or if we reel off into fantasy land here for a second, if you hit something with this thing, you would want it to stay put in your hand and not try to spin on you. This thing will never be used to hit anything with, it is just a fun project to recreate a bit of history, but still a fun aspect to try getting “right” I think.
The point I am trying to make is simply to make the handle a rectangle in cross section, clearly wider than high so it locks in place when held.
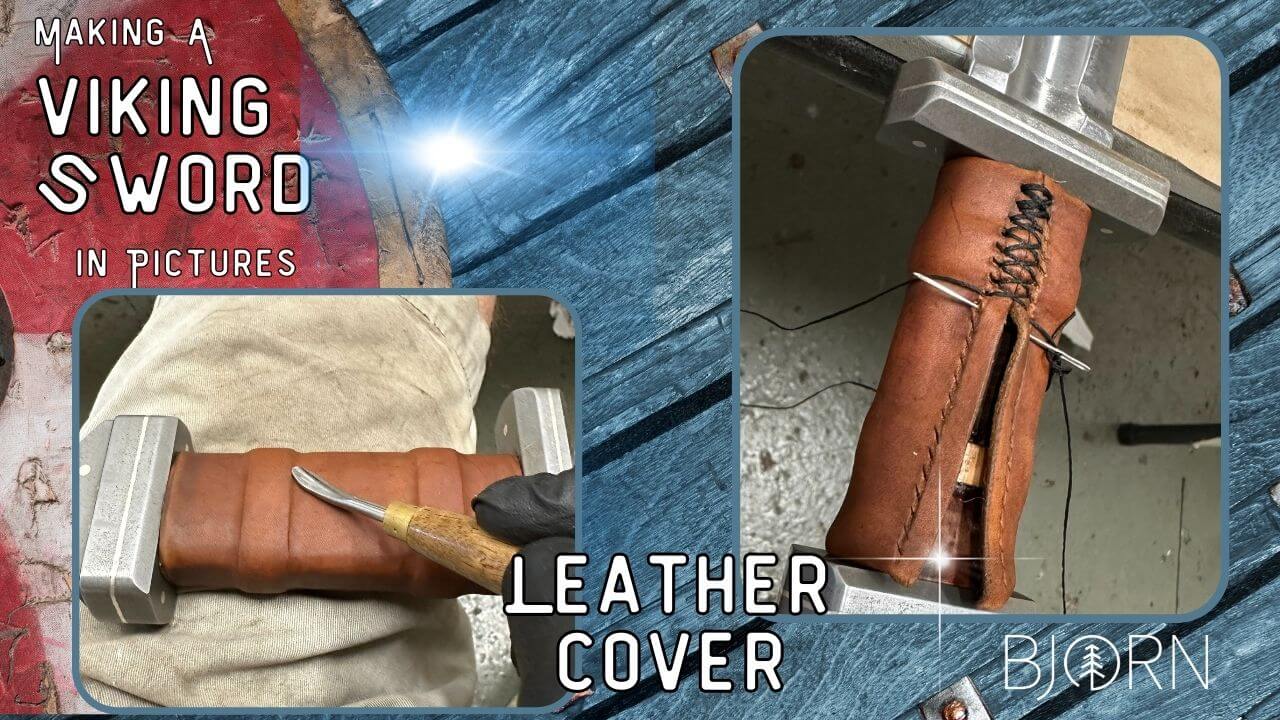
Leather covered handle
To help with a secure grip, I added leather strips to the wooden core before covering it all up in some 2 mm veg tanned leather. To my mind it looks nicer with the raised rigdges and I think it really helps fill the hand in the final result.
I stitched the wet leather with a baseball stitch creating a thick, prominent stitch line. It was a little hard getting it even over the wider diameter leather strips added and the narrower wooden handle but this big, coarse stitch made it all come together.
Using a tooling iron I rubbed the wet leather to follow the leather strips of the wooden core as much as possible. I like the feel of the handle with the thick stitching line and the leather ridges, it really fills the hand well to my mind. I keep saying "fills the hand" and it is not something I think of when making a knife but on this project it became an element I played around with a bit. To my mind at least, it made a difference in the feel of the finished sword when picking it up.
I was a bit back and forth on dying the handle or not, since natural veg tanned leather that is oiled and “worn in” a bit looks really great to me. But in the end I opted for dying the handle, thinking it would stain too easily when handled if left natural. From memory the leather dye was Whisky colour.
Scabbard or sheath?
Scabbard is the sheath of a sword or dagger, while sheath just means holder and can be filled with also “non-weapons” I learned while googling scabbard for writing this article. So I will use the word scabbard here, even though I think of it as just another sheath myself.
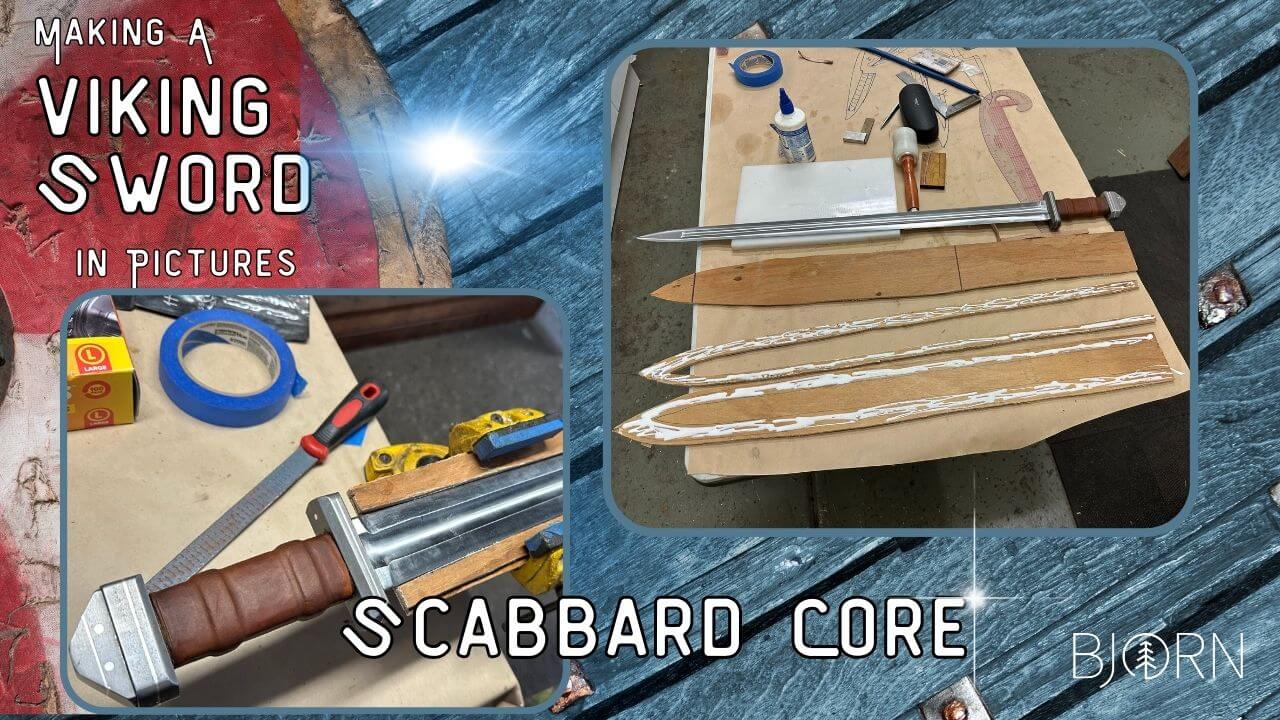
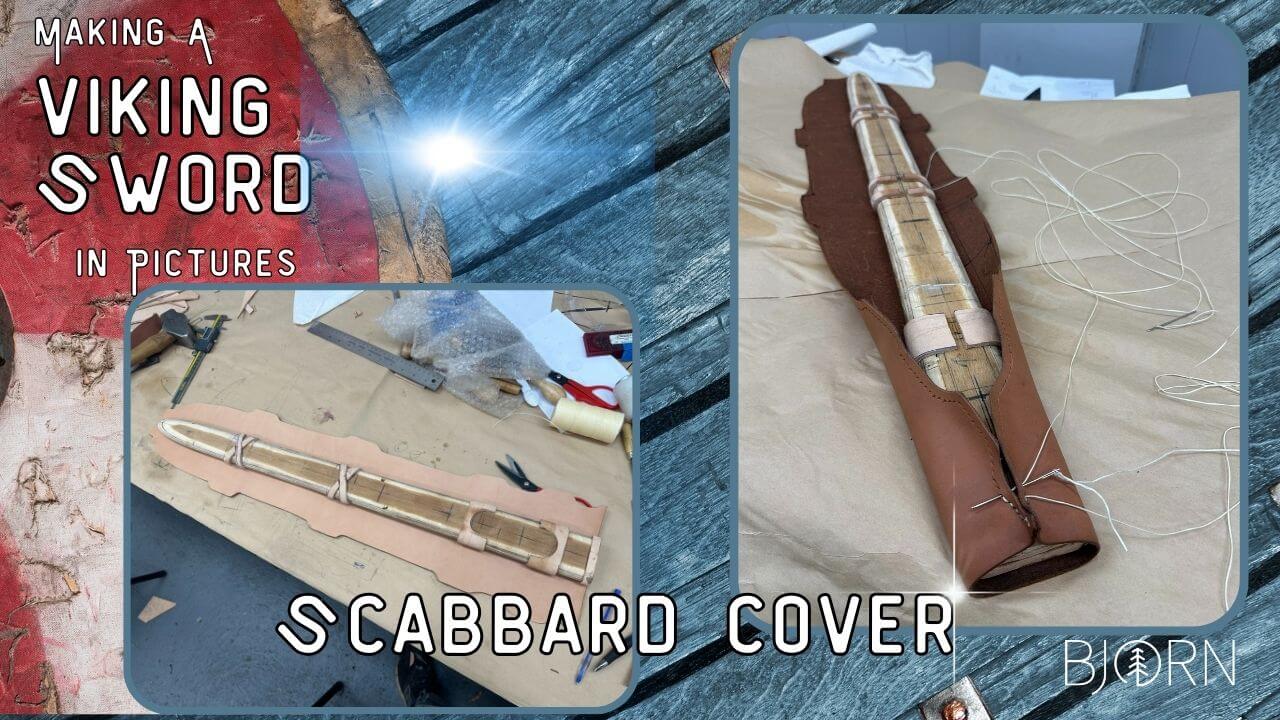
From my short samurai sword project last year (LINK) , I had learned that a leather-only sheath would be quite floppy. Because of this I wanted a wooden core one, more like the authentic Viking swords. Now mine was not linen covered wood with sheep skin inside but a bit more modern in material choice but not too unlike in design.
Using 3 layers of plywood I made a sheath core consisting of outer
layers and a “welt” of plywood to go in the middle. This was much less work
than the handle where I had to dig out the tang space with chisel and rasp (yay
to less chisel and rasp work!). But it created the problem of having the same
thickness the entire sheath scabbard length.
This would create a scabbard where the sword bangs around – which would be a bad thing. To resolve this issue, I glued strips of leather to the inside of the plywood core. Then pressing the pieces together, clamping them and testing by inserting and removing the sword until happy. I smeared the inside of the sheath core as well as the leather strips heavily with wax before gluing it all up.
The glued together wooden core was then taken to the grinder, cleaning up the profile as well as tapering it a bit towards the tip. I left the core so wide that it will match the guard width when leather covered, and quite thick to be strong with a bit of a distal taper still towards the tip.
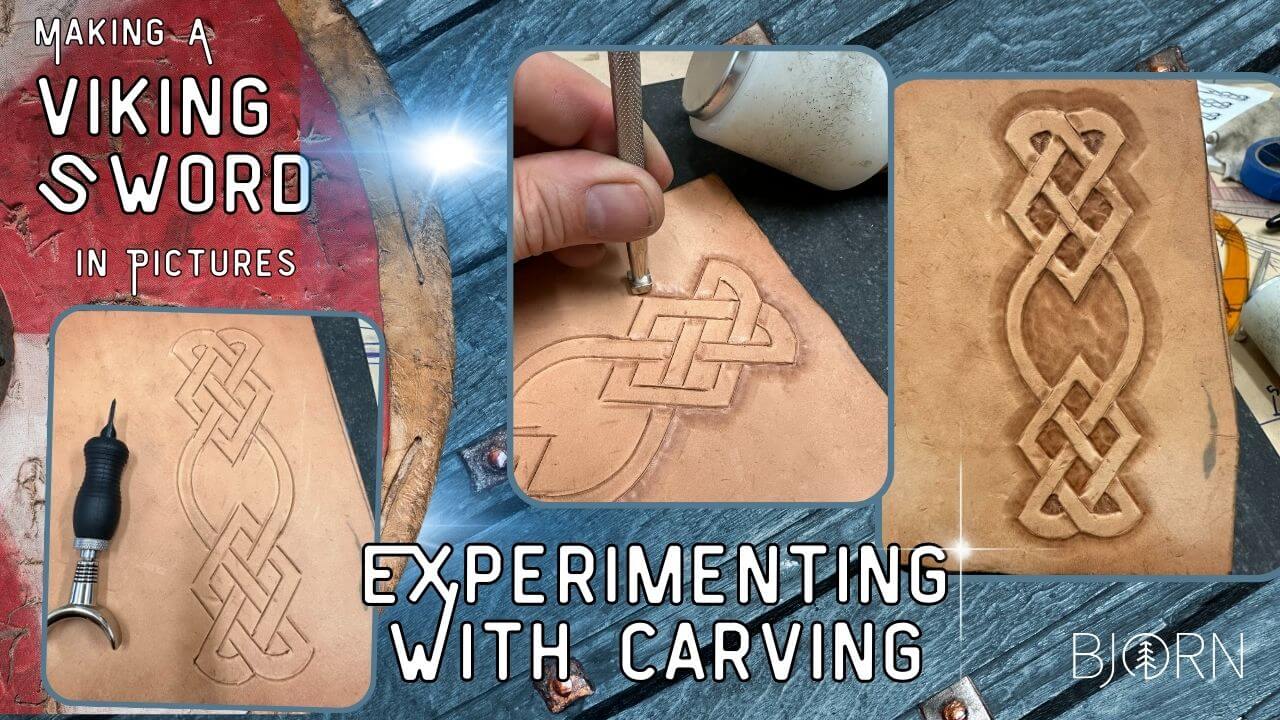
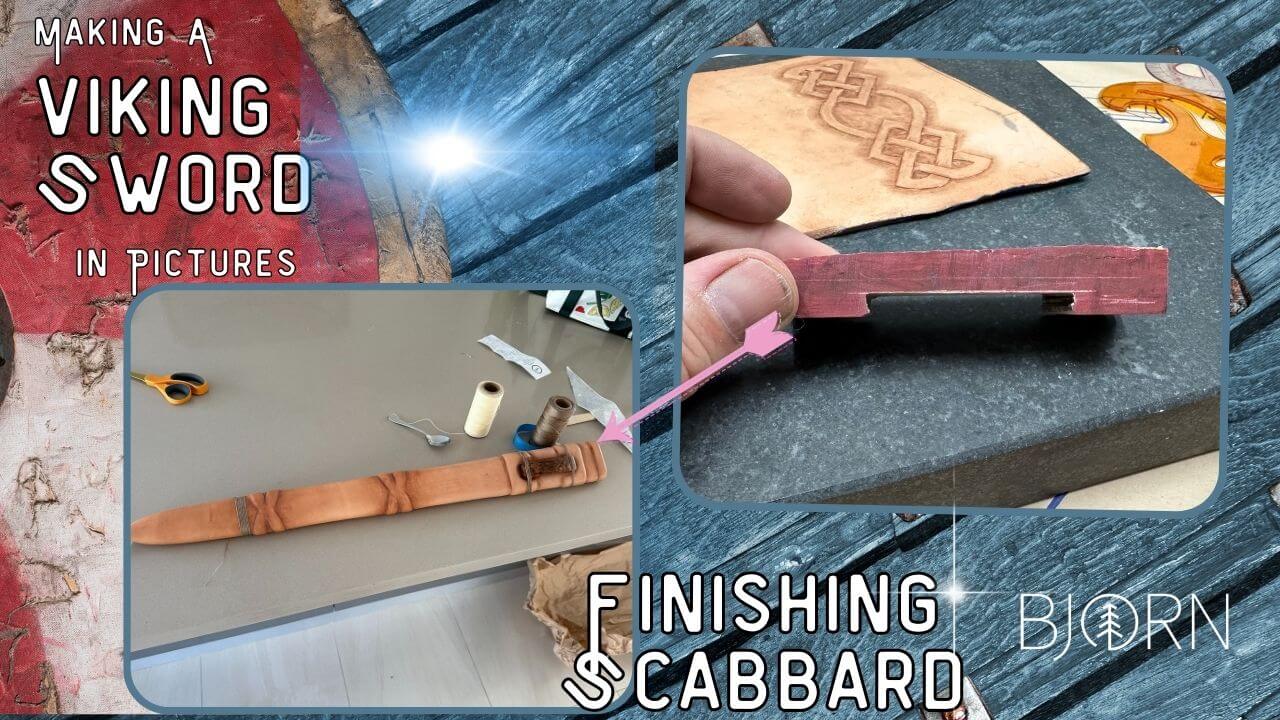
Sidetracked – or experimenting
In the spirit of learning new skills, I thought a Viking leather carving on the sheath could be cool. Luckily I was clever enough to actually practise this time, rather than just go for it. (I know, even surprised myself there!)
Researching some Nordic inspired patterns and transferring these to leather, I tried two different ones but after a couple of goes it was clear I was not good enough at this to pull it off on this sword scabbard.
My first motive was a bit intricate with rounded thin lines that ended up looking like they were made by a child - drunk - in the dark. (this is the dragon looking one in the below photos).
Keeping it simple
The second carving attempt (and third and fourth) were made with a new pattern, thinking a larger pattern with more straight, angular lines would be easier to follow. This was true to a point but even this simpler knot pattern ended up looking pretty home made and flawed.
I have not really used a barrel knife much before and there is way more to leather carving than what I was able to teach myself in a few nights here. Because of this I decided to leave it, thinking an amateur carving would make the whole project look worse than a scabbard without a carving. I am glad I left this element out, but it yet another thing to try getting better at in the future.
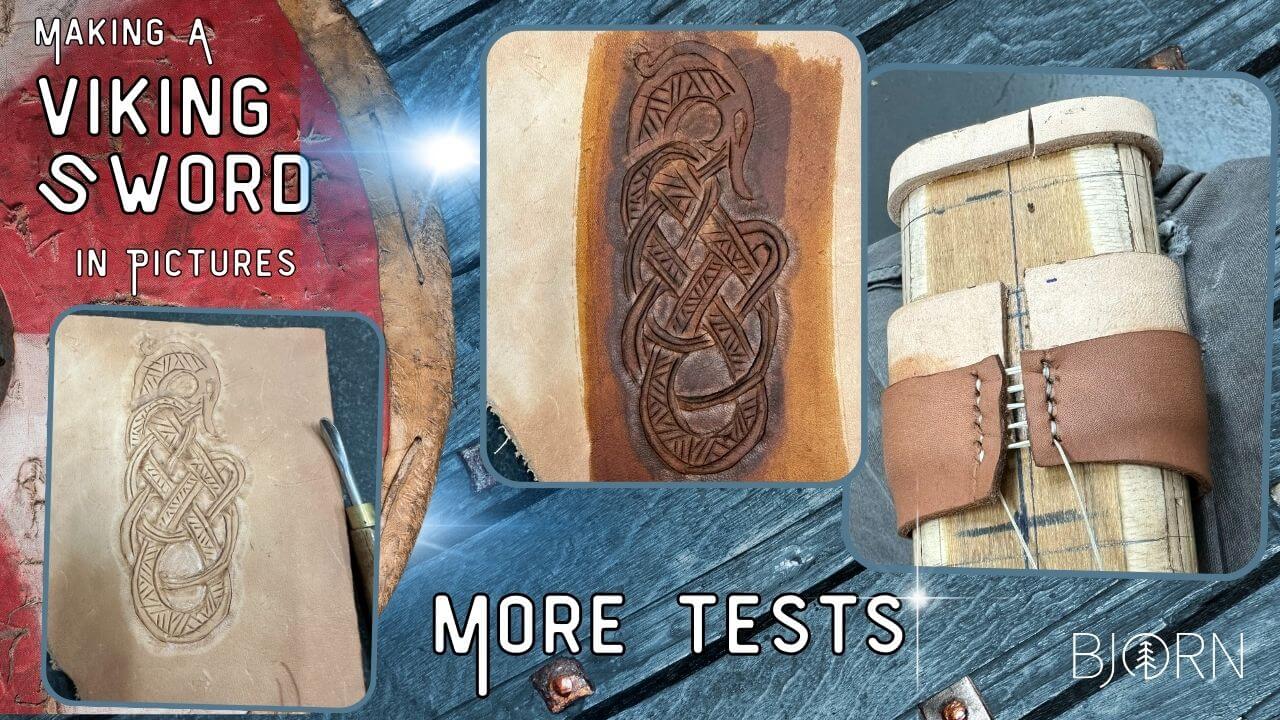
The issue of stitching
Another issue that had cropped up when doing the leather straps on the handle core, was that stitching up the leather was hard to get even when the circumference of the handle kept changing. The narrow handle without leather strips was quite a bit smaller than the bigger leather-strip-covered parts.
I experimented by trying to stitch around the wooden core with wet leather cut for the length/circumference of the wooden core only. This failed badly as the leather was not long enough to meet over the leather strips I had glued to the wooden core. Trying to stretch it as much as the stitches would take, it still did not meet in the middle and I was worried even if I made it meet, how would it look when drying again?
Leather strips for raised patterns
To the wooden core I had glued pieces of 2 mm veg tanned leather in two crossed marks, and then made “holders” for the wooden frog that would sit outside the leather as a holder for the belt.
The thinking was simply to cover the core with wet leather and then rub and rub until the leather wet moulds around these raised sections.
But as mentioned, these raised leather areas have a bigger circumference needing more leather to meet in the middle than the “core only” sections, so some more testing was needed.
Big stich-up
Cutting a leather strip and marking with a pen for every 5 and 10 mm, I used this to measure around the entire wooden core and all the leather strips, as well as the transition areas from wood-only core to leather-bound core. The result was a cut out piece of 2 mm veg tanned leather with lots of “brackets” of wider areas. This was my last piece of 2 mm leather, so this better work!
In the end result, these added areas did not deliver a smooth, uniform line on the back of the sheath as I had hoped. They stick out like tabs – maybe they were simply too large and should been made smaller.
Wet leather has give, maybe I should have measured with wet leather rather than dry? My thinking was that the leather would dry again, and come apart if stretched too much over the leather strips but it does seem the wider sections could been a bit narrower.
I think the conclusion here is that it worked ok but more experimenting could deliver a better result for sure next time. I solved it by folding the “tabs” sticking out over while wet and it came out ok in the end.
Wet moulding and creating a belt holder
Wet moulding the 2 mm leather made the leather strips attached to the core come out nicely, creating raised patterns in the scabbard. I thought it looked quite good in the end!
Shane Partridge of Blacks Blades (LINK) let me know he had used 1 mm kangaroo leather on this amazing gladius sheath he made a few weeks before. His sheath looks much more defined than my version over the leather ridges he added to his wooden core.
Now Shane is a much better leather worker than me, but I think his choice of leather thickness was also a more educated decision. So the pro tip here might be to go with 1 mm kangaroo leather instead. Now that does not sound very Viking like, but I believe Viking scabbards used sheep skin so we are probably way off the beaten track here anyway..
Should I do it again, I would go for 1 mm veg tanned ox leather and see how that worked, simply from struggling with the concept of kangaroo leather on a Viking scabbard :)
The external belt holder was made from a piece of stabilised curly birch. The authentic handle material of the Nordic Gods. Or at least I think so!
This was shaped to sit outside of the leather, sitting in the space created by the two leather strips glued to the core with a couple of mm space between leather strips and belt holder. This was epoxied on and then wound very tight with the same thread used to stich up the sheath.
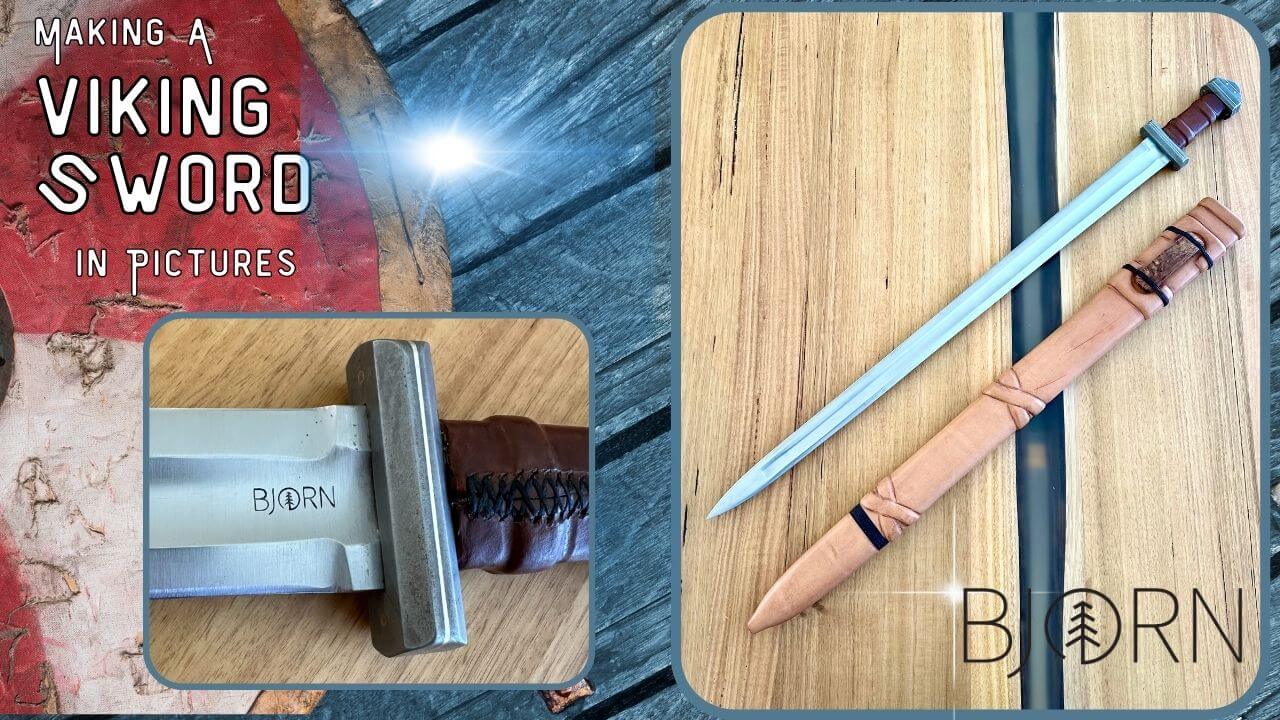
Sword belt and finished sword
The sword belt itself was made from a single thin strip of veg tanned leather, with one end split into two tails, and the other end with a hole near the end. The belt goes around the scabbard, under the frog or belt holder, before the two tails meet at the end with a hole, being tied to a knot.
The thinking here was to try keeping it simple, without brass buckle or other hardware. With a single attachment point the sheath is hanging more up and down than across, to me this seems simpler and possibly more authentic than an elaborate setup with multiple mounting points and brass hardware.
The sheath was smothered in Carnauba Crème several times before having some resolene added for moisture control and to help protect the undyed leather. The rubbing and oiling has left it a beautiful rich colour in my opinion.
All done, what do you think?
And that brings this build to conclusion, the sword is ready! It was a fun project, I learned a lot and had fun doing it. I knew making a full-sized "battle ready" sword would be much harder than just making a few knives after each other, mostly just due to the new processes and steps involved. But also the sheer size of the blade makes things complicated.
Grinding a 90 cm piece of steel is hard, the length means you cannot do the entire blade side in one go as we normally would. Keeping it straight was another challenge, the dimensions just means you cannot easily true it up on the grinder or disc.
The new steps with wooden core, leather strips and the different leather dimensions were also something to tackle, and maybe do even better next time.
But it was fun, and the result is a nimble sword that slices paper, it is light in the hand and easy to move around with the balance point just a few inches in front of the guard. I love picking it up, it feels so good in the hand.
And the short handle at 9.5 cm works surprisingly well! I had the sword on the table at Iron Fest 2024 (LINK) and it was picked up by lots of people over the weekend.
Many commented on how comfortable it was to swing, and several of the reenactors mentioned how easy it was to move the tip around.
Squeezing your hand into the available handle length really works, at least for me and for most of the people lifting it up at the market. If you have really big hands it will possibly just be a bit on the small side but I found it to work better than I had thought.
The light blade with a deep fuller is probably not the best tool for chopping down a door or an oak tree but if wanting a blade you can move around – and fast – I think this should do the job nicely ?
Thank you for reading along, hoping you enjoyed it.
Bjorn
Recent Posts
-

The Etch Test: Ferric vs Hydrochloric vs Gator Piss
The Etch Test: Three Very Different Looks From One Steel One of the great things about knife making …3rd Jan 2026 -

Why Bed The Tang In Epoxy - Then Knock it OFF Again.
What is "Bedding the tang"? Bedding the tang means gluing a stick-tang blade into the handle block i …21st Mar 2025 -

Marble Leather - How to Dip Dye Veg Tanned Leather
This was my first experiment with hydrodipping or dip dying leather, and it came out pretty cool! I …14th Mar 2025