


Description
Or how to get into leather working with a simple leather knife sheath.
How to make a knife sheath is another whole area of knife making with tools, techniques and ways to make it as simple or as advanced as you want to. Leatherworking is a whole craft in itself, and there is lots to learn if wanting to make high end leatherwork - but it does not have to be all that complicated.
Here we are going to make a simple "slip sheath" for a chef knife, showing the tools and supplies used in the process. This is a great beginner project and an easy way into leatherworking.
Want to take a course?
Should you enjoy the leatherwork and want to do a proper course, there are several people around the country holding courses. As with any workshop it is a great way to pick up skills quickly, and get a chance to ask questions.
Tharwa Valley Forge (ACT), Carswell Leather (Melbourne), Blacks Blades (Wollongong), Birdsall Leather (Sydney) are some we know about that all will be able to help in this space.
You do not need all the tools straight away
As in anything else there is a whole bunch of specialist tools for different steps, and we tend to add these over time. You do not need everything we are listing here to get your first sheath done, these are just the tools I used because I have been adding tools over the years to our leather tool box at Nordic Edge.
My first sheath had holes marked with a ruler and pen, the holes punched with a steel wire glued into a branch as the awl. Then I stitched it together with dental floss as it is thin and strong - and I still have the knife 10+ years later.
The point is just to not get discouraged. Start with a basic tool kit and add tools as you go along if you enjoy the leather work and want to keep doing it.
Having said that - here are the tools and supplies we are using on this sheath.
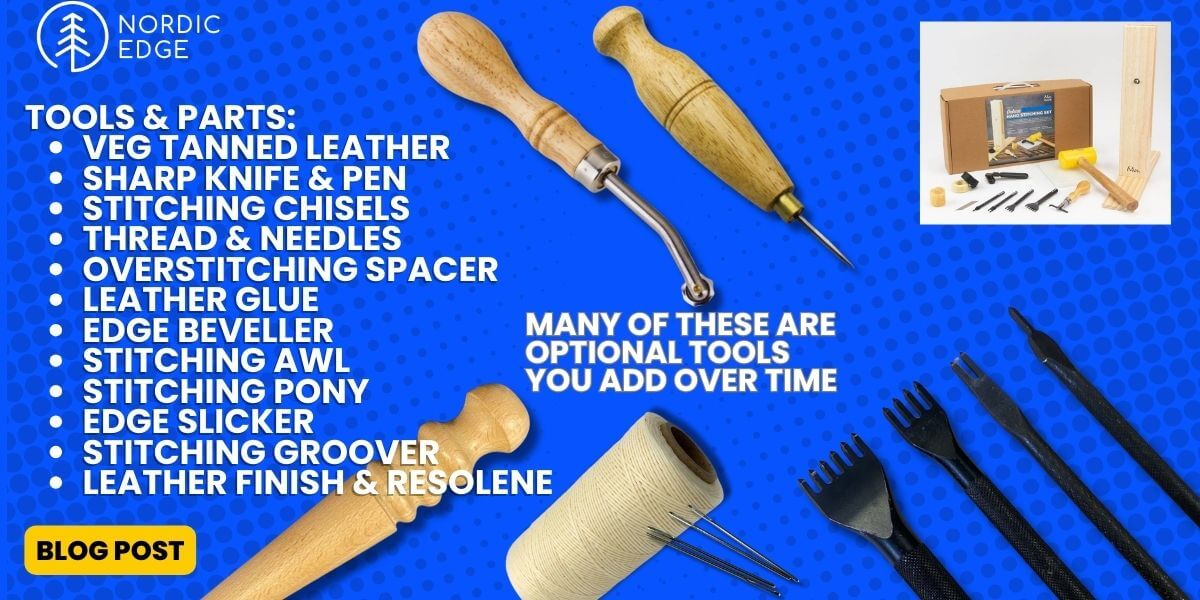
Tools & Supplies needed
- Vegetable tanned leather
- Sharp knife & pen as well as a ruler
- Stitching chisels and mallet
- Stitching awl
- Overstitch spacer/wheel
- Leather glue
- Thread and needles
- Edge beveller
- Stitching pony
- Edge slicker
- Stitching groover
- Leather creme and some kind of finish
Slip sheath for kitchen knife
We are here making a simple "slip sheath", without belt loop or a locking mechanism. I enjoy making these for kitchen knives as they help present the knife when handing it to someone and it makes sure it has a safe storage option, should it end up rattling around in a drawer.
If a kitchen knife even needs a sheath is another question - probably not?
But I enjoy making them and I do like how they help present the knife as a "package" rather than handing someone a sharp knife with nothing to store it in.
It is also a great beginner project if wanting to try some basic leatherwork to get started, then later you can add carving or stamping to the leather, add a retainer for the blade if you want, experiment with dyes, antique finishes etc.
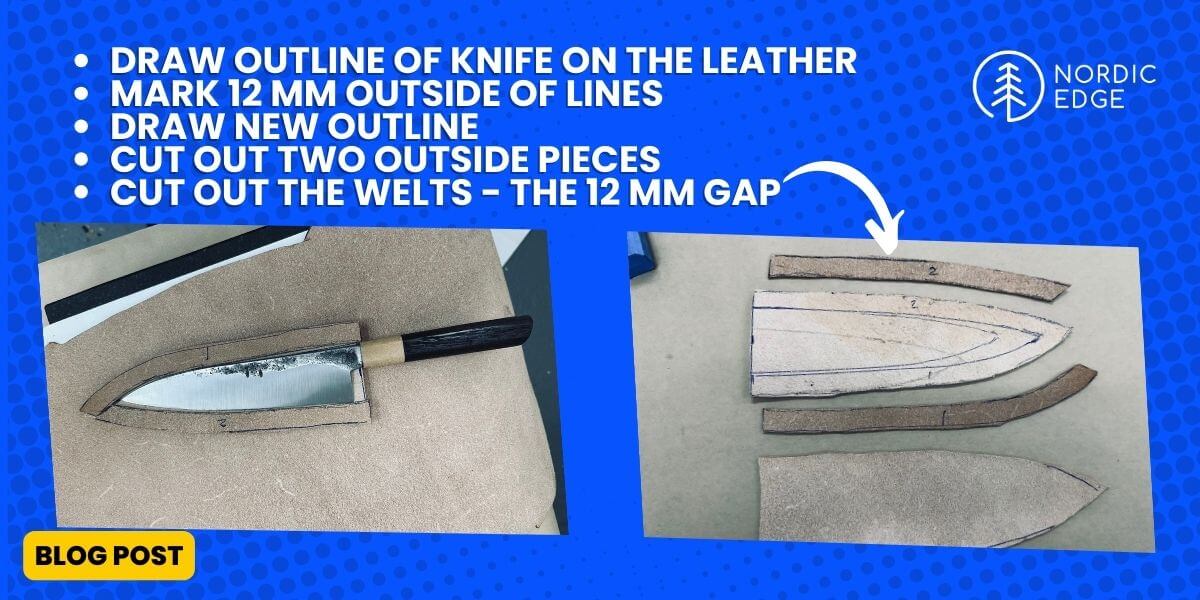
Cutting out the parts needed
We place the knife on the inside of the leather, drawing around the blade.
Then we use callipers or a ruler to make marks 12 mm (1/2") outside of those lines, then drawing a new, outer outline. This is the outline we will cut out for the sheath.
Personally I like leather shears over a knife but a sharp knife will do this just as well.
Then this first piece is placed on the inside of the leather again, and cut out again.
We now have 2 matching pieces, each with the nice outside of the leather out, hiding the flesh side inside the sheath.
Vegetable tanned leather
It is important to use "veg tanned leather" and not chrome tanned leather which is the "normal" leather you see all around us in couches, jackets etc. We want vegetable tanned leather which is a more expensive tooling leather that can be wet moulded, stamped, dyed and worked. The chrome tanned leather is already finished and will be softer but generally not useful for our purposes. Most knife makers use 3 mm leather but you can get lost of different thicknesses. For a thin chef knife 3 mm might be too thick for the middle (welt) layer, I just wet mould the sheath a bit after stamping, pressing the sides together and it holds the chef knife securely still.
Welts
The 12 mm space on the drawing between the outline of the knife and the outer outline will be the welts. These are small parts of leather that will stop the edge touching the stitching, as well as work as a padding border all around the knife so we can shape it to the final shape and have some space for stitching.
Draw the welts on with a pen and cut them out, following the line on the inside towards the knife and going a bit too big on the outside. This helps when we glue it all together and then grind to one even finish. If you cut the welts a bit too narrow or glue them too far inside the sheath you are forced to grind off your sheath profile more than you planned before you hit clean leather all the way through.
You can cut out the welts as in the photos below from scraps to their exact shape, or create a third piece of leather and then cut out the middle section but this does waste way more leather.
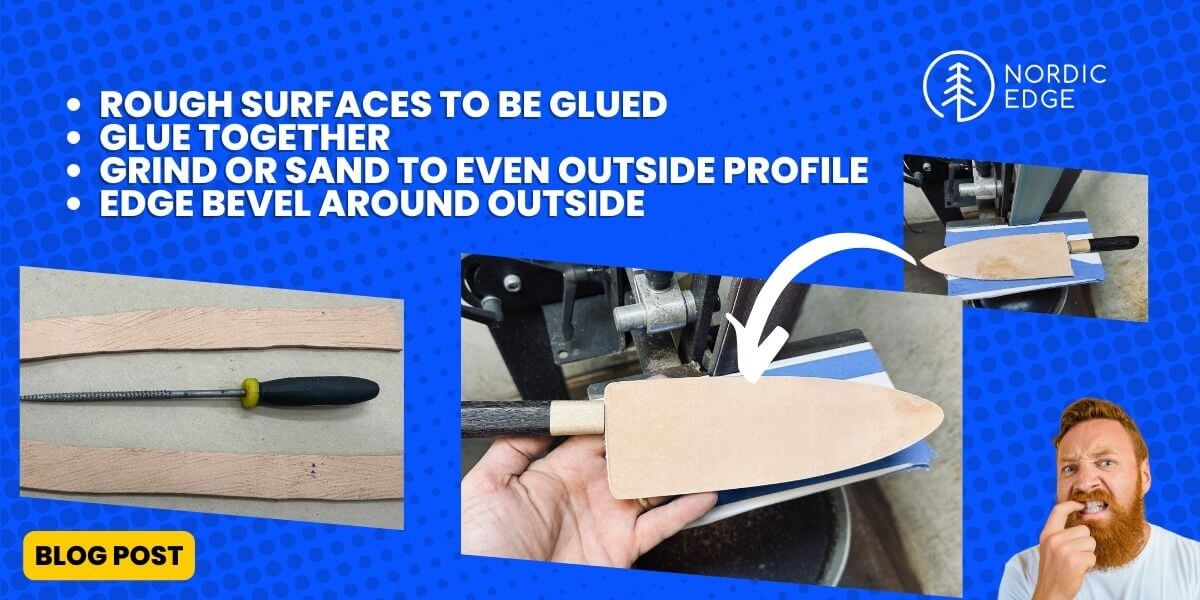
Roughing any surface being glued
We now have 2 pieces both with the nice outside pointing out of the sheath, as well as the welt as a single piece or as two separate pieces as in my case.
Each side to be glued is first roughed up a bit with a rasp or other tool that can scratch the surface. This helps the leather glue bond better.
Gluing it all together
The pieces are glued together using leather glue or leather cement. It does not really matter a lot what type you go for, I prefer the white leather glue that leaves less of a glue line and looks more like PVA / wood glue.
Many makers prefer the glue cement, this works more as a contact adhesive where you apply it and wait for it to become sticky before attaching the pieces to each other.
How to align the pieces:
- glue the welts to the inside of one piece
- make sure the welt follows the drawn line on the inside that was drawn following the blade
- apply glue on the top of the welt
- attach the top piece, insert the knife
- roll the edge or press the entire sheath under something heavy and flat until the glue sets
- if cutting the welts out from a whole third piece, the inside you cut out is great to add inside the sheath to help hold everything nice and flat while resting something heavy on it if not wanting to leave the knife in there.
Grind to shape
The outer profile of the knife sheath is now too big, the 3 layers are not matching evenly and the whole thing needs to be ground to final shape.
You can use French curves to get really nice lines or do what I do and just grind the sheath to final shape on a belt grinder.
In the photo above you can see I have taped a sheet of copy paper to the tool rest of the grinder, this stops the leather from getting dirty.
Then I use a Zirconia belt to grind the sheath to profile, before running over the edges with a 180 grit alu oxide belt.
Leather burns easily, use sharp belts and slow speed. And burning leather stinks so you will know when you do it even before seeing the brown edge..
I just grind to the 3 layers match, and make a simple flowing line all the way around. I gently round the corners where the knife will go as well as the tip.
Make sure you don't go crazy on this step, you only have max 12 mm and need quite a bit of that space for stitching. Basically you grind to shape while keeping as much of the outline as you can. Without a grinder you probably have to do this step with a curved ruler and knife, the belt sander just makes it a bit easier.
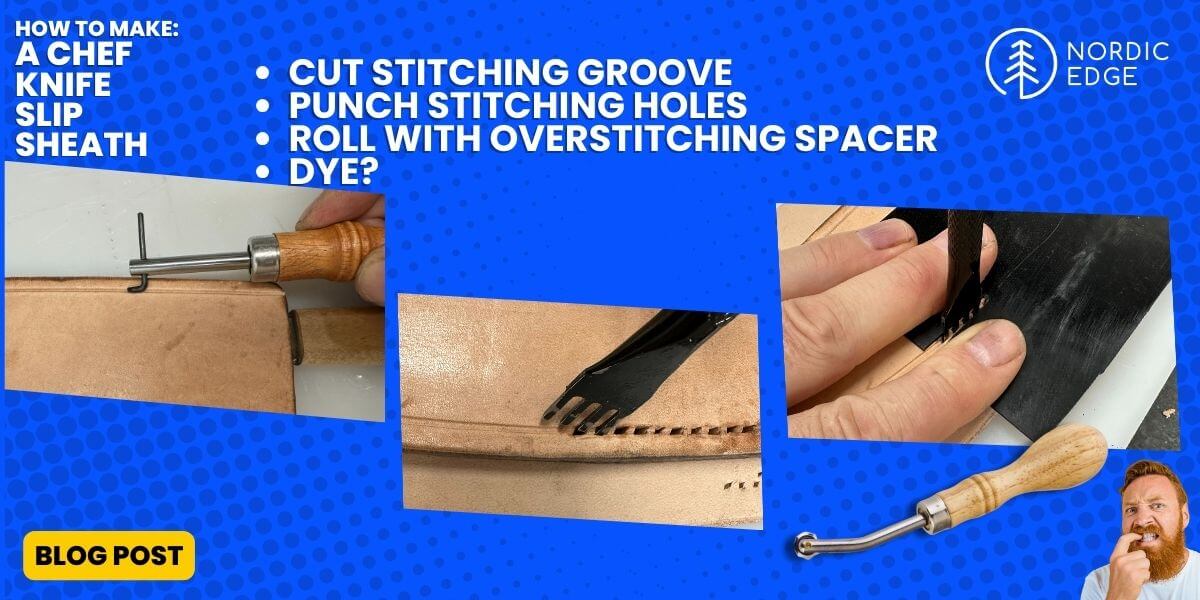
Making holes
It is now time to stitch or sew the whole thing together. There are several ways to do this, the below is just how I do it when there is only 3 layers and I can punch them all in one go.
Stitching groover
Before getting to the actual stitching holes, I use a stitching groover (top left photo above) that cuts out a small slit in the leather the holes and thread will sit down into. This is another of those optional tools. My first several sheaths were done with a ruler and pen, marking out every 5 mm then punching holes with an awl, one hole at a time.
But I find the stitching groover handy now and always use it only on the front side of the sheath before punching holes.
This because I am not great at punching holes straight down, and want to see where they come out on the back before running the stitching groover on the back side. In case I need to adjust the groove a bit sideways to hit all the exit holes..
Punching holes
Some like to drill holes, I prefer punching them with diamond stitching chisels. These usually come in a pack with 1, 2, 4 and 6 teeth, I only ever seem to use the 4 teeth version and sometimes the 2 teeth version in a tight corner.
From Shane Partridge at Blacks Blades I learned to dip the chisel in leather balm every other set of holes or so, this helps get the chisel out again. Martin Carswell polishes his chisels to a mirror polish and applies some beeswax to get them to release easier.
Either way, when I punch holes with the diamond stitching chisels and a poly mallet, I place the sheath on a cutting board and also add a layer of scrap leather underneath. I know you can punch directly into the cutting board but I think another layer of leather protects the teeth of the chisels a bit more.
I try to punch straight down to get the exit holes on the underside to line up, using the 4 teeth chisel. Then I use a piece of G10 I made up to have a slit just wider than the chisels, sliding this over the stitching chisel to help get it back out.
I can now rock the chisel back and forth to get it out without the leather moving too much, pressing down the G10 spacer piece on top of the leather.
Stitching groover and overstitching spacer
Before starting the actual stitching, I run the stitching groover down the backside to create the slit for the holes. Then run over all holes back and forth with an overstitching spacer. This helps create "bumps" for the holes to sit in. Another optional tool I added later, I run it before stitching and then again afterwards, on top of the stitches themselves.
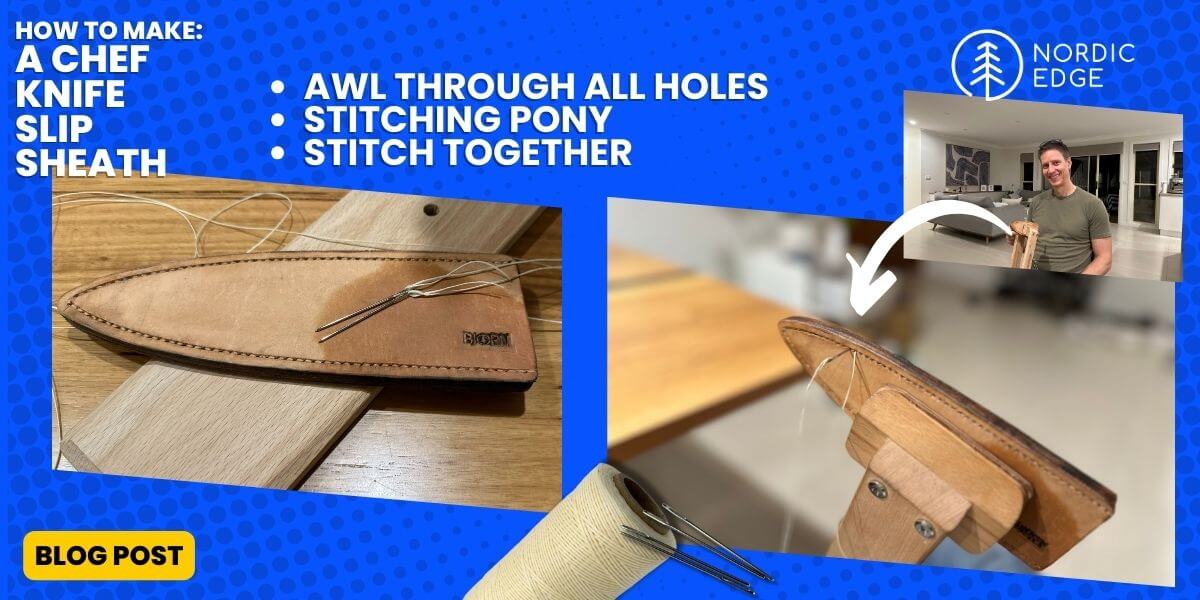
Stitching pony or not?
Only recently have I started using a stitching pony - and it is much easier than without one! I used to just hold the sheath between my knees - awkwardly - while stitching and having the sheath clamped in the stitching pony (a wooden clamp with leather in the clamp jaws to not mark the sheath) is a big help.
My stitching pony is the type you sit on, basicially an L shape where I sit on a plank and the other end of the L sticks up and holds the leather sheath.
Consider this another optional tool to add if you keep at the leather work.
Checking all holes with an awl
The last step before stitching is to run an awl through all the stitching holes. It might seem a bit overkill but it is much faster to do this now than having to stop stitching and deal with it later if some of the holes are not quite large enough.
Two needles and thread
My first sheet was done with dental floss, then I upgraded to linen thread, liking the organic sound of it. After trying polyester thread once I am never going back to linen thread, but each to their own. The polyester thread is stronger, thinner, and probably lasts way longer. My issue with the linen thread was that I managed to pull it apart a couple of times and it got messy.
One needle locked in each end of the thread and saddle stitching is the way to go. I start one hole away from the end, then go out to the end and then back again the whole way around the sheath.
The thread should be way longer than you think you need. There is a rule of something like 5 or 6 times the length of the seam in thread length. I just use 3-4 meters or a sheath and have enough rather than hope it will be long enough.
Consistency pays off
With one needle in each hand and the thread in the middle so the same length is on each side, I start with the left needle. Putting this through the hole, then the right needle goes into the same hole, coming out on the left side before I grab both threads and tighten.
The key thing is consistency, the same side always go in first. Pulling the thread back each time so you don't piece the thread already in the hole with the second needle.
When tightening the threads, my left hand pulls up and left while my right hand pulls down and right.
The stitches end up looking more consistent when you settle on a pattern that works for you, then do that for all stitches.
At the end I double back a couple of holes again, before ending up with both threads on the back of the sheath. Tie a couple of knots before cutting the threads 5 mm from the not, and touch a lighter or match to the ends until they melt and shrink away.
Hammering or rolling?
To even out the thread a bit and help closing up the holes, you can gently hammer the stitching with a polished hammer. Or roll the overstitching spacer "rolling wheel" over all the stitches again. I often do both, just for good measure :)
Edge beveller
Before we can burnish the edges, we cut the corners off the top and bottom with an edge beveller. This is a tool that comes in different sizes, the size deciding how much of the corner is cut off. You want a slightly rounded corner before burnishing.
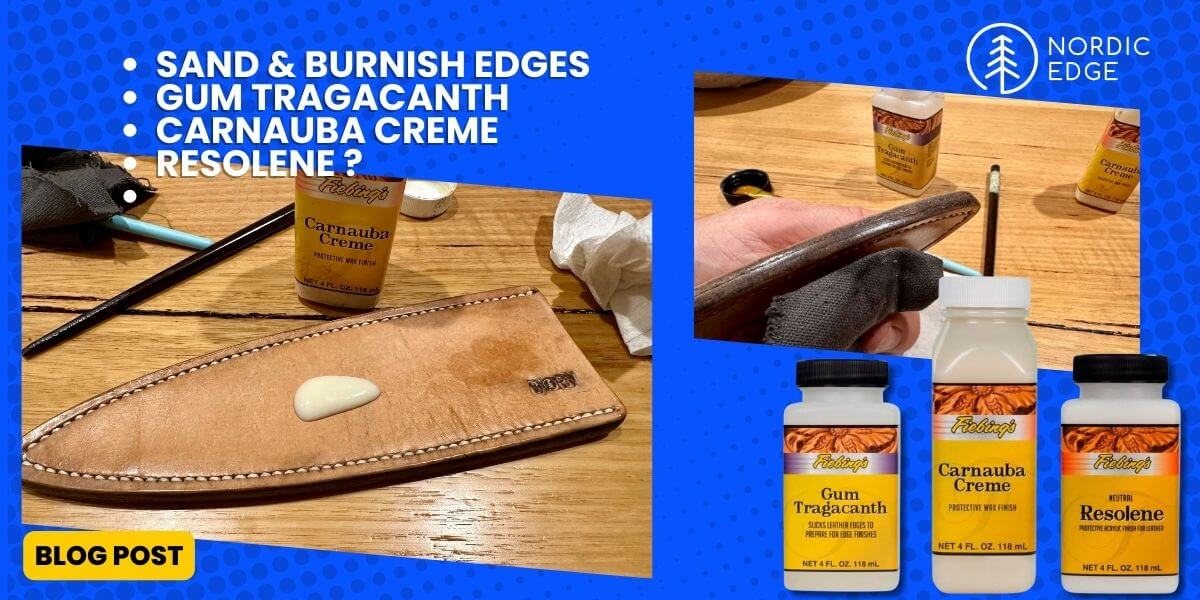
Burnishing edges
Burnishing means to rub the edges of the sheath where the 3 layers of leather is visible after applying some moisture until the edge gets shiny.
A great way to do this is to keep doing it.. Sand with 180 grit paper, apply moisture (water, dye or Gum Tragacanth) then rub with a smooth piece of wood or canvas. Sand with 320 grit sand paper, apply moisture and burnish again, then 600 grit and then 1000 grit paper.
My way is a bit more rough and ready, sanding the sheath on a grinder with 180 and 400 grit alu oxide belts, then burnishing once after applying Gum Tragacanth and rubbing with canvas while it is still wet.
Leather finish
There are several options for leather finish,and there is more to be said about this than what we will cover here. But in a short summary, consider Carnauba Wax the "satin" version that you can reapply more of later should that be necessary while Resolene is the more moisture-proof "glossy" finish.
I like to smear the whole sheath liberally with a leather balm of some sort first. Then after this is absorbed I rub quite a lot of carnauba wax on the sheath, repeating the process half an hour later. I love how smooth and satin the finish is and can see why carnauba wax is popular with a lot of leather workers.
On this project I ended up not adding any Resolene, thinking the Carnauba wax was enough. If using Resolene instead or even after the Carnauba Wax, you get a glossy finish that will not later allow leather balm or other things to be reapplied but you do get better moisture protection. Resolene is my preferred finish for most sheaths but I was so happy with the carnauba wax on this one that I left it at that. It gives some depth and shine to the leather, I really liked how it ended up.
Final thoughts
As with everything else there are lots of ways to do this, the above is just how I do it. I enjoy making these simple leather "slip sheaths" as I think they help present the knife well. They are quick to make, I love the smell of the leather while working with it, and the process of stitching it all up is one of the few steps in knifemaking that is silent and I find it peaceful.
This is also an easy project to expand on. Maybe you want to add a strap and snap button to hold the knife even more securely? Or dye the sheath (before stitching), or stamp it?
If stamping, do this after cutting out the first side but before cutting out side number two as the leather will change shape a little bit when stamping.
The finished product, with the forged chef knife it was for:
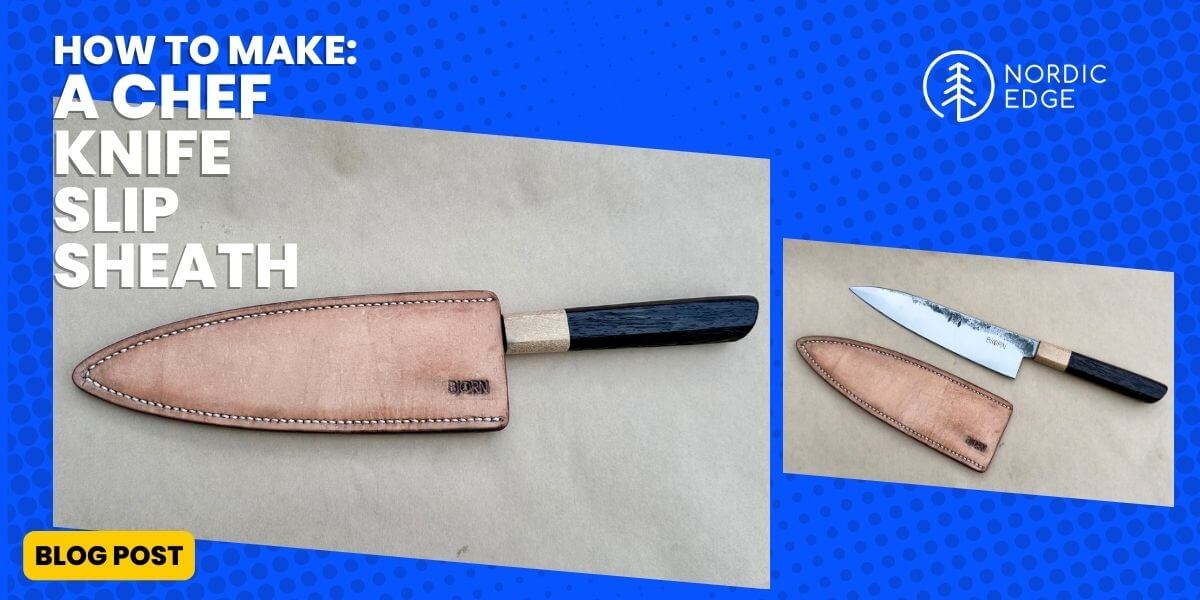
")


